12.2 Printing via Wi-Fi
Printing via WLAN is started directly from the GP Inlay Printing 24/7 module in the GP Manager and the file is automatically transferred to the printer's internal memory.
| 1 | |||
| Firstly, the programme searches for your installed printers. All installed printers are displayed in the list on the left-hand side. For each printer, the name of the printer (1), the current status of the printer (2), the remaining printing time (3) and the name of the print file (4) are displayed. Your print file (.crypted) is created automatically in this module, unless you have switched off the automatic function (5). In the top tab, you will see the categories Slicing (6), New (7) and Completed (8). You can see your list of designed inserts in the table. Double-click to select an order and the insert is displayed in the view window. The views can be changed using the buttons next to the view window. The software automatically searches for newly created files. These files are sent to Create it Real via a web service and sliced online. The respective status for the left and right inserts is displayed in the table under Links and Right displayed A pair of insoles that you have just sent from InsoleCAD to this module is initially listed under Slicing (6) with the status "New". If you have activated Automatic slicing (5), the programme starts the slicing process immediately. If automatic slicing is activated, the next print job is automatically sent to the next available printer. The printer indicates that printing is being started via Wi-Fi. | 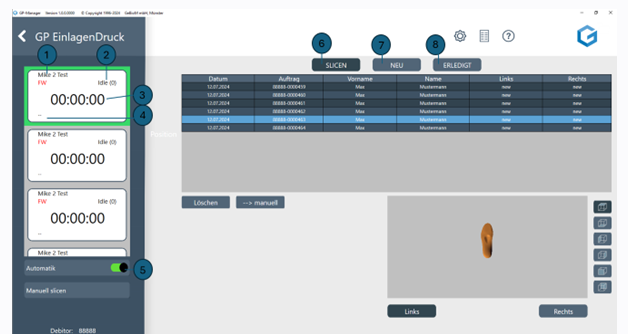  | ||
| 2 | The print preview screen shows the status of the print process during printing: (1) indicates whether the printer is heating or printing. (2) shows the current and target temperature. (3) shows the remaining time of the print job to be completed. (4) shows whether printing has been started via WiFi. (5) shows the progress of the print in %. (7) shows the file name of the object to be printed. To pause printing, press the pause button (8). For more information, see section 11.3. To cancel the printing process, press the cancel button (6). | 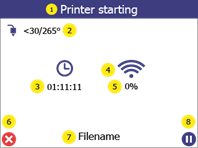 | |