2.1 Structure and use of the module

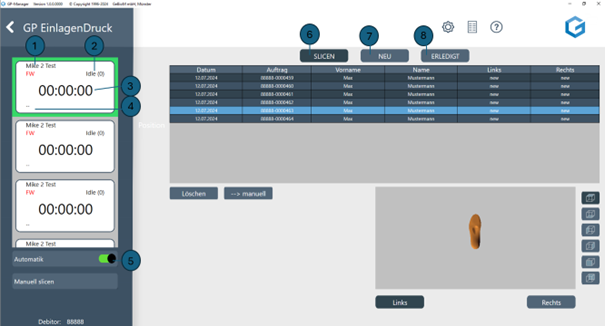
Firstly, the programme searches for your installed printers. All installed printers are displayed in the list on the left-hand side. For each printer, the name of the printer (1), the current status of the printer (2), the remaining printing time (3) and the name of the print file (4) are displayed. Your print file (.crypted) is automatically created in this module, unless you have switched off the automatic function (5).
In the top tab you will see the categories Slicing (6), New (7) and Done (8).
You can see your list of designed inserts in the table. Double-click to select an order and the insert is displayed in the view window. The views can be changed using the buttons next to the view window. The software automatically searches for newly created files. These files are sent to Create it Real via a web service and sliced online. The respective status for the left and right inserts is displayed in the table under Links and Right displayed
A pair of insoles that you have just sent from InsoleCAD to this module is initially listed under Slicing (6) with the status "New". If you have activated Automatic slicing (5), the programme starts the slicing process immediately. The insert goes through various stages for this:
The following statuses are displayed:
read Measurement was added to the list
ws Workspace file created
rvwj Workspace file has been sent
pc Point-Cloud file has been sent
task Slicing has been started
queued Slicing has been placed in the queue.
24% Progress in slicing
finished Slicing successfully completed
crypted GCODE has been downloaded
printed The insert was sent to the printer and printed
crypted -> no extractor GCODE was generated without eject hooks because the insert is too wide (max. insert width 103 mm) for this function. The insert can be printed normally, but it remains on the print bed. The printer then switches to STOP mode. The insert must be removed from the print bed manually.

Once the inserts have been sliced, they can be found under "New" (7). Finished inserts, i.e. when the right and left sides of a pair have been sent to the printer, can be found under "Done" (8). You can also move the inserts manually to "Done". Simply select the insert in the list and click on the [-> DONE] button.

You can also delete the insert in a similar way. Simply select the insert in the list and click on the [Delete] button.

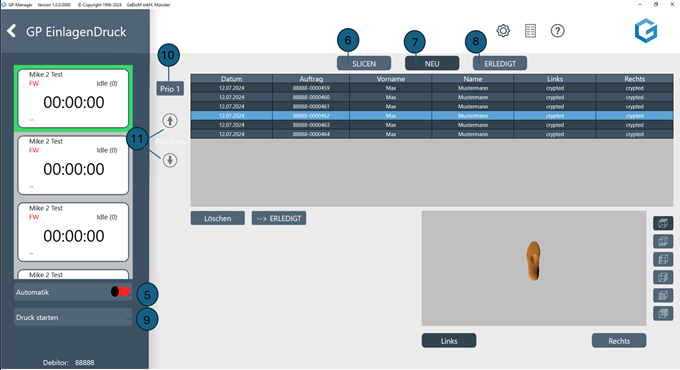
You can only change the priority of the inserts if you have switched off the automatic function (5) (red button). You can then either move the insert selected in the list directly to priority 1 (10) as the next file to be printed or move it up or down in the printer waiting list via the position (11) in the list.
Printing can then also be started manually (9).

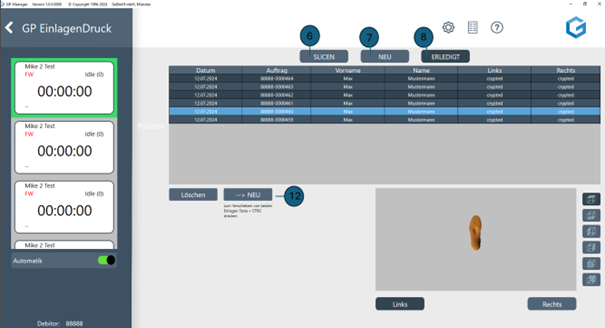
If you are in the completed jobs (8), you can move the selected insert back to the printer waiting list for reprinting by selecting the insert and clicking on the [-> New] button (12).