2.2.2 Definition of the degrees of hardness
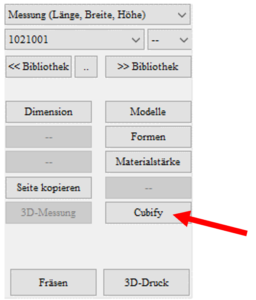
To select the extension, return to GP InsoleCAD. You will find the new Cubify button at the bottom right. Use this to open the hardness levels function.

The following view then opens.

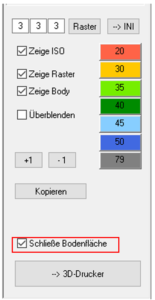
The user interface is structured as follows (Figure 2). In the top line, you have the option of setting the resolution of the grid used to create the PointCloud. We recommend a setting of 5 x 5x 5 mm. The standard setting for the grid can be saved in the INI using the à INI button. If your insert is not covered with grids over the entire top side, please click once on Grid. This regenerates the grid.
NOTE: The lower the resolution, the higher the computing power required for the design and the more time-consuming the creation of the print files.
Show ISO represents an isobaric representation of the degrees of hardness on the top of the insole.
Show grid represents the grid that is used for the PointCloud.
Show body defines whether the degree of hardness is defined over the entire height of the insert or not. Is Show body is selected, all boxes are selected (Figure 3). If Show body is not selected, only the boxes that touch the top of the insert are selected (Figure 4).

Figure 3 Show body selected -> All boxes of the insert are selected.

Figure 4 Show body not selected -> Only the boxes that touch the top of the insert are selected.
Fade displays the grids transparently so that the insert can be recognised. Will Fade is deselected, the underlying insert is no longer visible (Figure 5).

Figure 5 Fade not selected -> boxes are not transparent and the insert is not visible.
The different degrees of hardness can be selected on the right-hand side of the function box.
The button [CopyCopies the PointCloud to the other side.
NOTE: Only use if the left and right inserts have a similar structure. The entire PointCloud is copied and not aligned with the other insert. If you want to design different inserts, you must define left and right separately.
The button [3D printer] sends your design to the central production department at GeBioM mbH. Your inlays are printed there and then sent to you. The inlays are not sent to GeBioM by e-mail, but are stored securely in a cloud.
NOTE: The definition of the degrees of hardness is only saved when you return to the main window or when the deposit has been sent to GeBioM mbH.
Will Closing floor surface is selected, the underside of the insert is closed during printing (Figure 6).
