2.3.1 WiFi configuration for the printer
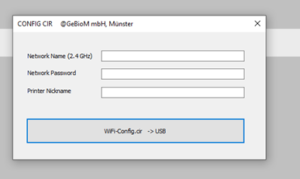
Before you can also access your printer via WiFi, it must first be configured. To do this, click on the cogwheel in the top bar. The following window opens.

Enter the name of your network and your network password here. You can also enter a name for the printer here, which will make the printer visible on the network. Once you have made all the entries, create the configuration file for the printer using the WiFi-Config.cir -> USB button. This can then be found on the desktop (wifi_config.cir). Save this file to an empty USB stick.
Configure the printer:
Once the configuration file "wifi_config.cir" has been created, place it in the root directory of a USB stick and carry out the following steps on the printer:
1.  |
Switch on the printer |
| 2. |
Insert the USB stick into the printer. NOTE: The USB stick must have the following format FAT32. |
3.  |
Open the settings menu |
4.  |
Select Network settings. |
5.  |
Select reconfigure. |
If successful, a confirmation message "Wi-Fi configured" will appear on the screen. At this point, the printer will be connected to the selected network and the printer name will be displayed on the printer's LCD.