2.3.2 Creating the print file and printing the insert
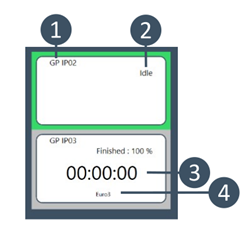
Firstly, the programme searches for your installed printer. All installed printers are displayed in the list on the left-hand side. For each printer, the name of the printer (1), the current status of the printer (2), the remaining print time (3) and the name of the print file (4) are displayed
 .
.
Your print file (.gcode) is created automatically in this module. You will see your list of designed inserts in the table. You can select a job by double-clicking on it and the insert is displayed in the view window. The views can be changed using the buttons above the view window. The information on the displayed insert is also displayed there. The software automatically searches for newly created files. These files are sent to Create it Real via a web service and sliced online. The respective status for the left and right inserts is displayed in the table under Links and Right is displayed (Figure 16, red box). The following statuses are displayed:
read Measurement was added to the list
ws Workspace file created
rvwj Workspace file has been sent
pc Point-Cloud file has been sent
task Slicing has been started
queued Slicing has been placed in the queue.
24% Progress in slicing
finished Slicing successfully completed
gcode GCODE has been downloaded
printed Insert has been printed
Once a print file has been created for both sides (status for left and right = gcode), you can send this .gcode directly to your printer via the module using WiFi and start it automatically. To do this, select the job in the list and the page you want to print. Then select a free printer (IDLE status) from the list on the left. The selected printer is highlighted in green. Then start printing via Start printing.
NOTE: Make sure that the printer is prepared for printing and, in particular, that there is no liner on the print bed.
You still have the option of saving the gcode to a USB stick and printing this file on the printer without WiFi.
NOTE: The print file is encrypted and can only be printed by the GP Mike printer.
After an insert has been printed, the status in the list changes to printed. If both inserts have been printed, they are automatically moved to the "Done" folder. However, the orders can also be moved manually using the Move to completed orders can be moved. The completed orders can be moved via the radio button Completed orders are displayed.
NOTE: All orders initially remain in the table as long as they have not been printed. You can also first design several insoles in GP InsoleCAD and create the design file. You can then create all print files at a later date by opening the GP InsolePrint module. A print file is created for all new orders. This can take a few minutes. You can scroll through the list. The module must not be closed during slicing.
You will find the respective print files in your programme folder under the following path \GPDATA\INLAYPRINT\CIR\CIR_DONE.
NOTE: The name of the print file consists of the job that is displayed in the GP Inlay Print module.


NOTE: If problems occur during slicing, please click the Logs button
 in the upper operating bar. Save the two logs that are opened and send them to cubix@gebiom.com