3.2 AutoUpdate
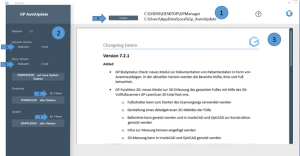
After successful login, the user interface for the GP AutoUpdate opens:

The user interface essentially consists of three parts. The header (1) shows the path to the GP Manager, which is being updated. The path for saving the logs is also displayed. The logs are displayed in the editor via the Logs button (8).
On the left-hand side (2) you will find information about the update. The currently installed version (4) and the new version (5) available for update are displayed here.
All changes to the new version are displayed on the right-hand side (3) (ChangeLog).
Before you carry out the update, make sure that all GP Managers are closed.
Perform update:
- Press the "CHECK for new update files" button. The number and total size of the new files will then be displayed under (6).
- Now download all files using the "DOWNLOAD all files" button. The number and total size of the files is also displayed here under (7).
- In the last step, the update is carried out using the "INPUT all files" button. After a successful update, all numbers under (6) and (7) have the value ZERO.
Your GP Manager is now up to date.
NOTE: Always carry out all 3 steps described above for the update.
Close the programme. The GP Manager can now be started.