Select the button "Copy page", a mirrored copy of the displayed insert is created. If an insert already exists for the other side, a dialogue box opens and you decide whether the existing insert should be replaced or not.

You can copy the insert at any time. All models are also copied.

The workflow in the Dimensions workspace should be run through from top to bottom. The editing mode can be selected for each work step (Total, Partial, Especially).

Note:  If you are in the Dimensions area, you can no longer freely rotate the model. Only the standard views are available to you. If you want to rotate the model, you must first click on the "Main window" to switch to the standard work area of the main window.

Note:         When working with the dimensions, remember to press the "Rescue" button.

Select the button "Copy page", a mirrored copy of the displayed insert is created. If an insert already exists for the other side, a dialogue box opens and you decide whether the existing insert should be replaced or not.

You can copy the insert at any time. All models are also copied.

This option is a special option that should not normally be used. The inlay is shaped so that the edge of the inlay lies on the edge of the measurement.

If the radio button "Crescent position" becomes a rectangle within of the insert. The insert is deformed by rotating it at the centre of the rectangle. The rectangle is placed by pressing the left mouse button on or next to the insert in the active workspace and selecting an area.

The rotation is performed with the combination Ctrl key + left mouse button and can be performed for the (forefoot) or (hindfoot) areas. The decisive factor here is the position of the mouse pointer in relation to the defined rectangle.

After clicking on the radio button "Height" you can change this dimension on the insert. The area of the change can be selected by selecting one of the radio buttons "Total" or "Especially" can be determined in more detail. You can set the height with the combination Ctrl + left mouse button + mouse movement customise.

Attention: The height can only be changed in views A (outside) and I (inside).

  • Total: The entire height is adjusted.
  • Partial: Not available
  • Especially: The height is adjusted in the selected area.

After clicking on the radio button "Width" you can change the width of the insert. The range of the change is defined by selecting one of the radio buttons "Total", "Partial" or "Especially" can be determined.

  • Total: The width is changed on both sides
  • Partial: Depending on the position of the mouse, five areas can be changed. It is not possible to customise the areas as they are predefined.
    • If the insole is clicked in the toe area, the area from the tip of the foot to the ball of the foot is changed (right or left), with the greatest change occurring at toe height. The following key combinations are possible:
      Ctrl + left mouse button                Change a page
      Ctrl + Shift + left mouse button      Change both sides
    • If the insole is clicked in the area of the bunion line, the width is changed from the toe to the heel (right or left), with the greatest change occurring at the intersection of the bunion line and the edge of the measurement/insole. The following key combinations are possible:
      Ctrl + left mouse button                Change a page
      Ctrl + Shift + left mouse button    Change both sides
    • If the insole is clicked in the heel area, the width at the rear of the foot is changed on both sides.
  • Especially:          The width in the selected area can be adjusted.

If the Length option is selected, you can adjust the length of the insert to the measurement. To change the length, use Ctrl + left mouse button + mouse movement. Change depending on the mode:

  • Total: Front and rear length
  • Partial: Front or rear length, depending on the position of the mouse
  • Especially: The length in the selected area

Position the bale line with Ctrl + left mouse button + mouse movement so that it is parallel to the bale line of the measurement. If necessary, use "Position" to bring the bale lines into alignment.

Attention: Please note that a very strong shift of the bunion line can lead to major changes to the entire insole.

If the option "Position", you can select the insert with :

Ctrl + left mouse button + mouse movement Move horizontally/vertically
Ctrl + Shift + left mouse button + mouse movement Rotate forefoot/rearfoot area

Switch through the standard views to get an exact idea of the spatial position of the insert. Make sure that the insert is not below the zero line in views I, A, V and H. The zero line is the horizontal line. The zero line is the horizontal line.
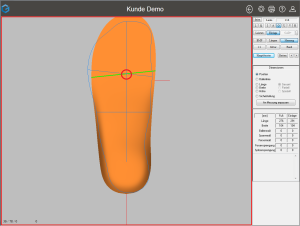
Dimension-Position-richtig-markiert

Figure 16: Positioning the inlay (the bale lines should intersect at this point)

After positioning, the ball line of the insole (green line) should be positioned so that it intersects the point at which the ball line of the measurement intersects the foot axis.

The insert should be positioned so that it lies within the measurement.