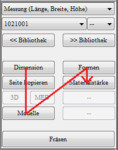
The descriptions in this manual only refer to the modelling of the top side of inserts. If you are interested in modelling beddings, you must consult the CAD+ manual and have purchased the corresponding module.

All the functions required for 3D modelling are located behind the buttons in the toolbox. You can easily memorise the workflow by imagining you are reading a book. It is recommended to use the buttons in the same order.

The exact procedure depends on whether you start with a 3D measurement or a 2D scan (see Figure 12: Recommended work sequence).

There are generally three different options for modelling: Total, Partial and Especially. These always refer to the current context. If you are modelling the insert, the mode refers to the insert. If you are currently editing a model, this mode only applies to the model. Changes in the modes are always carried out with Ctrl + left mouse button + mouse movement.

Depending on the mode, the position of the mouse click determines which part is changed.

TotalTotal is the coarsest mode. If this is activated, the entire insert or the entire selected property such as length, width, etc. is changed. This mode allows you to roughly customise the insert. For example, if "Dimensions" -> "Width" is selected, the width is adjusted on both sides.

PartialPartial is the next finer mode. In this mode, part of the currently selected Wenur is changed. For example, if the "Dimensions" -> "Length" is selected, only the length of the insert at the front or rear is changed.

EspeciallySpecial allows the finest changes to the model. You can use the mouse to define a rectangular area in which you want to mould the model. To do this, hold down the left mouse button and drag the mouse over the area you want to mould. As soon as the area is marked, release the mouse button. The marked area is displayed as a red rectangle.

The following applies: At the point of attack, the change is carried out at 100 %. At the edge of the selected area at 0 %.

The other points are calculated from the distance to the centre.

Now change the dimension by clicking on a point within the rectangle with Ctrl + left mouse button drag with the mouse.
You can organise inserts in libraries. With every installation, you will find a selection of ready-made inserts in the library BIB_GP_Inserts. You can use these inserts as the basis for your own inserts. You must save the modified inserts in your own libraries. Of course, you can also create your own inserts from scratch.

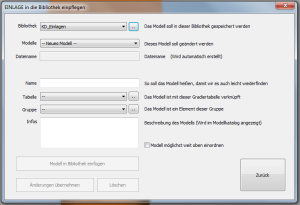
Select "Library >>" to the "Add an insert to the library" dialogue.EINLAGE-in-die-Bibliothek-einpflegen

Library

Under Library, you can select the library in which you want to save the insert.

Note:  Supplied inserts cannot be changed. If you want to change an insert, you must transfer these inserts to a customer library. To do this, load the insert, make any necessary adjustments to the insert and select "Library >>". Select a customer library and then save the insert as described below.

Library -> ...

With the button on the right (".."), you can rename libraries and create new libraries. You can also include and deactivate libraries (see ).

Models

You have the option of overwriting an existing model with the current insert. In this case, select the name of the model here. If you want to create a new insert, select "- New model -"

File name

The file name is derived from the model name. Nothing can be entered here. If you have selected an existing insert, the file name under which the insert can be found in the library folder is displayed here.

Name

Give the insert a name. The insert appears under this name in the model catalogue.

Attention: Do not use any special characters for the name. A file with the name of the insert is created. If the name contains special characters, the file cannot be created. Only use letters, numbers, spaces, hyphens and underscores.

Table

Enter a grading table for the inlay. This is used by the GP Manager to calculate the dimensions of the insert.

Table -> ...

With the button on the right ("..") you can enter the dimensions for the inlay manually or import an existing grading table. Please note that the numbers are written according to the English notation. A full stop is used here instead of a comma.

Using the number pi as an example, 3.14 becomes 3.14 in the English notation.

The measurements are given in the table in the following order: "Shoe size = length width height" (in mm).

Note:  The GP Manager is able to calculate the grading table. To do this, you must enter the measurements for at least two shoe sizes. You will achieve the best results if you enter the measurements for shoe sizes 36 and 43.

Group

In addition to libraries, inserts can be organised in groups. You can select an existing group from the drop-down menu. In the model catalogue, you can display the inserts according to these groups.

Note:  In the model catalogue, the groups are called "Type".

Group -> ...

With the button to the right of Group ("..") you can edit your groups. This makes it easier for you to find inserts in your libraries.

Note:  If you have created a new group, it is displayed in the "Add an insert to the library" dialogue is only displayed after you have closed and reopened it once.

If you assign a number twice, it can happen that deposits are assigned to a group that already exists. You should therefore avoid assigning a number twice by mistake. It is advisable to leave larger number spaces between different groups. For example, you can start groups for adults only from 100. Groups for children's inserts from 200.

Info

The text entered here appears in the model catalogue under the respective insert.

Place the model as high up as possible

Select this option so that the insert is categorised at the top of the selection menu. You should select this for frequently used inserts. This allows you to find the inserts quickly in the main window.

Note:  If you want to categorise existing inserts at the top, open the insert and select this option.

Insert model into library

This button is used to add the insert to the library.

Apply changes

This option writes the changes to the loaded insert. This means that the insert currently displayed on the workspace is saved with the changes. If you only want to rename existing inserts, you must ensure that the insert you want to rename has been loaded from the library beforehand.

Delete

The insert selected under Models is deleted from the library.

Back

You return to the GP InsoleCAD module without making any changes to the library.

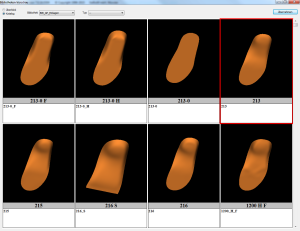
This button takes you to the model catalogue. Here you can display a preview of the insoles and load an insole.

The dialogue offers several options for adjusting the display so that you can find the insert you are looking for as quickly as possible.

Bibliothek-Katalog

Figure 14: Catalogue view option

Bibliothek-Überblick

Figure 15: Overview view option

Library

  • Select the library in which you have saved the insert you are looking for.

Type

  • Select the type/group of the insert you are looking for.

Note:  Unfortunately, scrolling through the inserts only works properly using the buttons above and below the scroll bar. If you want to search through the insert library, it is best to use these.

Once you have found the insert you are looking for, mark the insert by clicking on it so that it is outlined in red (see figures Figure 15 and Figure 14). Then click on "Take over". Alternatively, double-click to load the insert immediately and close the dialogue.
If you do not wish to load an insert, close the dialogue window.

You can select the shoe size in the drop-down menu on the right.

Note:         You can also click on the drop-down menu and then select the size using the scroll wheel. The insole is recalculated directly so that you get an impression of the size ratio of the insole and the measurement.

You can use the drop-down menu on the left to select an insert directly. The function corresponds to the "<< Library" button, but the selection via this drop-down menu is often faster than the selection from the graphical display.

Note:         You can also click on the drop-down menu and then use the scroll wheel to scroll through the insoles. The insoles are loaded directly and you get an impression of the shape and models of the insoles.

The top drop-down menu provides a selection of how the insert is adapted to the selected measurement. GP InsoleCAD offers several options for how this is calculated. By default, the two options Measurement (length, width, height) and Original size are activated. These two methods are sufficient for most cases. The other methods can also be activated on request.

Measurement (length, width, height)

  • The inlay is adapted to the measurement in width and length. The corresponding height is taken from the grading table.

Original size

  • The model of the insert is loaded from the library in the size in which it was saved there.

Note:  Which options are available in the drop-down menu depends on the settings of the GP Manager installation. The following additional options are possible and can be activated on request. As a rule, however, these are not required.

Best possible size (stitch)

  • The insole is adapted to the measurement in width and height according to the grading table. The next larger "shoe size" is used for the length of the measurement (plus toe allowance).

Specified size GP FootMeasure

  • Manual adjustment of the customer's actual size. To be set by the person scanning/measuring the customer. The measured values are stored in the GP FussMess module and can only be entered in GP InsoleCAD be utilised.

Measurement (length, ball, heel)

  • Predefined points at which a fixed value of millimetres is added to the insert.
    • (tip/end)
    • (Bale inside/bale outside)
    • (inside heel, outside heel)

The points are displayed in the GP FussMess module and can only be set in the GP InsoleCAD be utilised.

Adopt only the form

  • Existing models (pads, bars, etc.) are retained, only the inlay is exchanged with the selected inlay from the library.

Measurement (length, width)

Subsequently changes the size of the insole and all models (length/width) without changing the height, i.e. if this option is not activated, changing the shoe size also grades the models.

Inlays can be loaded directly from the library using the drop-down menus at the top of the toolbox.

Hauptfenster-Bibliothek

Figure 13: Library management

Most of the functions of GP InsoleCAD are stored in the toolbox. To create an insert, you can work through the toolbox in the same order as you would read a book (see Figure 12).

Werkzeugbox-Arbeitsreihenfolge

Werkzeugbox-3D-Messung-Arbeitsablauf

Figure 12: Work sequences in InsoleCAD. Above: creating an insole with a 2D scan. Bottom: creating an insole from 3D data

With the help of the "Rescue" buttons to save your current deposit at any time. Via the buttons "<" ">" button to switch between saved work steps.

Note:         As in GP InsoleCAD If it is not possible to undo every single work step, it is advisable to create a backup with rescue before or after every major work step.
In general, you should get into the habit of using Retten frequently.

Via the button "Main window" button to return to the standard work area of the toolbox. All selected tools are automatically closed.