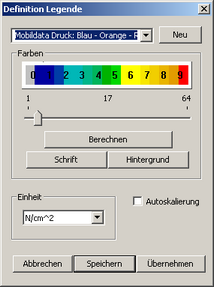
To define the colours, set the slider below the colour scale to the desired number of colours. This is displayed in the centre below the scale. You can set values between 1 and 64. Each individual colour must now be defined. To do this, double-click in the colour field to be defined and the Windows colour dialogue box will appear. Click on the desired base colour on the left. If required, this can be varied manually on the right in the square colour spectrum or in the brightness gradation next to it. The current colour is displayed in the "Colour / Base" is displayed. Once the desired colour has been set, click on "Add colour" and the colour appears in the first box of the "Custom colours„.

Attention:
Make sure that the colour appears in the top left-hand box before continuing.

Then click on "OK" and the colour is entered in the colour scale. You must repeat this process for each colour box (or see "Calculate„)

After clicking on "New", a new name appears in the list field "NN". The new legend can later be found under this name in the list field. The name can be changed by clicking with the mouse in the "NN" and enter a new name...

The scaling of the legend can be changed by clicking on the arrows SQL_FussDruck Pfeile below the colour scale can be changed manually. However, the entire scaling can also be changed. By clicking in the units field, e.g.SQL_FussDruck N_cm2 (default setting "N/cm²") to access the "Definition legend" menu.

SQL_FussDruck Listenfeld1
SQL_FussDruck Legende2

The following functions are used to define new legends, or predefined legends can be called up and changed. Predefined legends are selected via the list field . If you click on the arrow in the list field, the available options are displayed.

With a click on "Cancel" button, the settings are discarded and you return directly to the MobilData module without accepting a measurement.

With the function "Exit" button, a selected measurement is transferred to the "MobilData" evaluation programme and displayed.

Calibration refers to the assignment of the raw measured values to a specific sole arrangement and the conversion of the measured values into pressure values. A calibration file exists in the system for each base, in which the conversion tables for calculating the pressure values and the shape of the individual bases, including the exact position of the sensors, are stored.
As it can happen that a series of measurements was carried out with different soles, this function can be used to assign each measurement to its corresponding sole. The user must therefore decide at this point which sole combination was used for the selected measurement.

!!!!! Attention !!!!!

The assignment made here CANNOT be cancelled afterwards. It is then necessary to read in the SRAM card again.

For this reason, it is advisable to keep a precise record when carrying out the measurement. Make a note of the following

  • Customer
  • Sole combination used
  • Consecutive Numbering of measurements starting from 1

The following tips for handling the SRAM card may also be helpful:

  • Process only one customer per measurement series
  • Use only one sole combination per measurement series
  • Delete the SRAM card as often as possible so that not too many measurements have to be taken into account

Before you carry out a calibration, you must ensure that you have selected the correct sole size from the list fields (see chapter 6.4.1) on the "MobilData" interface. Now select all measurements that match the set sole size. This is done by:

  • Select the measurements with the left mouse button (individually)
  • Drag the mouse while holding down the left mouse button (several)
  • Select + CTRL (add single)

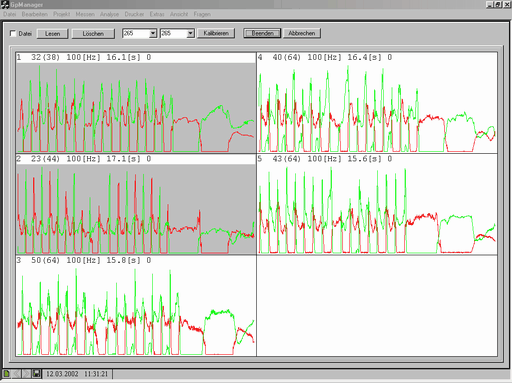
Selected measurements are outlined in red. Once you have selected all suitable measurements, click on the "Calibrate" button. The selected measurements are calibrated and saved calibrated in the LOGG file. The raw measurement data will be overwritten. To indicate that the measurements have been calibrated, they are given a grey background.

At this point, the following information is stored in the LOGG file:

  • The pressure values
  • The shape of the sole
  • The position of the sensors
  • The size of the measuring range for each sensor
  • The position of a pair of soles in relation to each other.

This information can be not can no longer be changed, so once again it is important to proceed carefully when assigning the measurement to a sole combination.

At this point, it is possible to exit the dialogue box via Exit without having to assign a measurement to a customer. To do this, no measurement must be selected, i.e. be outlined in red. The next time this dialogue box is opened, the LOGG file last edited is automatically displayed again. However, this only applies as long as the programme is not closed in the meantime.
The sole size is selected using the following list fields:

SQL_MDLogger_Sohlengroessen

If you click on the arrow in the list field, the available sole sizes are displayed. Click again to select one of the specified sole sizes. When selecting from the left-hand list field, the result is transferred to the right-hand list field. Two different sizes can be set by making an initial selection from the right-hand list field, as the result is not transferred to the left-hand field.

With the function "Delete", measurements are deleted from the SRAM card or hard drive after a confirmation prompt. Please note the "File" checkbox. If the "File" checkbox is activated, a log file is deleted; if the checkbox is deactivated, the SRAM card is deleted. The deletion is irrevocable.

Note:
The SRAM card can be written with max. 4 MB or max. 64 measurements. If one of these limits is exceeded, measurements are no longer taken. To avoid problems here, the SRAM card should be deleted after each read-in. This also makes it easier to keep records of the sole combinations used.

With the function "Read" button, measurements are loaded into the memory. Before reading, the location where the measurements are located must be defined (see the section "File„).

If the checkbox "File" checkbox is deactivated when reading in, all measurement data is read from an SRAM card and transferred in full to the computer's memory. If the "File" checkbox is activated, measurements are loaded from the hard disc into the memory.
The measurement data from the SRAM card is initially saved on the hard drive in the GPTEMP folder under the name LOGG_xxx.dat and the date and time of reading. xxx is representative of consecutive numbering in order to distinguish between different measurement series.
A new measurement series, i.e. a newly read SRAM card, does not overwrite the previous measurement series. It is therefore possible to save several measurement series in quick succession on the computer.
As up to 4 MB of data can be transferred with each transmission, over time this can lead to an accumulation of data on the hard drive that is no longer required. To avoid this, it is possible to delete specific measurement series from the hard drive.

After clicking on "Read", all available measurements are displayed.

SQL_MDLogger_Lesen

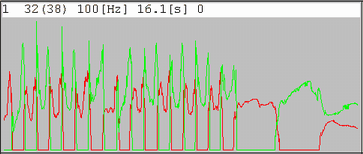
Some additional information is displayed for each measurement:

SQL_MDLogger_Kalib_Einzelbild

2 Serial no. Number (1-64) within the measurement series
35 (38) 35 of 38 sensors were loaded
25 [Hz] Frequency
19.2 [s] Measurement duration
0 Number of additionally measured analogue channels (optional)

The displayed curves describe the average value of all loaded sensors over the recorded period on a floor.

Note:
These cannot be interpreted as force curves and are therefore not comparable.

Red 1st sole (usually left)
Green 2nd sole (usually on the right)

The measurements shown above are read from the LOGG_xxx.dat file, i.e. the SRAM card can already be removed from the device at this point and used for further measurements. The SRAM card may need to be deleted beforehand.

Immediately after reading out the SRAM card, all measurements are highlighted with a white background. The measurements are thus labelled as raw measurement data, i.e. the measurement data has not yet been assigned to a specific sole shape or calibration. It is merely an exact copy of the measurement data on the SRAM card.

At this point, it is possible to exit the dialogue without further processing of the data. The next time the dialogue is called up, the last data read in is automatically displayed again. However, this only applies as long as the programme has not been closed in the meantime.

With the checkbox "File" checkbox determines where the measurements to be processed come from. If the checkbox "File" are active, the functions "Read„, „Calibrate" and "Delete" to a log file located on the hard drive. If the checkbox is deactivated, the above functions refer to the SRAM card that is inserted in the OmniDrive and is read out from there.