To start the module from the start page, you must first select a customer or create a new one. To do this, please click on the following symbol in the top right-hand corner  . To create a new customer, click on
  and fill in at least the mandatory fields (*). Via the arrow
  or double-click on the customer name in the table to return to the start page and start the GP FussMess 3D module.
To open the GP Foot Measurement 3D module, click on the button with the "GP Foot Measurement 3D" icon in the module overview of the GP Manager.

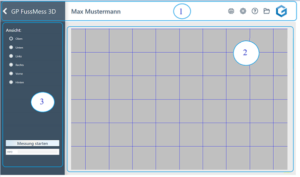
The user interface of the module consists of the menu bar (1), the workspace (2) and the toolbar (3).

After starting the module, the following menu bar is displayed:

The arrow (1) takes you back to the module overview. The name of the module (2) is displayed to the right. If a customer has been called up, the customer name (3) is displayed, otherwise this field is empty. Under the cogwheel button (4) you can make various settings regarding the colour display. If you have any questions or problems with the GP Manager, you can click on the question mark (5) to access the support page gpsupport.com. Click on the folder (6) to open the customer data and call up old measurements, for example. The GeBioM logo (7) is the home button that takes you back to the start page.

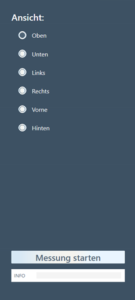
The toolbar is located on the left-hand side.
You can change the view of the measurement on the upper half.
You can start new measurements on the lower half and add notes in the free text field.
The exact handling of the individual functions is explained in the next chapter.
Functions in GP FussMess 3D
Working in the workspace
Move
To move the measurement, press the CTRL key and move the mouse in the desired direction.
Turning
To rotate the measurement, press the SHIFT key and move the mouse in the desired direction.
Rotate
To rotate along the longitudinal axis of the body, press the CTRL and SHIFT keys and move the mouse in the desired direction.
Zoom
Use the scroll wheel to zoom in and out of the measurement.
Working with the toolbar
Change view

After selecting one of the six available views, the measurement is displayed in this view.
Bunion line and foot axis
After activating the view of below you can move the displayed bale line with the left mouse button. To adjust the foot axis, you can rotate the foot in the front or rear foot area by holding down the left mouse button.
Start measurements

Left-click on the [Start measurement] button to activate the scanner and start a new measurement. If a measurement is already open, you will be notified and you can decide whether to create a new file or overwrite the old measurement.
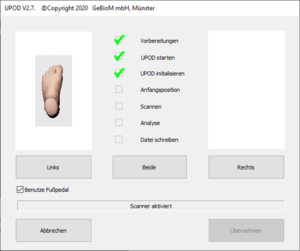
Next, the separately installed driver for the scanner is started and automatically carries out the initialisation process.

As soon as the scanner is initialised, you can select whether you want to scan on the left, right or both sides. The measurement can then be started using the foot pedal (if selected) or by pressing CTRL. If both feet are to be scanned, you must start with the left side. After scanning, a preview image is displayed. If both feet or only one foot has been scanned, the measurements are saved by clicking on Accept. The measurement is then displayed in the workspace.
Insert notes

You can create your notes by left-clicking in the free text field. These are saved with the customer under the measurement.


