Move

To move the measurement, press the CTRL key and move the mouse in the desired direction.

Turning

To rotate the measurement, press the SHIFT key and move the mouse in the desired direction.

Rotate

To rotate along the longitudinal axis of the body, press the CTRL and SHIFT keys and move the mouse in the desired direction.

Zoom

Use the scroll wheel to zoom in and out of the measurement.

To start the module from the start page, you must first select a customer or create a new one. To do this, please click on the following symbol in the top right-hand corner . To create a new customer, click on and fill in at least the mandatory fields (*). Via the arrow 

or double-click on the customer name in the table to return to the start page and start the GP FussMess 3D module.

To open the GP Foot Measurement 3D module, click on the button with the "GP Foot Measurement 3D" icon in the module overview of the GP Manager.
The user interface of the module consists of the menu bar (1), the workspace (2) and the toolbar (3).
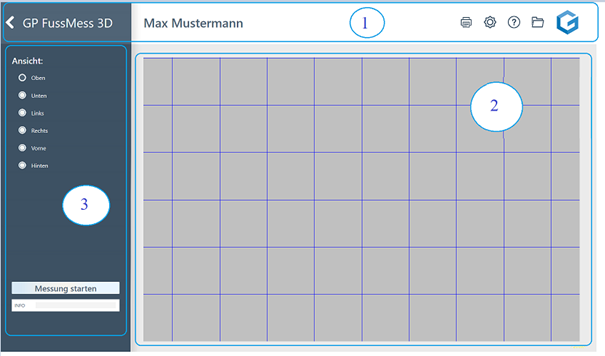
After starting the module, the following menu bar is displayed:

The arrow (1) takes you back to the module overview. The name of the module (2) is displayed to the right. If a customer has been called up, the customer name (3) is displayed, otherwise this field is empty. Under the cogwheel button (4) you can make various settings regarding the colour display. If you have any questions or problems with the GP Manager, you can click on the question mark (5) to access the support page gpsupport.com. Click on the folder (6) to open the customer data and call up old measurements, for example. The GeBioM logo (7) is the home button that takes you back to the start page.
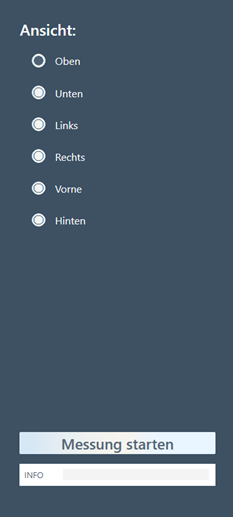


The toolbar is located on the left-hand side.
You can change the view of the measurement on the upper half.
You can start new measurements on the lower half and add notes in the free text field.

The exact handling of the individual functions is explained in the next chapter.


  • Prevent light from falling directly onto the scanner plate. To enable scanning, it is important that the leg is not covered by clothing up to below the knee.
  • The customer should be positioned as centrally as possible on the scanning surface

The customer must remain as still and upright as possible during the entire measurement process.

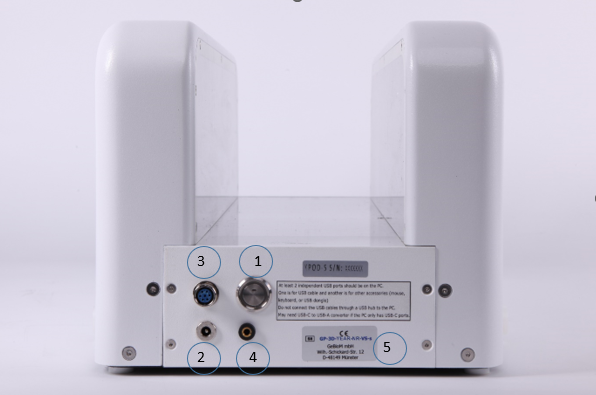
  1. Switch off the scanner using the switch on the back (1).
  2. Remove all cables from the back of the scanner and roll them up loosely for storage.
  3. Remove the footrests from the bolts.
  4. Fasten the transport lock:
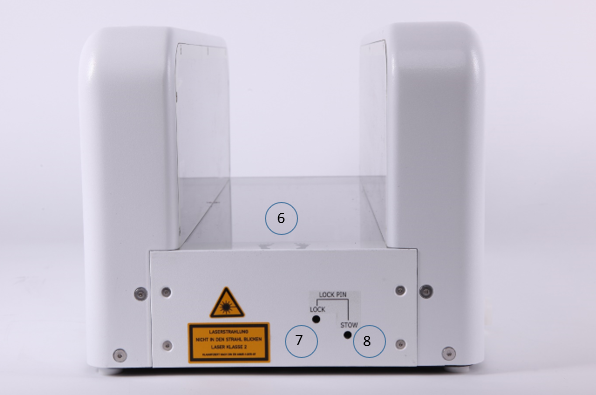
    1. Remove the screw from the bearing slot (stow) (8)
    2. Lift the back of the scanner using the handle under the connections until the carriage in the scanner slides all the way forwards.
    3. Screw the screw into the locking slot (lock) (7) until the carriage is fixed in place
  1. Connect the power supply unit (2), the USB connection cable (3) and, if you want to use it, the foot pedal (4) to the back of the scanner.
  2. Connect the red USB connection cable to a normal USB port on your computer.
    1. red USB cable: at least quad-core CPU i7-6700HQ, 8GB RAM
  3. Plug in the power supply unit.
  4. Switch on the scanner using the switch on the back (1). If the button does not light up, check the connection of the power supply unit.
  5. The scanner can now be controlled with the GP FootMess 3D module.
  1. Place the foot scanner on a level, stable surface.
  2. Remove the transport locking screw (lock) (7) on the front of the scanner and screw it into the storage slot (stow) (8).
  3. Optionally, attach the foot supports on both sides of the scanner by sliding the recesses of the supports onto the bolts on the outside of the scanner.
  4. Establish a connection between the scanner and your computer as described below.

The GT George full foot scanner is a 3D scanner that can now scan the entire foot in addition to the plantar information of the foot (i.e. from below). To do this, the device is placed on a firm, non-slip surface. With the GT George's laser technology, the entire foot can be scanned in all three dimensions, whether fully, partially or unloaded. It only takes a few seconds to take the image and create a photo of the plantar view. Thanks to the laser technology, the feet are captured with millimetre precision and a detailed 3D image of the feet is obtained. The camera and laser unit are controlled and the measurement data is transferred to the PC via a USB port. The measurement data is displayed on the PC in the GP FussMess3D software module, where it can be further processed.

WARNING

It must be possible to walk or run in front of and behind the device without tripping.


Please first check that the appliance is complete and undamaged. If in doubt, do not use the appliance and contact the manufacturer.

The scope of delivery of the GT George includes

  • 1 GT George (laser scanner for measuring the entire foot)
  • 1 power supply unit (12 V, 3.0 A )
  • 1 USB connection cable (approx. 3.0 metres): 1 red with 2 USB ports,
  • 1 foot switch with connection cable (approx. 2.4 metres)
  • 1 instruction manual
  • 2 side footrests

The packaging is reusable or can be returned to the raw material cycle. Please dispose of packaging material that is no longer required properly. If you notice any transport damage during unpacking, please contact the manufacturer immediately.

WARNING

Make sure that the packaging film does not get into the hands of children.

There is a risk of suffocation!

1 - On/off switch

2 - Connection for the power supply unit

3 - Control unit and camera connection

4 - Foot switch connection

5 - Serial number

6 - Measuring surface/scan plate

7 - Remove the transport lock before use!

8 - Storage slot (stow)