Once you have configured the email server and created your own contact, you can send emails from the GP Manager.

Open a project via "Project" -> "Determine". You can then save the data via "File" -> "Send email" button. If you have several entries in your address book, you can decide which contact you would like to send the email to.

GP-Manager-Dateimenü-eMail-senden-markiert

If you have entered exactly one contact in your address book, the email will be sent to this contact without any further enquiry.

If you have no contact or several contacts in your address book, the "eMail address book" dialogue appears.

GP-Manager-eMail-Adreßbuch-2-Kontakte-Abbrechen-markiert

Figure 10

Attention:
Sending to multiple email addresses is not possible. If you select several addresses (see Figure 11), the email will only be sent to the email address that was clicked first.

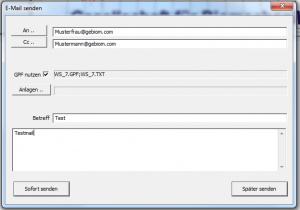
You can compose an email from this dialogue by selecting "Cancel". The following dialogue then appears:

GP-Manager-E-Mail-senden

Figure 11

This field currently has no function.

Retrieved emails are temporarily stored in this folder. Make sure that the GP Manager has write authorisation in this folder. It is recommended to select a subfolder of the folder in which the GP Manager is installed on the target computer.

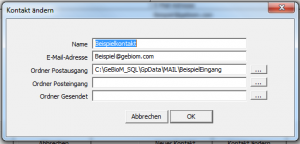
Change the email address from Beispiel@gebiom.com in the email address to which you would like to send the data.

Change the name of Example contact into the name of a branch or an employee to whom the customer is to be sent.

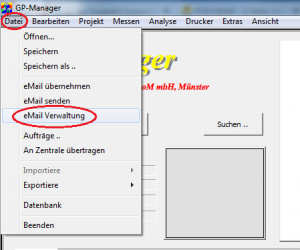
To transfer your customer data by email, you can add contacts to your address book. You can access the address book in version 6.5 via "File" -> "eMail administration" -> "Address book ..." (see Figure 7). In version 7 via "GP Touch Mail" -> "E-Mail administration" -> "Address book ..." (see Figure 7).

GP-Manager-eMail-Verwaltung-Adressbuch-markiert

Figure 7

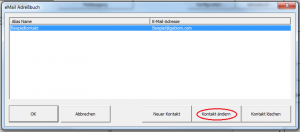
If you have copied a Mail.ini, the following dialogue should already contain a "Example contact" are included. Click on the example contact so that it is highlighted in blue (see Figure 8).

GP-Manager-eMail-Adressbuch-Kontakt-ändern-markiert

Figure 8

Then click on "Change contact", adjust the individual fields accordingly in the following dialogue (see Figure 9).

Note:
If only emails are to be received on this computer, you can also leave the address book empty. In this case, delete the example contact.
You can still send an email by selecting "File" -> "Send email" -> "Cancel". Here you can compose an email and enter any sender.
If you insert only one contact, emails are automatically sent to this contact.

GP-Manager-Kontakt-bearbeiten

Figure 9

Start the GP Manager and select "File" -> "eMail administration"

GP-Manager-Dateimenü-markiert

Figure 5

In the following dialogue, select "Configuration ..."

GP-Manager-eMail-Verwaltung-Konfiguration-markiert

Figure 6

You can enter your login information for the email inbox in the following dialogue. If your GP Manager is installed in a different location, please also change the "Standard folder ...".

GP-Manager-Konfigurationsdialog-markiert

Figure 7

Check whether the correct addresses have been entered under "Server". If you have copied a suitable Mail.ini, these values should be correct. If you use Web.de, please also read the FAQ point 3.4

Enter the user name and password for your email account.

Select "Test connection"If everything is configured correctly, the message "Test SMTP - Access to SMTP server OK" or "Test POP - Access to POP server OK" should appear. This completes the configuration of the email module. Next, you must add a contact to your address book in order to be able to send emails to them.

Attention:
You can tick the "Check subject", then all emails will be retrieved. This is not normally a problem, but can lead to problems if the same email account is also used for other GP Manager installations or elsewhere. In this case, the emails are no longer available there, as the emails are deleted from the server after retrieval.

Note:
Change the subject and leave the tick next to "Check subject", you must change the subject in the Mail.ini in the section [Init_Send] also have to be adjusted. Otherwise, emails are still retrieved, but are no longer offered for transfer.

Copy the Mail.ini into the subfolder "GpSystem\INI" of the GP Manager folder (see Figure 1).

If you use GMX, Web.de, Strato or 1&1 as your email provider, you can use a ready-made Mail.ini.

File name Link
Mail_1and1.ini  [wpfilebase tag=fileurl id=512 linktext=' Mail_1and1′ /]
Mail_GMX.ini  [wpfilebase tag=fileurl id=510 linktext=' Mail_GMX' /]
Mail_Strato.ini  [wpfilebase tag=fileurl id=509 linktext=' Mail_Strato' /]
Mail_Web.ini  [wpfilebase tag=fileurl id=511 linktext=' Mail_Web' /]

Select the appropriate preconfigured Mail.ini file for your email provider.

If you do not have the INI files, you can download them from the homepage (see table). If you use a different email provider, select one of the INI files we offer.

Open the corresponding INI in any text editor (e.g. with Notepad). You must always change the sender address. The line in the INI file reads, for example: "Address = Ihre.Mail@web.de". For GMX.de, make sure that you use the ending that you selected when setting up your email. So gmx.de, gmx.net, gmx.at or gmx.ch.

If the Mail.ini is for your provider, then you do not need to make any further changes in the INI itself. If you use a different provider, you may have to adjust the security settings in Mail.ini. You can ask your email provider for the settings, unfortunately GeBioM mbh cannot provide an INI file for all email providers.

Firstly, carry out the update of the mail module. You can usually find the update in the GP Manager folder under "C:\GeBioM_SQL\GpTools\SSL_Fix_R3.exe". The italicised part of the path may differ depending on the installation.

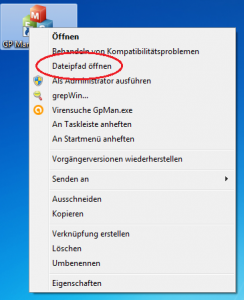
If you have an existing installation, you can find the folder by right-clicking on the GP Manager shortcut. In the following menu, select "Open file path".

GP-Manager-Verknüpfung-Kontextmenü-Dateipfad-öffnen-markiert

Figure 1

If you cannot find the update there, you can download the update [wpfilebase tag=fileurl id=508 linktext=here /] from our homepage.

Double-click to start the update; when you are asked whether the programme is allowed to make changes to the computer, confirm with "Yes".

After the installation has been started, confirm in the following dialogue with "Further".

SSL-Fix-Installation-Screen1-Weiter-markiert

Figure 2

Enter the path to your GP Manager folder (see above) and select "Further"

SSL-Fix-Installation-Screen2-Weiter-markiert

Figure 3

In the next dialogue, you will be asked to enter the ports for the incoming and outgoing mail server. The currently valid ports are specified for GMX and 1&1, Web.de and Strato.

The port numbers are written to Mail.ini by the installation routine. For the most common email providers, please refer to "Table 1" for the port number.

Email provider Incoming mail server Outgoing mail server
GMX 995 587
Web.de 995 587
1&1 995 587
Strato 995 465

If you are not sure which port numbers to enter here, ask your email provider. Then confirm with "Further".

SSL-Fix-Installation-Screen3-Ports-und-Weiter-markiert

Figure 4

In the following dialogues, click on "Further" and "Exit" to complete the installation of the update.