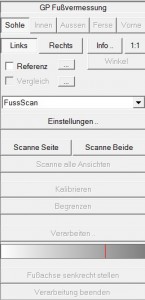
Function box
This box contains all the processing steps required to carry out a digitisation process (scanning) or to switch to certain views. The box is processed from top to bottom with the following steps:
- Setting the view via sole, inside, outside, heel or front (note: availability depends on the module).
- Setting the page via Left, Right
- Edit the scanner settings via "Settings ...". you can select a source to be used for measurement. If the scanner has already been set up, you can continue with step 4. Scanner settings: Colour resolution: Colour; DPI : 100
- Start the scanning process using the "Scan page" or "Scan both" button
- If necessary, define a partial area and then cut out using the "Limit" button
- Possibly setting a threshold value for detecting the foot outline using the white/grey slider.
- Remove all parts of the image that lie outside the outline using the "Delimit" button.
- Remove all background images required for the calculation using the "End processing. (Caution! It is no longer possible to edit the outline again)

Note:
If the result is not as desired, you can start processing again by clicking on "Calibrate". This only applies as long as the "End processing" button has not yet been used.