Manual Customise print pages with Adobe Pro

1. introduction
From GP Manager version 7.3, PDF templates are used for printouts in the GP Branch module. The previously used INI print templates are first converted into PDF templates when switching to version 7.3. These templates can then be customised and edited using Adobe Pro, for example.
2. editing with Adobe Pro
The "Forms" tool from Adobe Pro must be used to edit the print template. To display information recorded in the GP Manager on the print page, text fields with defined names must be inserted on the form.
2.1 Text fields
Once a text field has been inserted on the PDF, double-click on the text field to open the properties window for this text field. The most important properties are explained in more detail below
2.1.1 General - Name and tooltip
By inserting text fields with defined names on the PDF, information from the order from the GP shop can be displayed on the printout.
The following information can be displayed on the print page:
- Category: Measurement data / Scans
| Name of the text field | Description of the | Note |
| GRAPHIC_1to1_Links | inserts the image of the Mobildata measurement on the left in original size | The text field must be created appropriately large for this |
| GRAPHIC_1to1_Right | inserts the image of the Mobildata measurement on the right in original size | The text field must be created appropriately large for this |
| GRAPHIC_3DScan | inserts the image from the 3D scan | - |
| GRAPHICS_Balance | inserts the image of the balance measurement | - |
| GRAPHIC_PICTURE1 | inserts the 1st photo from GP shop | - |
| GRAPHIC_PICTURE2 | inserts the 2nd photo from GP shop | - |
| GRAPHIC_PICTURE3 | inserts the 3rd photo from GP shop | - |
| GRAPHIC_PICTURE4 | inserts the 4th photo from GP shop | - |
| GRAPHIC_Photo | Inserts all photos from GP shop | The text field must be large so that all images can be displayed |
| GRAPHICS_DV | inserts the image of the entire MD measurement | - |
| GRAPHIC_Inlay | inserts the image of the selected insert | - |
| GRAPHIC_recipe | inserts the image from the recipe scan | - |
| GRAPHIC_Scan1 | inserts the image from the 2DScan | - |
| GRAPHIC_Scan2 | inserts the image from the second 2D scan | - |
| GRAFIK_Trittscan | inserts the image from the footprint scan | - |
| GRAPHIC_SIGNATURE | inserts the image of the signature | Can be displayed on any number of pages; the name must then be numbered consecutively: GRAFIK_Unterschrift_1, GRAFIK_Unterschrift_2, ... |
| Logo | Inserts the logo stored in the BMP folder | The file name must be inserted under Quickinfo:
[LOGO];FILE=Logo.jpg; Several different logos can also be inserted, the name must then be numbered consecutively and the image file must be specified: LOGO_1, Logo_2, .... |
- Category: Customer and order information
| Name of the text field | Description of the | Note |
| TXT_Date of issue | inserts the date on which the insert should be ready | Can be displayed on any number of pages, the name can be without consecutive numbering can be inserted several times |
| TXT_Drop-off location | Adds the branch from which the deposit is to be collected | Can be displayed on any number of pages, the name can be without consecutive numbering can be inserted several times |
| TXT_CHECK | Order overview, insert selection in text form | It is recommended to select "Multiple lines" under "Options" (see section 2.1.3) |
| TXT_KONTROLLE | All information about the order in text form | It is recommended to select "Multiple lines" under "Options" (see section 2.1.3) |
| TXT_Address | Address text field: Surname, first name, street, house number, country, postcode, town/city | It is recommended to select "Multiple lines" under "Options" (see section 2.1.3) |
| TXT_Order number | inserts the order number | Can be displayed on any number of pages, the name can be without consecutive numbering can be inserted several times |
| TXT_Editor | inserts the employee | Can be displayed on any number of pages, the name can be without consecutive numbering can be inserted several times |
| TXT_Inlay | Inserts the name of the selected insert | - |
| TXT_Total | Inserts the final total | - |
| TXT_Quality mark-up | Adds the economic surcharge | - |
| TXT_Capture date | Inserts the date on which the order was entered | - |
| TXT_Branch | Inserts the branch where the order was accepted | Can be displayed on any number of pages, the name can be without consecutive numbering can be inserted several times |
| TXT_GZ | Adds the statutory co-payment | - |
| TXT_Cash_Out_Till | Inserts how long the KK card is still valid | Can be displayed on any number of pages, the name can be without consecutive numbering can be inserted several times |
| TXT_Cash_Name | Inserts the name of the KK | Can be displayed on any number of pages, the name can be without consecutive numbering can be inserted several times |
| TXT_Cash_Number | Inserts the number of the KK | Can be displayed on any number of pages, the name can be without consecutive numbering can be inserted several times |
| TXT_Cash_Status | Inserts the insured status | Can be displayed on any number of pages, the name can be without consecutive numbering can be inserted several times |
| TXT_Cash_StatusExtension | Inserts additions to the insured status | Can be displayed on any number of pages, the name can be without consecutive numbering can be inserted several times |
| TXT_Kasse_Versichertennummer | Inserts the policyholder number | Can be displayed on any number of pages, the name can be without consecutive numbering can be inserted several times |
| TXT_Cash_Copayment | Inserts whether the patient is exempt from co-payment or not | Can be displayed on any number of pages, the name can be without consecutive numbering can be inserted several times |
| TXT_Cash_Cover_Payment_Till | Inserts how long the co-payment exemption is valid for | Can be displayed on any number of pages, the name can be without consecutive numbering can be inserted several times |
| TXT_Checkout_VKNR | Inserts the VKNR | Can be displayed on any number of pages, the name can be without consecutive numbering can be inserted several times |
| TXT_Kd_Salutation | Inserts the patient's salutation | Can be displayed on any number of pages, the name can be without consecutive numbering can be inserted several times |
| TXT_Kd_Geb | Inserts the patient's date of birth | Can be displayed on any number of pages, the name can be without consecutive numbering can be inserted several times |
| TXT_Kd_Weight | Inserts the weight of the patient | Can be displayed on any number of pages, the name can be without consecutive numbering can be inserted several times |
| TXT_Kd_size | Inserts the patient's height | Can be displayed on any number of pages, the name can be without consecutive numbering can be inserted several times |
| TXT_Kd_Remark | Inserts the comments from the patient form | Can be displayed on any number of pages, the name can be without consecutive numbering can be inserted several times |
|
TXT_KD_Kdnr
TXT_Kd_Exide |
Inserts the patient's customer number
Inserts the customer number of the patient's industry software |
Can be displayed on any number of pages, the name can be without consecutive numbering can be inserted several times
Can be displayed on any number of pages, the name can be without consecutive numbering can be inserted several times
|
| TXT_Kd_Name | Inserts the patient's surname | Can be displayed on any number of pages, the name can be without consecutive numbering can be inserted several times |
| TXT_Kd_Title | Inserts the title of the patient | Can be displayed on any number of pages, the name can be without consecutive numbering can be inserted several times |
| TXT_Kd_first_name | Inserts the patient's first name | Can be displayed on any number of pages, the name can be without consecutive numbering can be inserted several times |
| TXT_delivery address | Inserts the delivery address | It is recommended to select "Multiple lines" under "Options" (see section 2.1.3) |
| TXT_Note | Inserts the note | Can be displayed on any number of pages, the name can be without consecutive numbering can be inserted several times |
| TXT_shoe width | Inserts the selected shoe width | - |
| TXT_shoe_size | Inserts the selected shoe size | - |
| TXT_Shoe type | Inserts the selected shoe type | - |
| TXT_Classic_Date | Inserts the current date at the time the printout was created | Can be displayed on any number of pages, the name can be without consecutive numbering can be inserted several times |
| TXT_Address_Strasse | Inserts the street from the patient form | Can be displayed on any number of pages, the name can be without consecutive numbering can be inserted several times |
| TXT_address_house_number | Inserts the house number from the patient form | Can be displayed on any number of pages, the name can be without consecutive numbering can be inserted several times |
| TXT_Address_Country | Inserts the specified country from the patient form | Can be displayed on any number of pages, the name can be without consecutive numbering can be inserted several times |
| TXT_Address_PLZ | Inserts the postcode from the patient form | Can be displayed on any number of pages, the name can be without consecutive numbering can be inserted several times |
| TXT_Address_City | Inserts the specified location from the patient form | Can be displayed on any number of pages, the name can be without consecutive numbering can be inserted several times |
| TXT_address_telephone | Inserts the telephone number from the patient form | Can be displayed on any number of pages, the name can be without consecutive numbering can be inserted several times |
| TXT_Address_Mail | Inserts the e-mail address from the patient form | Can be displayed on any number of pages, the name can be without consecutive numbering can be inserted several times |
| TXT_Address_Mobile | Inserts the mobile phone number from the patient form | Can be displayed on any number of pages, the name can be without consecutive numbering can be inserted several times |
| TXT_Ordinator | Inserts the prescriber | Can be displayed on any number of pages, the name can be without consecutive numbering can be inserted several times |
- Barcodes
| Name of the text field | Description of the | Note |
| BARCODE_Article | Displays the article numbers of the selected insert and the add-ons as a barcode | The following must be entered under Quickinfo:
[BARCODE];SUB=BARCODE_TYPE;EAN=EAN-128 |
| BARCODE_Article_PG08 | Represents the PG08 numbers of the selected insert and the additives | The following must be entered under Quickinfo:
[BARCODE];SUB=BARCODE_PG08;EAN=EAN-128 |
| BARCODE_Order number | Displays the order number as a barcode | The following must be entered under Quickinfo: [BARCODE];SUB=ORDER NUMBER;EAN=EAN-128
The order number can be displayed on several pages, but the name must be numbered consecutively and the tooltip must be included: BARCODE_Order_number_1, BARCODE_Order_number_2, ... |
| BARCODE_Inlay_PG08 | Displays the PG08 number of the selected insert as a barcode | - |
| BARCODE_Kdnr | Displays the customer number as a barcode | The following must be entered under Quickinfo: [BARCODE];SUB=CUSTOMER NUMBER;EAN=EAN-128
The customer number can be displayed on several pages, but the name must be numbered consecutively and the tooltip entered: BARCODE_Kdnr_1, BARCODE_Kdnr_2,.... |
2.1.2 Appearance
Double-click on the text field to open the text field properties window. The font and font size can be adjusted under "Appearance". Font size "Auto" means that the size of the inserted text is automatically adjusted to the size of the text field.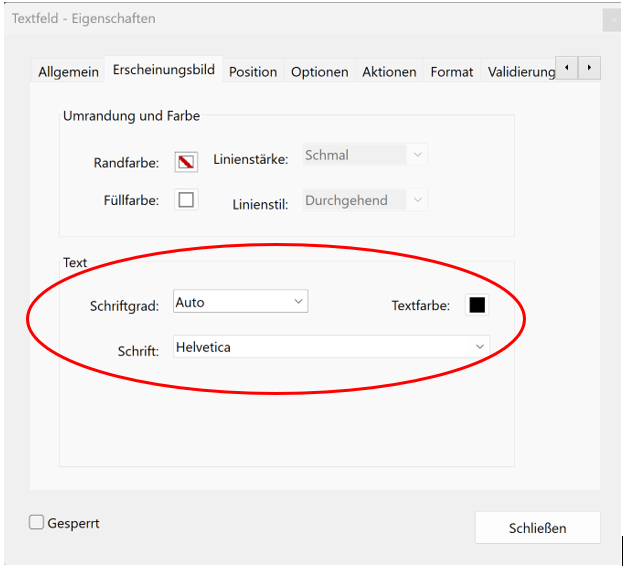
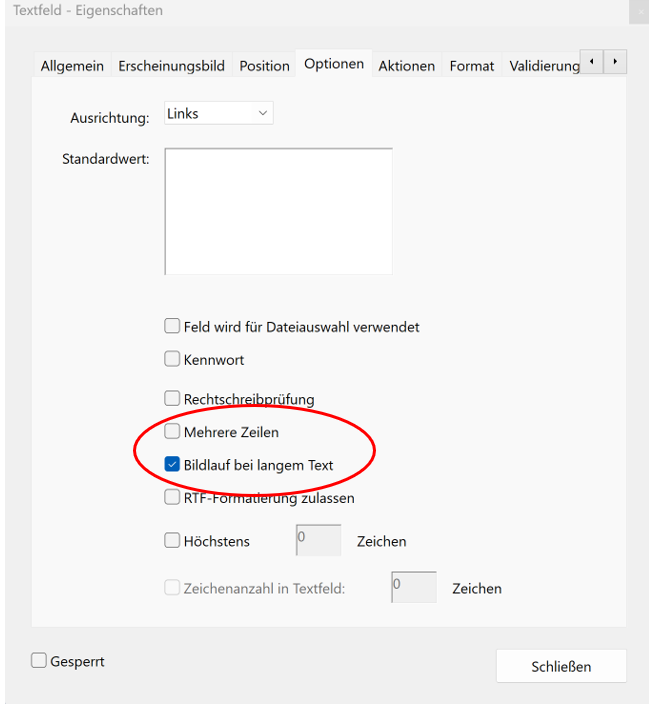
2.1.3 Options
Double-click on the text field to open the text field properties window. Under "Options", you can also select whether the inserted text should be inserted over several lines. This is particularly recommended for text fields where several pieces of information are inserted, e.g. TXT_KONTROLLE.
2.2 Tables
The following tables can be inserted on the printed page in the form of text fields:
| Name of the text field | Description of the | Note |
| TABLE_AB | Displays all selected items of the order with quantity, article number, article description, price and cash register share | The text field must be large so that all information can be displayed |
| TABLE_AB_PRIVATE | Displays all selected items of the order with quantity, article number, article description and price | The text field must be large so that all information can be displayed |
| TABLE_Material | If material has been selected, the material thickness in the toe, ball and heel areas can be displayed here | The text field must be large so that all information can be displayed |
| TABLE_Invoice | Shows the individual price components, such as the total price of the inserts, health insurance portion, economic surcharge, statutory co-payment and the final total | The text field must be large so that all information can be displayed |
| TABLE_Control | Tabular overview of the selected items; the mm specification and the side are also displayed for the accessories and covers | The text field must be large so that all information can be displayed |
In addition to the text fields, INI files are automatically created for the tables in the .\GPM_V7\GPSystem\PDF folder. The appearance and font of the table can be changed in these files:
[Table]
Name = TABELLE_AB // Name of the table
Size = 1/6 // Number of columns
Begrenz_Auf_Feld = yes // the text is only displayed in the designated text field, if "No" is selected, the text continues to be written outside the field
USE_RahmenFeld = yes // the individual fields are framed
Use_RahmenTabelle = yes // the table is given a frame
Use_Grid =no // Table grid is displayed
Use_Title_line = yes // the table contains a title line
Titelzeile_AufJederSeite = yes // Title line should be repeated on every page
Alignment = LEFT TOP // Alignment of the table within the text field
[Line] // Section for defining the layout of the individual lines of text
Line_height_MM = 5
RGB_Background = 255 255 255
RGB_Background_Even = 255 255 255 255
RGB_Text = 0 0 0
RGB_Text_Even = 0 0 0 0
Property = REGULAR
Alignment = HCENTER VCENTER
Font = Helvetica
Font_Height_MM = 3
[Title bar] // Section for defining the design of the title bar
RGB_Background = 255 255 255
RGB_Text = 0 0 0
Property = BOLD
Alignment = HCENTER VCENTER
2.3 Checkboxes
The following checkboxes can be transferred from GP Store to the print page:
| Name of the text field | Description of the | Note |
| CHECK_Complaints | Checkbox for other complaints of the patient | - |
| CHECK_Diabetes | Checkbox for diabetes of the patient | - |
| CHECK_rush | Checkbox for urgent order | - |
| CHECK_First aid | Checkbox for initial treatment | - |
| CHECK_Delivery | Checkbox for different delivery address | - |
| CHECK_Neuropathy | Checkbox for neuropathy of the patient | - |
| CHECK_Post | Delivery of insoles by post | - |
| CHECK_Rheumatism | Checkbox for rheumatic complaints of the patient | - |
| CHECK_SchuhZentrale | Delivery of shoes to the centre | - |
To insert the checkboxes, the tick boxes / checkboxes must also be selected in Adobe Pro and the corresponding name inserted. If the corresponding checkbox has been ticked in the order, it will also be used on the printout. It is advisable to insert a description of the checkbox in the form of text.
2.4 Text in Adobe Pro
By converting INI files to PDF templates, the inserted texts are also transferred as text fields. However, when editing these texts, it is recommended to delete the text fields and insert the desired text directly in Adobe Pro as text.
3. print pages in the GP Manager
The print pages and the INI files for the tables are inserted in the following folder: .\GPM_V7\GPSystem\PDF
The reference to the respective print file is made in the individual workstation in GP_TP_Filiale.ini:
[Print]
FILE_1 = Print_page_1 // Clear name of print page 1
FILE_2 = Print page_2 // Clear name of print page 2
....
B_Zeige_DRUCKVORSCHAU = yes
T_Currency = €
D_Postage = 5.95
B_Use_PGNumberExpression = yes
I_AnzExemplare = 1
B_Drucke_Patientenerklaerung = yes
B_PDF_Save = yes
B_Check_Print = yes // only allow after printing (for unordered orders)