Manual - GP print page editor
1.1.Start
To start the GP print page editor module, please click on the corresponding tile on the start page
The print page editor offers the option of customising standard print pages and saving drafts.
Note:
The print page editor also offers the option of changing the standard print. This should be done very carefully.
If necessary, back up the .\GpSystem\Print folder in the GP Manager installation directory. If something does not work, you can then restore the folder.
1.2.Overview
The following sections give you an overview of the functions of the GP print page editor.
1.2.1.View
The view corresponds to the print view, so that everything that can be seen on the print layout is also printed out accordingly.
To be able to create or edit a new print layout with the GP print page editor, it is important to be able to place the elements as precisely as possible on the template. The following settings help here: Zoom, grid, paper format, alignment.
1.2.1.2.Grid
The elements are placed by aligning them to a grid. The elements are automatically aligned to the horizontal and vertical lines displayed. The smaller the distance selected via the 'Grid' option, the more precisely elements can be placed. The default value is 5 mm. If a very small grid is selected, it is advisable to zoom the view.
1.2.1.3.Format
Various settings can be changed using the Format button. Click on 'Printer...' to select the printer for the selected print page. If the default printer is to be selected, the line is left blank. If the specified printer is not found when the print job is sent, the GP Manager prints on the default printer.
The four numbers describe the page margins in mm, as shown in the overview. The format can be A4 or A3. If User is selected, the GP Manager receives the page setting from the printer (e.g. for a label printer). Landscape can also be selected as the format.
1.2.2.1.Create/save template
When the print page editor is opened, page '1_blank' is loaded. If the editor is used several times in a session, the last page opened opens.
The editor is primarily intended for editing existing pages.
When a new template is created, it is not automatically available in the print page selection.
To create a new page, a name for the template must be entered after clicking on 'New...'. When it is then saved, a new print file is created according to the name, which can be called up again at any time via Templates.
The view remains saved for the entire GP Manager session. If the Save button is not pressed, the changes will be lost when the GP Manager is restarted.
1.2.3.Modules
Individual elements can be placed on the print page using the various modules. The modules correspond to the individual measurement and analysis modules of the GP Manager and are inserted using drag and drop. By holding down the left mouse button, the created window is moved and can be resized at the edge. To do this, click on a highlighted point of the rectangle and drag it larger or smaller with the mouse.
Double-click in the window to activate the module.
Further information: BarCode, Rich Text, Logo, Classic
1.2.3.2.Type
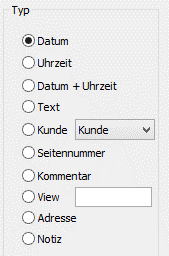
The type offers an extensive selection of individual or general data. The transfer to the document takes place after confirmation with OK.
Further information: Date, time, date+time, text, customer, page number, comment, view, address, note
date:
The current date is inserted.
Time:
The current time is inserted
Date+Time:
The current date and time are inserted.
Text:
A customised text can be inserted. The text is entered at the bottom of the Classic module.
Customer:
All customer-related data can be selected under Customer. Please note that only the surname, first name, date of birth and customer number are always available. All other data can be optionally entered and then integrated, but the fields remain empty if no data is available.
Page number:
The page number changes automatically depending on the number of pages and should be used with the 'Show on every page' function.
Comment:
An individual comment can be entered. In contrast to the Text field, this is queried before printing and is not formatted.
View:
If a subtype is entered, the image of a currently open measurement can be printed out.
following Subtypes can be entered:
| DRUCK_ANAMNESE | DRUCK_BEFUND | PRINT_ANSWERS |
| PRINT_ANALYSIS | Print_ANAM_PODOPOSITION | DRUCK_STANDARD |
| PRINT_PHARMACY_ORDER | QUESTIONS_ANALYSIS | |
| QUESTIONS_ANSWERS_2 | QUESTIONS_ANSWERS_1 | BIKE_REPORT |
| BIKE_ONE_ONE | BIKE_TOTAL | BIKE_INFOS |
| BIKE_INFO_RIDER | BIKE_INFO_MEASUREMENT_SERIES | BIKE_INFO_MEASUREMENT |
| DV_EINSZUEINS | DV_TOTAL | DV_LEGENDE |
| DV_TRITTSPUR | DV_FLEXDATA_BMP | DV_FLEXDATA_CURVES |
| BALANCE_LEGEND | BALANCE_ONE_TO_ONE | FLEXDATA_LEGEND |
| CADF_INFO | FRAESE_EINLAGE | FRAESE_MULTI |
| FUSSMESS_Parameter | BALANCE_OneToOne | PODO_TABLE |
| PODO_RUECKEN_2D | PODO_RUECKEN_3D | PODO_RUECKEN_ISO |
| PODO_PODOSCOP | PODO_BEINE | PODO_PAGE |
| DV_ONE_LINK | DV_ONE_RIGHT | |
| PRAXIS_AB | PRAXIS_EINLAGE_TXT | PRACTICE_INSERT_BMP |
| PRACTICE_CONTROL | PRAXIS_SCAN | PRAXIS_DV |
| PRACTICE_RECOMMENDATION | PRACTICE_PHOTO | PRAXIS_DV_TRITTSPUR |
| PRACTICE_DV_INDIVIDUAL_LINKS | PRACTICE_DV_INDIVIDUAL_RIGHT | PRACTICE_BALANCE |
| PRACTICE_MATERIAL_STRENGTH | PRACTICE_ENTRY_DATE | PRAXIS_ABKONTROLLE |
| PRACTICE_FILIALE | PRACTICE_PROCESSOR | PRACTICE_COLLECTION_LOCATION |
| PRACTICE_ABHOLDATUM | PRACTICE_SHOE_SIZE | PRAXIS_NOTIZ |
| PRACTICE_SIGNATURE PRACTICE_TOTAL
Checkout_Name Checkout_VKNR |
PRAXIS_GESETZLICHE_ZUZAHLUNGKasse_Nummer
Checkout_Cash_Out PRACTICE_SHOE_MODEL |
Fund_insured_numberFund_status
Checkout_StatusExtension |
Address:
Inserts the customer's address if entered.
Note:
Inserts saved notes on the customer in the field.
1.2.3.3.Legend
Selection between content and legend.
1.2.3.4.Position
The text can be aligned left or right or centred using the 'Position' function.
1.2.3.5.Format
The Format area offers a display in a line or in a block. After selecting, you should check whether the entire text is displayed.
Further information: Line+Block, Font, Colour, Height MM, Underline, Bold, Italic
Line+Block:
The alignment in the text field can be changed here. With Line, the text is written in a line. With Block, a new line can be inserted using the Enter key.
Font:
The font can be changed after clicking on 'Font'. You can select the font, the font style and the font size.
Colour:
The colour setting of the text can be adjusted by double-clicking on the default black field next to Font. Please note that only standard colours should be selected.
Height MM:
The font size can be changed quickly by entering a numerical value.
Underlined, bold, italics:
The font style can also be changed quickly using the F (bold), U (underlined) and K (italic) checkboxes.
1.2.3.6.Frame
Activates or deactivates a frame around the active text field.
1.2.3.7.Show on every page
Shows the active field on each page, in the same position
1.2.3.8.Date stamp
Reads out the date of the measurement currently called up.
1.2.3.9.Logo
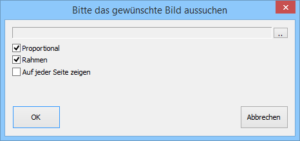
The logo module can be used to insert images into the printout. After double-clicking, the source is determined via the two dots on the right-hand side. The logo should be in JPG file format.
Further information: Proportional, Frame, Show on every page
ProportionalChecking this box ensures that the proportions of the image are correct. If the box is not ticked, the image may be distorted when the size of the field is changed.
Frame:
Activates or deactivates a frame around the active text field.
Show on every page: Shows the active field in the same position on every page.
1.2.3.10.Rich Text
The Rich Text module makes it possible to combine a text with an image. The text is read in from a text file so that, once created, it can be used again and again. It is important to ensure that the file is created in .rtf (Rich Text Format) (e.g. with Word, Wordpad or Works). To do this, the file type must be changed to .rtf when saving the file. The file must be saved in the GpSystem\BIB_Texte folder in the root folder so that it can be found by the GP Manager. Corresponding changes to the format are adopted.
Note:
If you make changes to the texts, first save the .\GpSystem\BIB_Texts folder from the GP Manager installation directory.
Step 1
To add an image to the corresponding text, the image file must have the same name as the text file. The format should be *.bmp. However, other formats are also supported.
Step 2
Example: Filename.rtf and Filename.bmp appear in the GP Manager as the file name in the selection. The image can be positioned to the right or left of the text.
Step 3
1.2.3.11.BarCode
A barcode can be integrated into the printout using the BarCode module.
The customer number is used as the default.
To display an order number in the printout, the following must be changed:
Open print page in DRUCK folder > GPM_V7\GPSystem\DRUCK
(usually the one with the latest update)
This is what the section for the customer number barcode looks like:
T_TYPE = BARCODE
T_Barcode_Type = EAN-128
T_SubType = CUSTOMER NUMBER barcode
This is what the section for the order number barcode looks like:
T_TYPE = BARCODE
T_Barcode_Type = EAN-128
T_SubType = ORDER NUMBER


