1. introduction
1.1 Installation
GP OptiCAD is part of the GP Manager and must be activated by a GeBioM employee. If you have purchased GP OptiCAD with the GP Manager, the module should already be activated.
If you have just purchased GP OptiCAD, the module can be activated subsequently in a support session; the computer requires an Internet connection for this.
1.2 System requirements
Every modern computer with a 3D graphics card has sufficient computing power to work with GP OptiCAD. As GP OptiCAD is part of the GP Manager, the system requirements are based on this. The following operating systems are supported:
- Windows 7 (64 bit)
- Windows 8 (64 bit)
- Windows 10 (64 bit)
1.3 What is GP OptiCAD?
GP OptiCAD (CAD = Computer Aided Design) is used to model mouldings and is part of the GP CAD module.
The GP CAD module consists of the GP OptiCAD module and the modules:
- GP InsoleCAD: The module enables the modelling of insoles.
- GP CAD+: Allows modelling of the underside of inserts.
The workstation at which you use GP OptiCAD is independent of where your measurement data is collected or where your milling machine or 3D printer is located. The required measurement data can be transferred to the GP OptiCAD computer via a network if required.
You can incorporate information about your customer's foot into the design using various measurement methods (3D and 2D scanning methods).
After construction, the finished lasts or trial shoes can be transferred to the milling machine or 3D printer, to another computer or to an external partner.
Five points are decisive for optimally designed mouldings:
- The measurement and its interpretation (3D scan, 2D scan)
- The moulding library and its adaptation to your wishes/handwriting
- The software, its editing options and usability
- Your ability to apply and implement positions 1-3
- The milling machine and its accuracy or the 3D printer and its accuracy
All elements have the same high priority.
2. overview
The following section describes the basic organisation of GP OptiCAD. To start GP OptiCAD, you must first select a customer after starting the GP Manager.
To do this, click on  to search for the desired customer in the search field or create a new customer.
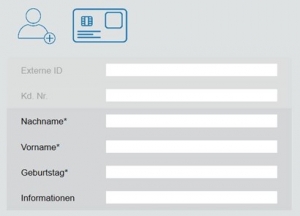
To do this, click on the customer symbol with the small (+) and fill in at least the fields marked with an asterisk. Click on the back arrow 
the customer is created for you and displayed in the GP Manager start menu.
You can then access the GP CAD module via the GP Cad symbol.

2.1 The GP CAD module

The user interface of the CAD module consists of the menu bar (1), the workspace (2) and the toolbar (3).
![]()
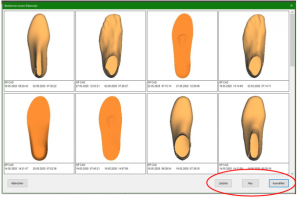
The menu bar displays the customer that is currently selected and being edited (1). The arrow (2) takes you back to the start page. The "Archive" button (3) can be used to load previous designs (by clicking on the [Select] button) and delete them (by clicking on the [Delete] button) or start a new project (by clicking on the [New] button).
The GP CAD module itself is divided into the workspace, where the 3D model to be modelled is displayed, and a toolbar on the right-hand side of the screen. The range of functions differs depending on which CAD modules you have purchased. You can see the activated modules in the function box (bars, insert, CAD+); if one of the buttons is not active, the module is deactivated. This is always the case if you have not purchased the module or if you do not need these CAD functions at the workstation.
2.2 Work surfaces

In the workspace, mouldings from the library or your own designed mouldings are displayed and edited.
Click on the "Page" button in the function box to change the bar to be edited (right/left).

2.3 Toolbar
The toolbar is located on the right-hand side of the screen and contains all the functions you need to edit the strips.

2.3.1 Function box
The various views and different display options can be selected using the function box.
![]()
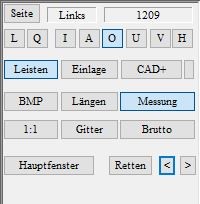
With [L] [Q] you can view both bars side by side or on top of each other in landscape and portrait format. Press [I]- Inside, [A]- Outside, [O]- Top, [U]- Bottom, [V]- Front, [H]- Rear to switch views.
Click on the [Mouldings] button to activate or deactivate GP OptiCAD Click on the [Insert] button to activate or deactivate InsoleCAD. Click on the [CAD+] button to activate the CAD+ module, where you can create a gross moulding in GP OptiCAD.
If you have selected a measurement as the basis for the moulding, you can display the corresponding plantar image by clicking on [BMP]. Click on the [Lengths] button to display the dimensions of the moulding (length and width). With CTRL on the [Measurement] button you can select a measurement and with a single click on this button you can activate or deactivate the measurements. With a calibrated screen, you can display the moulding in its original size (scale 1:1) by clicking on the [1:1] button. Click on the [Grid] button to display the bar as a grid structure. Hold down the CTRL key and click on this button to place this structure on the moulding.
With GP CAD+ activated, you can create a gross bar by clicking on the [Gross] button and then holding down the CTRL key and clicking on the [<<Library] button.
Individual work steps can also be saved using [Save]. The [Main window] button always takes you back to the standard view of the toolbox.
2.3.2 Toolbox
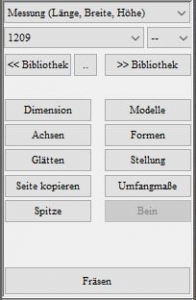
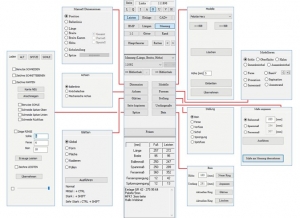
The toolbox is the area between the function box and the dimensions box. Depending on the selected workspace ("Dimensions", "Shapes", "Axes", "Models", etc.), various operating elements are displayed in this area. By clicking on the [Main window] button in the function box, you can switch back to the standard workspace at any time.
2.3.2.2 Tools
You can switch between different workspaces in the toolbox. If you change the workspace, the selection of tools available in the main window area changes. You can return to the standard workspace at any time by clicking on the [Main window] button in the function box.
2.3.2.3 Milling and 3D printing
Once you have completed the design, the finished lasts can be transferred to the GP last printing module by clicking on the [3D printing] button. Here you can send the order to the 3D printer and print a trial shoe or last.
Click on the [Milling] button to send a milling order.
2.3.2.1 Library
The top menus in the toolbox are for using the moulding library. You can load mouldings in different sizes from your libraries and save your own mouldings in your library.
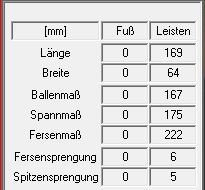
2.3.3 Dimension box
2.3.4 Notes
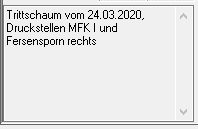
The notes that you have written in the currently selected measurement (in the GP foot measurement module) are displayed in the notes field.
3 GP OptiCAD in detail
Now that you have an overview of the structure of the GP CAD module, the functions of GP OptiCAD are described in detail in the following sections.
3.1 Creating new mouldings
If you have already created a moulding and want to design another one for the customer, click on the ![]() -symbol. The following window then opens:
-symbol. The following window then opens:
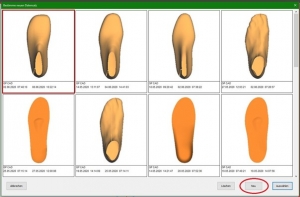
Now click on the [New] button at the bottom right to create a new design. If you want to continue working on an old design, you can simply double-click or single-click here and then click on the [Select] button to call it up again. You can enter additional information for each design by double-clicking in the text field.
3.2 Functions of the work surface
The moulding is displayed as a three-dimensional object on the workspace. The display on the workspace can be customised using the buttons in the "Function box".
To edit a moulding, make sure that the [Mouldings] button is activated in the function box. If the button is activated, you are in the GP OptiCAD module. If you have already selected a moulding, this moulding will be displayed on the workspace.
If you move the mouse cursor over the workspace, you will always see the current position in relation to the origin of the coordinate system at the bottom left. In GP OptiCAD, the origin is always the point at which the bale line intersects the foot axis.
Note: If the [Bars] button remains greyed out after clicking on it, the module is not activated. In this case, please contact GeBioM mbH Support.
Attention: If operation via keyboard shortcuts does not work, the GP Manager window is not active. Click once in the window to activate it.
3.2.1 Moving the moulding
The moulding can be moved on the work surface using the mouse or keyboard.
| Key combination | Mouse movement/button | Direction |
| Ctrl + left mouse button | forwards/backwards
left/right
|
Moving on the Y-axis Moving on the X-axis
|
| Ctrl + arrow key | top/bottom left/right |
Moving on the Y-axis Moving on the X-axis |
3.2.2 Rotating the moulding
To view the moulding from any perspective, you can rotate the moulding with the mouse or the arrow keys.
You can rotate the model using the following key combinations:
| Key combination | Mouse movement/button | Rotation |
| Shift + left mouse button | forwards/backwards
left/right |
Rotate around the X-axis
Rotate around the Y-axis
|
| CTRL + Shift + left mouse button | left/right
|
Rotate around the Z-axis
|
| Shift + arrow keys | top/bottom
left/right |
Rotate around the X-axis
Rotate around the Y-axis
|
| CTRL + Shift + arrow keys | left/right | Rotate around the Z-axis |
3.2.3 Zoom
The moulding can be zoomed in to view details of the model.
| Key combination | Mouse movement/button | Zoom |
| Mouse scroll wheel | before
back |
Zoom in
Zoom out
|
| < button | < | Zoom out
|
| Shift + < key | > | Zoom in
|
Note: When zooming with the mouse wheel, the perspective changes as the area under the mouse cursor is zoomed.
Attention: If zooming in with the mouse scroll wheel does not work, make sure that the window is activated. Click once on the workspace with the left mouse button. If the window is activated, make sure that the 1:1 view is not activated.
3.2.4 Measuring
In OptiCAD you have the option of measuring distances or dimensions. To do this, you must be in a standard view. Move the mouse to the starting point from which you want to measure. Press the right mouse button and hold it down while moving the mouse.
The information on the measuring section is displayed in the bottom left-hand corner of the workspace.
- Current cursor position (relative to the origin of the coordinate system)
- Current cursor position (relative to the starting point of the measurement)
- Absolute length of the measured distance (in mm)
Note: If you want the most accurate measurement possible, zoom in as close as possible to the area to be measured. The smaller the bar is displayed, the greater your measurement error.
3.3 Function box in detail
Most of the buttons in the function box affect the display of the bar on the workspace. Some of the buttons can be activated by clicking on the button. These buttons are highlighted in colour when activated.
Clicking on the button again deactivates it. For example, the currently selected measurement can be shown or hidden by clicking on [Measurement].

3.3.1 Page
You can use the [Page] button to change the currently selected page (left/right). If a view of the workspace is selected in which the workspace is split, the currently selected page is outlined in red.
![]()
The currently active page and the moulding model from the library are displayed to the right of the button (if a library moulding has been loaded).
3.3.2 Views
The workspace offers three different views for displaying the moulding (display of the current mouldings, both mouldings next to each other, both mouldings on top of each other).
The "L" (lengthwise) and "Q" (crosswise) buttons divide the work surface into two halves so that you can see the mouldings for both sides at the same time.
If one of the two buttons is highlighted, click on it again to display only the currently selected bar.
![]()
3.3.3 Standard views
The following views are available as standard views.
![]()
- I: Inside
- A: Exterior
- O: Top
- U: Bottom
- V: Front
- H: Rear
By clicking on one of these buttons, you can always display the moulding in one of these views. If you position a bar manually on the workspace (rotate), you may leave the standard view. In this case, the button is also deactivated again.
Attention: If you want to measure the lengths, a standard view must be activated (I, A, O, U, V or H). If you want to display the current lengths, you must be in one of the views I, A, O or U.
3.3.4 Mouldings
If you select the [Mouldings] button, this has several effects. Deactivating the button hides the 3D model of the moulding. At the same time, you exit the GP OptiCAD module so that all functions of this module are deactivated.
All functions for selecting and editing strips are no longer available. You will not be able to use these functions until you reactivate the button.
3.3.5 BMP
The "BMP" button is used to project the images of the foot taken from GP TrittScan, GP DvScan, GP FussScan, GP LaserScan or GP KinectScan onto the moulding. In order for an image to be displayed, a measurement must first be selected with Ctrl + left-click on "Measurement" and a strip loaded from the library.
3.3.6 Lengths
The "Lengths" button is used to switch the dimensioning of the moulding on or off. The following dimensions (in mm) are displayed for the dimensioning:
Overall length, forefoot length, rearfoot length, forefoot width, rearfoot width, toe allowance, toe lift and heel lift
Note: Please note that the lengths are only displayed in the standard views I, A, O or U. The height is only displayed in views I and A, the forefoot and back foot width only in views O and U.
3.3.7 Measurement
Ctrl + left-click on [Measurement] to display all measurements for the selected customer. A measurement can be selected to serve as the basis for the design.
Shift + left-click on [Measurement] to display the blue measurement line above the bars.
Simply click (left-click) on the [Measurement] button to activate/deactivate it. If it is activated, the contour line, the bale line and the foot axis are displayed in blue. For this to work, the lines must first be set correctly in the measurement module (GP TrittScan, GP DvScan, GP FussScan, GP LaserScan or GP KinectScan).
Note: If the contour line is missing or the bale line/foot axis is not set correctly, open the measurement in the measurement module again and set the lines.
3.3.8 1:1 representation
If you press the "1:1" button, the bar is displayed 1:1. The prerequisite for this is correct screen calibration.
Attention: As long as the 1:1 display is active, you can no longer zoom in or out on the bars. To be able to do this again, you must first deactivate the 1:1 function.
Excursus on screen calibration:
To calibrate the screen, go back to the GP Manager start page and select the module  and there the button
  .
.
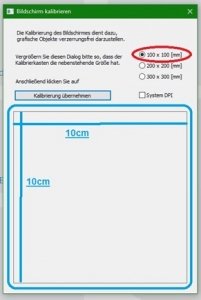
A window will now open in which you must select whether you want to align the square shown there to 10x10cm, 20x20cm or 30x30cm. Once you have decided on a size, drag the window in length and width so that the square (circled in blue) has these dimensions. Use a ruler, tape measure or folding rule held up to the screen. When the dimensions match, click on the [Apply calibration] button.
3.3.9 Grid
The [Grid] button displays the moulding as a grid. This provides a better impression of the 3D structure of the moulding.
CTRL + left-click on [Grid] to place the grid structure on the mouldings.
3.3.10 Gross
You can use the [Gross] button to display a gross list that has already been created.
3.3.11 Main window
The [Main window] button takes you back to the standard work area of the toolbox. All selected tools are automatically closed.
3.3.12 Rescue
You can save your current strip at any time using the [Save] button. You can use the [] buttons to switch between saved work steps.
Note: As GP OptiCAD does not save automatically, it is advisable to create a backup with [Save] before or after each major work step. In general, you should get into the habit of using [Save] frequently.
Note: 50 memory steps are stored in the buffer. The 51st storage step overwrites the 1st step!
3.4 The toolbox in detail
Most of the GP OptiCAD functions are located in the toolbox.

3.4.1 Library management
The drop-down menus at the top of the toolbox can be used to load mouldings directly from the library.

3.4.1.1 Calculating mouldings
The top drop-down menu provides a selection of how the moulding is adapted to the selected measurement. GP OptiCAD offers several options for how this is calculated. By default, the two options Measurement (length, width, height) and Original size are activated. These two methods are sufficient for most cases. The other methods can also be activated on request.
Measurement (length, width, height)
- The moulding is adapted to the measurement in width and length.
Original size
- The model of the moulding is loaded from the library in the size in which it was saved there.
- Subsequently changes the size of the last and all styles (length/width) without changing the height, i.e. if this option is not activated, changing the shoe size also grades the styles.
Note: The options available in the drop-down menu depend on the settings of the GP Manager installation. The following additional options are possible and can be activated on request.
3.4.1.2 Selecting a moulding
You can use the drop-down menu on the left to select a bar directly. The function corresponds to the [<< Library] button, but the selection via this drop-down menu is often faster than the selection from the graphical display.
Note: You can also click on the drop-down menu and then scroll through the moulding library using the scroll wheel. The mouldings are loaded directly and you get an impression of the shape of the mouldings.
3.4.1.3 Selecting the shoe size
You can select the shoe size in the drop-down menu on the right.
Note: You can also click on the drop-down menu and then select the size using the scroll wheel. The moulding is recalculated directly so that you get an impression of the size ratio of the moulding and the measurement.
3.4.1.4 <<Library
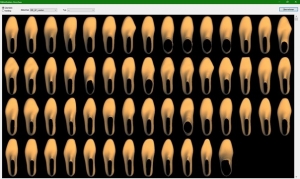
This button takes you to the model catalogue. Here you can display a preview of the mouldings and load a moulding.

View - Catalogue
View - Overview
Library
- Select the library in which you have saved the strips you are looking for.
Note: To scroll through the bar libraries, please only use the buttons above and below the scroll bar.
Once you have found the moulding you are looking for, mark it by clicking on it so that it is outlined in red. Then click on "Apply". Alternatively, double-click to load the moulding immediately and close the dialogue box. If you do not want to load any strips, close the dialogue window.
3.4.1.5 Library>> (Add strips to a library)
You can organise strips in libraries. With every installation, you will find a selection of ready-made strips in the BIB_GP_Leisten library. You can use these strips as a basis for your own strips. To expand your own libraries and your portfolio of strips, you can save them. Of course, you can also create your own mouldings from scratch. E.g. with a scanned plaster.
Select [Library >>] to access the "Add services to the library" dialogue.

Library
Under Library, you can select the library in which you want to save the strips.
Note: Supplied mouldings cannot be changed. If you want to change a moulding and save it again, you must transfer this moulding to a customer library. To do this, load the moulding, make any necessary adjustments to the moulding and select "Library >>". Select a customer library and then save the moulding as described below.
Library -> ...
You can use the button on the right ("..") to rename libraries and create new libraries. You can also include and deactivate libraries.

Models
You have the option of overwriting an existing model with the current moulding. In this case, select the name of the model here. If you want to create a new moulding, select "- New model -"
File name
The file name is derived from the model name. Nothing can be entered here. If you have selected an existing moulding, the file name under which the moulding can be found in the library folder is displayed here.
Name
Give the moulding a name. The moulding appears under this name in the model catalogue.
Attention: Do not use any special characters for the name. A file with the name of the moulding is created. If the name contains special characters, the file cannot be created. Only use letters, numbers, spaces, hyphens and underscores.
Table
Enter a grading table for the moulding. This is used by the GP Manager to calculate the dimensions of the moulding.
Table -> ...
With the button on the right ("..") you can enter the dimensions for the moulding manually or import an existing grading table. Please note that the numbers are written according to the English notation. A full stop is used here instead of a comma.
(Using the number pi as an example, 3.14 becomes 3.14 in the English notation).
The measurements are given in the table in the following order: "Shoe size = length width height" (in mm).
Group
In addition to libraries, strips can be organised in groups. You can select an existing group from the drop-down menu. In the model catalogue, you can display the strips according to these groups.
Note: In the model catalogue, the groups are called "Type".
Group -> ...
You can edit your groups using the button to the right of Group (".."). This makes it easier for you to find strips in your libraries.
Note: If you have created a new group, it will only be displayed in the "Add services to the library" dialogue after you have closed it once and opened it again.
If you assign a number twice, it can happen that strips are assigned to a group that already exists. You should therefore avoid assigning a number twice by mistake.
Info
The text entered here appears in the model catalogue under the respective strip.
Place the model as high up as possible
Select this option so that the moulding is placed at the top of the selection menu. You should select this for frequently used bars. This allows you to quickly find the bars in the main window.
Note: If you want to arrange existing mouldings at the top, open the mouldings and select this option.
Insert model into library
This button is used to add the moulding to the library.
Apply changes
This option writes the changes to the loaded strips. This means that the bar currently displayed on the workspace is saved with the changes. If you only want to rename existing bars, you must ensure that the bar you want to rename has been loaded from the library beforehand.
![]()
Delete
The moulding selected under Models is deleted from the library.
![]()
Back
You return to the GP OptiCAD module without making any changes to the library.
![]()
3.4.2 Creating a moulding from a measurement
The [...] button is located between the two library buttons. Here you select which measurement is to be used to construct a moulding. Either you have created a measurement with the GPM or you are using an external STL file - to do this, click on the 2 dots between the libraries:

A selection window will now open:
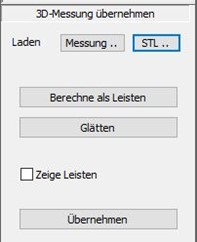
If you now click on the [Measurement...] button, you can select the desired measurement. This is then displayed in the following setting. Use the top and rightmost slider to set the cutting edge of the last on the leg and toe. The centre slider influences the resolution of the heel. The slider should be positioned close to the instep so that the heel is displayed in the best possible way.
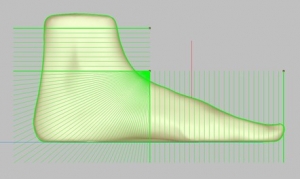
Then click on [Calculate mouldings]. If no mouldings are displayed, please tick the "Show mouldings" box. If required, you can now smooth the moulding again by clicking on the [Smooth] button. Click on the [Apply] button to create a moulding from the measurement.
Note: Please use the "Smooth" function with caution. If you click several times, the bar will become smaller and smaller!
If you want to load an STL, please click on the [STL...] button and then carry out the same steps.
4. moulding design with GP OptiCAD
4.1 From the measurement from GP FussMess to the customised library strips
1. open GP FussMess module & start measurement
On the start page of the GP Manager, click on the icon 
to start the module.
Now select the scanner you want to use for the measurement from the drop-down menu. The LaserScan F2 was used for this example. Clicking on [Scan page] (or [Scan both]) takes you to a submenu where you can select which page you want to scan. Start the measurement by pressing the CTRL key (or the foot pedal if available).

You can also adjust the dimensions in this module if required.
Click on the ![]()
button to return to the GP Manager start page.
2. open GP CAD module & create new strips
On the start page of the GP Manager, click on the icon 
start the module.
To create a new construction, please click on the button in the top right corner ![]() on. A window with your previous designs will then open. Click on the [New] button at the bottom of the window. Then activate the [Bars] button in the function box:
on. A window with your previous designs will then open. Click on the [New] button at the bottom of the window. Then activate the [Bars] button in the function box: ![]()
3. call up measurement and select library strips
To call up a measurement, hold down the CTRL key and click on the Measurement button
![]() .
.
A dialogue will now open in which you can select and load the desired measurement. The measurement is now displayed as a blue outline.
You can select a library bar by clicking on the [<<Library] button or via the drop-down menu.

The power is then displayed with the outline of the measurement.
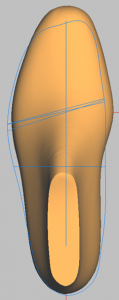
4. modelling library strips
All functions required for 3D modelling are located behind the buttons in the toolbox.
The exact procedure depends on which measurement you start with.
There are usually three different options for modelling: Total, Partial and Special. Changes in the modes are always carried out with Ctrl + left mouse button + mouse movement.
Depending on the mode, the position of the mouse click determines which part is changed.
4.1 Dimensions
Note: In the "Dimensions" design area, you can edit and view your moulding in the interior, exterior, top, bottom, front and rear views. If you would like to rotate the moulding in all axes, please switch to the "Main window".
Note: When working with the dimensions, remember to use the "Save" button after each successful step.
4.2 Position
If the "Position" option has been selected, you can add the strips with :
Ctrl + left mouse button + move mouse horizontally/vertically
Ctrl + Shift + left mouse button + mouse movement Rotate forefoot/rearfoot area
Switch through the standard views to get an exact idea of the spatial position of the moulding. Make sure that the moulding in views I, A, V and H is not below the zero line. The zero line is the horizontal line in one of the two side views (inside or outside). You can also change the position of your moulding in all other views.
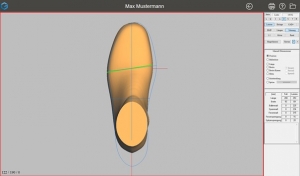
After positioning, the ball line of the last (green line) should be positioned so that it intersects the point at which the ball line of the measurement intersects the foot axis. This applies to a construction with a library last.
The moulding should be positioned so that it lies within the measurement.
4.3 Bale line
Position the bale line with Ctrl + left mouse button + mouse movement so that it is parallel to the bale line of the measurement. If necessary, use "Position" again to align the bale lines.
Attention: Please note that a very strong displacement of the bunion line can lead to strong changes in the entire last.
4.4 Length
If the Length option is selected, you can adjust the length of the moulding to the measurement. To change the length, use Ctrl + left mouse button + mouse movement. Change depending on the mode:
- Total: Length front and rear
- Partial: Length at the front or rear, depending on the position of the mouse
- Special: The length in the selected area
4.5 Width
After clicking on the "Width" radio button, you can change the width of the moulding or the moulding comb if you select "Width mouldings". The area of the change is determined by selecting one of the "Total", "Partial" or "Special" radio buttons.
- Total: The width is changed on both sides
- Partial: Depending on the position of the mouse, five areas can be changed. The respective areas are permanently defined.
- If the last in the toe area is clicked, the area from the tip of the foot to the ball of the foot is changed (right or left), with the greatest change at the height of the toes. The following key combinations are possible:
Ctrl + left mouse button Change a page
Ctrl + Shift + left mouse button Change both sides
- If the last is clicked in the area of the bunion line, the width is changed from the toe to the heel (right or left), with the greatest change occurring at the intersection of the bunion line and the edge of the measurement/ last. The following key combinations are possible:
Ctrl + left mouse button Change a page
Ctrl + Shift + left mouse button Change both sides
- If the last is clicked in the heel area, the width of the rear foot is changed on both sides.
- Especially: The width in the selected area can be adjusted.
4.6 Height
After clicking on the "Height" radio button, you can change this dimension on the moulding. The area of the change can be specified by selecting one of the "Total" or "Special" radio buttons. You can adjust the height with the combination Ctrl + left mouse button + mouse movement.
Attention: The height can only be changed in views A (outside) and I (inside).
- Total: The entire height is adjusted.
- Partial: Not available
- Special: The height is adjusted in the selected area.
4.7 Crescent position
If the "Crescent position" radio button is active, a rectangle is placed within the moulding. The moulding is deformed by rotating it at the centre of the rectangle. The rectangle is placed by pressing the left mouse button on or next to the moulding in the active workspace and selecting an area.
The rotation is performed with the combination Ctrl key + left mouse button and can be performed for the (forefoot) or (backfoot) areas. The decisive factor here is the position of the mouse pointer in relation to the defined rectangle.
4.8 Adjusting the tip
With this option, you can draw a rectangle over the forefoot. Within this rectangle, the tip of the opposite side is adopted after clicking the "Customise" button.
4.9 Axes
Selecting the axes opens a selection box:

These 3 axes (bunion line, ankle axis and mechanical axis) are displayed on the bar. These axis points can be moved and adjusted by grabbing the respective end of the axis with the left mouse button and editing them in the corresponding view, which can be changed in the process.
The mechanical axis represents the axis of rotation around which dorsiflexion and plantar flexion take place.

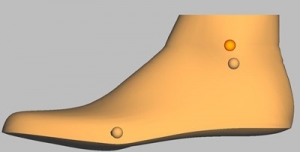
4.10. Smoothing
Click on the "Smooth" option to open a selection box:

Use the "Global" option to smooth the entire moulding. Click on the [Execute] button in the selection box to perform normal smoothing. If you hold down the CTRL key while doing this, the smoothing is increased slightly. Pressing the SHIFT key will smooth the area strongly and pressing CTRL+SHIFT will smooth the area very strongly.
These key combinations in conjunction with the Execute button apply to all smoothing options!
Note: With the right mouse button, you can select several areas at the same time. You can also delete selected areas by selecting them again.
With the shape and surface options, you can specify exactly how and where you want to smooth your moulding.
Use the left mouse button to drag a rectangle over the area of the moulding that you want to smooth. You can set this rectangle in any bar view. The area to be smoothed is then displayed on the moulding:
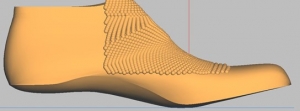
With the "Shape" option, a single unevenness is brought back to the height of the remaining moulding surface. The "Surface" option straightens several irregularities, i.e. a large uneven surface. These functions can be used both vertically and horizontally on the moulding.
The last two options "Erase" and "Fill" either remove (erase) or fill (fill) material in the selected area.
4.11. Copy page
If you select the "Copy page" button, a mirrored copy of the displayed moulding is created. If a bar already exists for the other side, a dialogue box opens and you decide whether the existing bar should be replaced or not.
You can copy the moulding at any time. All models are also copied.
4.12. Models
Models are pads, longitudinal arch recesses, etc. that can be positioned on the moulding. You can access the area for editing models by selecting the "Models" option in the main window of the toolbox.
Note: When milling the bedding, it may be advisable to position the models on the bedding. The models are displayed weaker over the mouldings in the bedding construction.

4.12.1.Insert models
To place a model on your moulding, select the "Models" option in the toolbox. You are then in the workspace for editing models. You can select models from the model library in the same way as you select a library moulding.

4.12.2.Position
Positioning is carried out using the following keyboard shortcuts.
Key combination Mouse movement Change
Ctrl key + left mouse button move horizontally right/left
Ctrl key + left mouse button to move vertically up/down
Shift key + left mouse button horizontal width/length (depending on view)
Shift key + left mouse button vertical height/length (depending on view)
4.12.3.Height
You can change the height of the activated model by entering a height in millimetres in the input field. The highest point of the model is adjusted to the specified height. The other dimensions of the model are retained.
![]()
Note: You can enter both positive and negative values for the height.
Embed and adopt
Selected models are integrated into the interface after clicking the [Embed] button.
Attention: They are then part of the surface and can no longer be changed.
Selected models are integrated into the interface after clicking the [Apply] button, but can still be selected and edited afterwards.
Note: This can slow down the GP Manager. It is advisable to embed the models. Correct positioning must be ensured before embedding.
4.13. Moulds
Depending on the selected shape, different modelling options are available to you. The options available to you can be found in the description of the individual moulds (see below).

After selecting one of the options "Sole", "Surface", "Hallux", "Base V", "Inner" & "Outer Ankle", the last is brought into the view in which the respective location is best visible.
The area to be modelled must now be defined and modelled. This is done by:
1) Draw a rectangle to define the effective range. To do this, place the
mouse pointer to the starting point of the rectangle and then move the mouse with
with the left mouse button pressed until the desired size is reached.
2) Place the centre (green rectangle) at the desired position on the bar by holding down the CTRL key and clicking the mouse.
3) Modelling the effective range by pressing the buttons o (top), u (bottom), i (inside), a (outside), v (front), h (rear). This causes the centre to move by 1 mm in the corresponding direction, whereby the reference of the change is always the slat. When moving, a view should be selected in which the change can be tracked.
In the effective range, the last is raised (or lowered) according to the following principle:
In the centre (green rectangle) to 100 %. At the edge of the effective range to 0 %.
The other points are calculated from the distance to the centre.
The changes can be tracked in the display on the workspace. The following two displays can be seen:
1) KO: 0 / 0 / 0 [mm] Display of the absolute change (origin in the
Intersection of the longitudinal axis of the foot and the line of the ball of the foot
2) Delta: 0 / 0 / 0 [mm] Display of the relative change
!!!Attention!!!: Modelling on the inner or outer ankle must always be carried out on the
groin and not on the leg!
4.13.1 Heel
After selecting the "Heel" radio button, the last is displayed in the "Outside" view.
Processing is carried out as follows:
| Key combination | Mouse position | Mouse movement | Focus of the change |
| Left mouse button +SHIFT | Heel | Horizontal | Entire heel
|
| Left mouse button +SHIFT | Heel comb | Horizontal | Heel comb |
| Left mouse button +SHIFT | Outermost heel point | Horizontal | Outermost heel point |
4.13.2 Pronation and supination
After clicking on "Pronation", the last is displayed in the "Outside" view, with "Supination" in the "Inside" view. The change is made as follows:
| Key combination | Mouse movement | Amendment |
| Left mouse button +CTRL | Top or bottom | Raise or lower laterally or medially |
The size of the change is displayed in mm in the workspace. If the moulding already has an increase as standard, this is displayed.
4.13.3 Inner edge and outer edge
After selecting the "Outside edge" radio button, the moulding is displayed in the "Outside" view, or in the "Inside" view for "Inside edge". Editing is carried out as follows:
1) Draw a rectangle to define the effective range. To do this, place the
mouse pointer to the starting point of the rectangle and then move the mouse with
with the left mouse button pressed until the desired size is reached.
2) Place the centre (green rectangle) in the desired position by holding down the CTRL key and clicking the mouse.
3) Elaboration of the scope of action:
| Key combination | Mouse movement | Amendment |
| Left mouse button +CTRL | Top or bottom | Raise or lower |
The moulding is retracted or extended in the effective area according to the following principle:
In the centre (green rectangle) to 100 %. At the edge of the effective range to 0 %.
The other points are calculated from the distance to the centre.
The changes can be tracked in the display on the workspace. The following two
Adverts can be seen:
1) KO: 0 / 0 / 0 [mm] Display of the absolute change (origin at the intersection of
Longitudinal foot axis and ball line)
2) Delta: 0 / 0 / 0 [mm] Display of the relative change
4.14. Position

After selecting one of the options "Leg", "Heel", "Forefoot", "Sickle", "Split" and "Pointed foot", the last is brought into the view in which the respective location is best visible and the editing points are displayed.
You can adjust these points according to the selected area and move the moulding to the desired position. To do this, grab the respective editing point with the left mouse button and move it to the desired position while holding down the mouse button; the bar follows your mouse movements.
4.15. Circumferential dimensions

If you have loaded a 3D measurement, you can apply the dimensions from this measurement to your moulding by clicking on the [Apply dimensions from measurement] button. If you want to edit these dimensions or adapt a library moulding, enter the desired dimensions in the corresponding field and then click on the [Execute] button. You can also move the position of the dimension lines.
4.16. Leg

If you want to build up the leg with a last (it does not matter whether it is a library leg last or from a measurement), you can do this here with several rings.
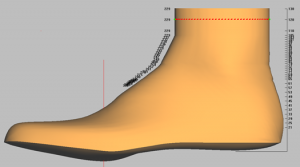
It is recommended not to build one large ring, but several small rings up to the desired leg height. Enter the top height of the last ring in the "Height" field. So if you have a last that is already 150 mm high and you want to build a 20 mm higher ring, enter "Height: 170" in the field and click on [New ring].
When customising the circumference, select a ring by clicking on it. You can now enter the desired circumference for this ring and confirm by clicking on the [Customise] button.
You can remove unevenness from the selected ring by clicking on the [Smooth] button. The selected ring is removed by clicking on the [Delete] button.
Note: The transitions between the rings can be adjusted using the green dots.
4.2 From the scan from GP FootMeasure3D to the gross moulding
1. open GP FussMess3D module & start measurement
On the start page of the GP Manager, click on the icon  start the module.
Once you have connected and switched on the 3D full-foot scanner, you can click on the ![]() to start the scanning process.
to start the scanning process.
If the scan is satisfactory, you can click on the ![]()
to exit the module and return to the GP Manager start page.
2. open GP CAD module & create new strips
On the start page of the GP Manager, click on the icon

start the module.
To create a new construction, please click on the button in the top right corner ![]() on. A window with your previous designs will then open. Click on the [New] button at the bottom of the window. Then activate the [Bars] button in the function box:
on. A window with your previous designs will then open. Click on the [New] button at the bottom of the window. Then activate the [Bars] button in the function box: ![]()
3. create mouldings from measurement
To generate a moulding from the 3D measurement, please click on the button [...]. ![]() Please select [Measurement] in the dialogue that now appears:
Please select [Measurement] in the dialogue that now appears: ![]() .
.
A window will then open showing all your measurements. Please select the measurement from the GP Foot Measurement 3D module here.
After you have selected a measurement, you will be shown this representation of the bar:
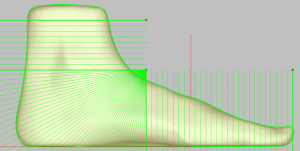
These green lines serve to delimit and break up the heel of the last. The upper line represents the upper cut edge of the last. The same applies to the toes. The line on the instep changes the resolution of the heel area. Here the point (as shown in the picture) should be placed close to the instep. You can move the dots with the mouse.
If these points are all set to your satisfaction, you can click on
![]()
create the mouldings. You can use the [Smooth] button below to smooth the moulding. However, please use the smoothing function with caution here, as the moulding will become smaller.
Click on the [Apply] button to return to the GP OptiCAD module with the moulding so that you can continue editing your moulding.
4. tip
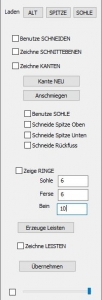
If you have created a moulding from a measurement, you can use this option to attach a tip to this moulding.
If you click on the [Tip] button in the "Load" area, the tip library opens. Here you can choose between the libraries "BIB_GP_Spitzen" and "BIB_GP_Spitzen_inSprengung" (here, the moulding is already in a specified blasting for boarding). Double-click on the desired point to add it to your design.
You can now adjust the tip on your moulding as follows:
Once you have selected a tip from one of the libraries, you can use the familiar combinations of the CTRL and SHIFT keys and the left mouse button to move it in different bar views and adjust it to the bars.
To edit and adjust the tip, tick the "Draw sectional plane" box. You can now define the area yourself at the corners of the two section planes (shown as triangles). When you have finished designing the cutting area, tick the "Use cutting" box. You can now define the transition between the cutting angles. If you like the transition, you can remove the tick next to "Draw cutting plane".
Use the slider at the bottom of this toolbox to set the transparency of the tip. To do this, the tick to the left of it must be set.
In the next step, tick the "Draw edge" box and click on the [New edge] button. The green line represents the end line and should always run below the red line.
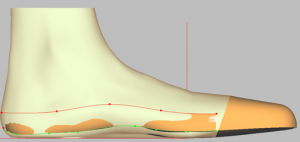
Click the [Adapt] button to adapt the edge to the mouldings.
Now you can set the edge step by step in all views (don't forget the view from below!).
By activating the "Use sole" option, the insole of the selected last is adopted.
If the foot being measured has a toe deformity, e.g. hammer toe, which would be equalised by the toe, you can tick the box next to "Cut toe top" or "Cut toe bottom". Such deformities of the measurement in the last are then adopted.
By activating the "Cutting back foot" option, you decide whether you want to retain the longitudinal arch of the last or the longitudinal arch of the measurement if it remains deactivated.
Once you have ticked the "Show rings" box, your moulding will be displayed like this:
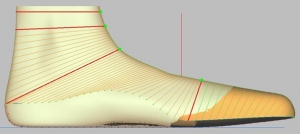
You can adjust the distance between the rings here
Click on the [Create moulding] button to display the finished moulding. If you are not satisfied with the result, you can remove the tick (which the system sets automatically after creating the moulding) and change the edge and rings for a better result. Then create the moulding again. Clicking on the [Apply] button completes this construction step and you can no longer change the tip and edges. Unless you reset the last "Save step". In "Tip" mode, the [Save] button has no function. After you have pressed [Apply], you can save this result and store it in the clipboard.
5. axes
Selecting the axes opens a selection box:

These 3 axes (bunion line, ankle axis and mechanical axis) are displayed on the measurement or on the last. These axis points can be moved and adjusted by grabbing the respective end of the axis with the left mouse button and editing them in the corresponding view, which can be changed in the process.
The mechanical axis represents the axis of rotation around which dorsiflexion and plantar flexion take place.
6. smoothing
Click on the "Smooth" option to open a selection box:

Use the "Global" option to smooth the entire moulding. Click on the [Execute] button in the selection box to perform normal smoothing. If you hold down the CTRL key while doing this, the smoothing is increased slightly. Pressing the SHIFT key will smooth the area strongly and pressing CTRL+SHIFT will smooth the area very strongly.
These key combinations in conjunction with the Execute button apply to all smoothing options!
Note: With the right mouse button, you can select several areas at the same time. You can also delete selected areas by selecting them again.
With the shape and surface options, you can specify exactly how and where you want to smooth your moulding.
Use the left mouse button to drag a rectangle over the area of the moulding that you want to smooth. You can set this rectangle in any bar view. The area to be smoothed is then displayed on the moulding:
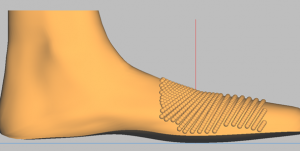
With the "Shape" option, a single unevenness is brought back to the height of the remaining moulding surface. The "Surface" option straightens several irregularities, i.e. a large uneven surface. These functions can be used both vertically and horizontally on the moulding.
The last two options "Erase" and "Fill" either remove (erase) or fill (fill) material in the selected area.
7. copy page
If you select the "Copy page" button, a mirrored copy of the displayed moulding is created. If a bar already exists for the other side, a dialogue box opens and you decide whether the existing bar should be replaced or not.
You can copy the moulding at any time. All models are also copied.
8. models
Models are pads, longitudinal arch recesses, etc. that can be positioned on the moulding. You can access the area for editing models by selecting the "Models" option in the main window of the toolbox.
Note: When milling the bedding, it may be advisable to position the models on the bedding. The models are displayed weaker over the mouldings in the bedding construction.

8.1 Insert models
To place a model on your moulding, select the "Models" option in the toolbox. You are then in the workspace for editing models. You can select models from the model library in the same way as you select a library moulding.

8.2 Position
Positioning is carried out using the following keyboard shortcuts.
Key combination Mouse movement Change
Ctrl key + left mouse button move horizontally right/left
Ctrl key + left mouse button to move vertically up/down
Shift key + left mouse button horizontal width/length (depending on view)
Shift key + left mouse button vertical height/length (depending on view)
8.3 Height
You can change the height of the activated model by entering a height in millimetres in the input field. The highest point of the model is adjusted to the specified height. The other dimensions of the model are retained.
![]()
Note: You can enter both positive and negative values for the height.
8.1.1 Embedding and transferring
Selected models are integrated into the interface after clicking the [Embed] button.
Attention: They are then part of the surface and can no longer be changed.
Selected models are integrated into the interface after clicking the [Apply] button, but can still be selected and edited afterwards.
Note: This can slow down the GP Manager. It is advisable to embed the models. Correct positioning must be ensured before embedding.
9. moulds
Depending on the selected shape, different modelling options are available to you. The options available to you can be found in the description of the individual moulds (see below).

After selecting one of the options "Sole", "Surface", "Hallux", "Base V", "Inner" & "Outer Ankle", the last is brought into the view in which the respective location is best visible.
The area to be modelled must now be defined and modelled. This is done by:
1) Draw a rectangle to define the effective range. To do this, place the
mouse pointer to the starting point of the rectangle and then move the mouse with
with the left mouse button pressed until the desired size is reached.
2) Place the centre (green rectangle) at the desired position on the bar by holding down the CTRL key and clicking the mouse.
3) Modelling the effective range by pressing the buttons o (top), u (bottom), i (inside), a (outside), v (front), h (rear). This causes the centre to move by 1 mm in the corresponding direction, whereby the reference of the change is always the slat. When moving, a view should be selected in which the change can be tracked.
In the effective range, the last is raised (or lowered) according to the following principle:
In the centre (green rectangle) to 100 %. At the edge of the effective range to 0 %.
The other points are calculated from the distance to the centre.
The changes can be tracked in the display on the workspace. The following two displays can be seen:
1) KO: 0 / 0 / 0 [mm] Display of the absolute change (origin in the
Intersection of the longitudinal axis of the foot and the line of the ball of the foot
2) Delta: 0 / 0 / 0 [mm] Display of the relative change
!!!Attention!!!: Modelling on the inner or outer ankle must always be carried out on the
groin and not on the leg!
9.1 Heel
After selecting the "Heel" radio button, the last is displayed in the "Outside" view.
Processing is carried out as follows:
| Key combination | Mouse position | Mouse movement | Focus of the change |
| Left mouse button +SHIFT | Heel | Horizontal | Entire heel
|
| Left mouse button +SHIFT | Heel comb | Horizontal | Heel comb |
| Left mouse button +SHIFT | Outermost heel point | Horizontal | Outermost heel point |
9.2 Pronation and supination
After clicking on "Pronation", the last is displayed in the "Outside" view, with "Supination" in the "Inside" view. The change is made as follows:
| Key combination | Mouse movement | Amendment |
| Left mouse button +CTRL | Top or bottom | Raise or lower laterally or medially |
The size of the change is displayed in mm in the workspace. If the moulding already has an increase as standard, this is displayed.
9.3 Inner edge and outer edge
After selecting the "Outside edge" radio button, the moulding is displayed in the "Outside" view, or in the "Inside" view for "Inside edge". Editing is carried out as follows:
1) Draw a rectangle to define the effective range. To do this, place the
mouse pointer to the starting point of the rectangle and then move the mouse with
with the left mouse button pressed until the desired size is reached.
2) Place the centre (green rectangle) in the desired position by holding down the CTRL key and clicking the mouse.
3) Elaboration of the scope of action:
| Key combination | Mouse movement | Amendment |
| Left mouse button +CTRL | Top or bottom | Raise or lower |
The moulding is retracted or extended in the effective area according to the following principle:
In the centre (green rectangle) to 100 %. At the edge of the effective range to 0 %.
The other points are calculated from the distance to the centre.
The changes can be tracked in the display on the workspace. The following two
Adverts can be seen:
1) KO: 0 / 0 / 0 [mm] Display of the absolute change (origin at the intersection of
Longitudinal foot axis and ball line)
2) Delta: 0 / 0 / 0 [mm] Display of the relative change
10. position

After selecting one of the options "Leg", "Heel", "Forefoot", "Sickle", "Split" and "Pointed foot", the last is brought into the view in which the respective location is best visible and the editing points are displayed.
You can adjust these points according to the selected area and move the moulding to the desired position. To do this, grab the respective editing point with the left mouse button and move it to the desired position while holding down the mouse button; the bar follows your mouse movements.
11th leg

If you want to build up the leg with a last (it does not matter whether it is a library leg last or from a measurement), you can do this here with several rings.
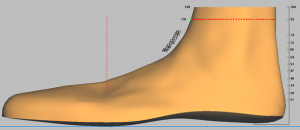
It is recommended not to build one large ring, but several small rings up to the desired leg height. Enter the top height of the last ring in the "Height" field. So if you have a last that is already 150 mm high and you want to build a 20 mm higher ring, enter "Height: 170" in the field and click on [New ring].
When customising the circumference, select a ring by clicking on it. You can now enter the desired circumference for this ring and confirm by clicking on the [Customise] button.
You can remove unevenness from the selected ring by clicking on the [Smooth] button. The selected ring is removed by clicking on the [Delete] button.
Note: The transitions between the rings can be adjusted using the green dots.
5 Gross mouldings
The CAD+ module must be activated to produce a gross moulding.
You activate CAD+ and Brutto in the function box.

Now click on the [<<Library] button with CTRL and the left mouse button. If you now switch to one of the two side views, i.e. inside or outside, you will see the gross bar.
In the toolbox under [Dimension], you can now edit the bedding and adjust it to the mouldings as follows.

You can use "Position" to position the footing as usual. You can also optimise the dimensions of the footing with length and width as already known from OptiCAD or InsoleCAD.
By selecting the "Gross" option, you can edit the end edge of the moulding. Click on the [Standard] button to reset this.
If you activate the "Roll" option, you can edit the heel break and also the toe lift of the ballast. If you then tick the "Use" box, your settings will be applied to the footing or gross last. You can also enter the corresponding material thicknesses (3 boxes under "Roll" and "Use") in the fields and then select "Use".
By selecting the "Subgrade" option, you can edit the end edge of the subgrade. Click on the [Default] button to reset this.
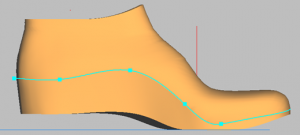
If you want to see the bedding individually, i.e. without the moulding, you can select [Insert] in the function box. Activating [Mouldings] again takes you back to the view of the gross moulding.
As described in the following chapter, you can also transfer these gross mouldings to the gross mouldings for production using the [Milling] and [3D printing] buttons.
6. moulding production
These two buttons are located at the bottom of the toolbox:
![]()
Click on the [Milling] button to open this dialogue window:
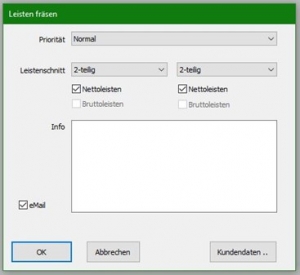
Here you can specify the priority of the last and the last cut (different for left and right lasts). In the large info field, you can enter all comments for the production. By ticking the "E-mail" box, you can send your designed last directly by e-mail to an external last manufacturer who also uses the GPM software.
Click on the 3D printing button to open this dialogue window:
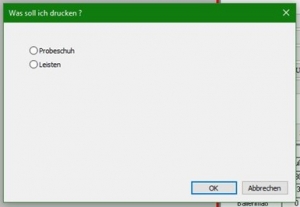
Here you can select whether you would like to have the design printed as a last or as a trial shoe. Click on the [OK] button to send the job to GP last printing. You can open and process these print jobs in the GP_Leistendruck module.
FAQ 7.
7.1 Why is the gross bar not displayed correctly?
Problem description:
After the moulding construction, [CAD+] and [Gross] were activated. However, after left-clicking with the CTRL key pressed, no gross moulding appears, but a graphically incorrectly displayed bedding.
Troubleshooting:
Stay in CAD+ and click on the [Dimension] button in the toolbox. There, activate the "Gross" item and click on the [Standard] button.
7.2 Why does one side compress when I want to widen the comb against my mouse movement?
Problem description:
Under [Dimension] and the "Width comb" option, the inside of the comb is adjusted to the width of the mouse movement and the outside is compressed inwards against the mouse movement. Or vice versa.
Troubleshooting:
Click once on the border you want to edit without holding down the CTRL or SHIFT key. The border will then widen as desired and not compress against the mouse movement.
