1.Overview
With the GP Mail module, you can send customers an email directly from the GP Manager. If the GP Mail module is activated, the items "Take over email" "Send email" and "eMail administration" in the "File" Menu black.
If the dots are greyed out and you have purchased the GP Mail module, please ask GeBioM Support to activate the Mail module for you.
Ready-made configurations are available for the email providers 1&1, GMX, Strato and Web.de. We recommend using GMX, as in our experience this provider is the easiest to configure. If the company website is made available via 1&1 or Strato, one of these providers can also be selected.
We recommend using a European email provider. As the European Court of Justice (ECJ) declared the Safe Harbour Agreement invalid in October 2015, it is currently not advisable to use an American email provider. For this reason, personal data should not be transferred via Gmail or Microsoft Hotmail, for example.
2.Installation
2.1.Update of the mail module
Firstly, carry out the update of the mail module. You can usually find the update in the GP Manager folder under "C:\GeBioM_SQL\GpTools\SSL_Fix_R3.exe". The italicised part of the path may differ depending on the installation.
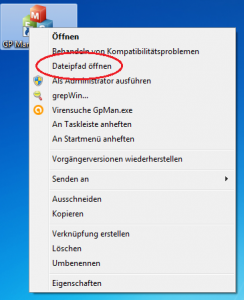
If you have an existing installation, you can find the folder by right-clicking on the GP Manager shortcut. In the following menu, select "Open file path".
If you cannot find the update there, you can download the update [wpfilebase tag=fileurl id=508 linktext=here /] from our homepage.
Double-click to start the update; when you are asked whether the programme is allowed to make changes to the computer, confirm with "Yes".
After the installation has been started, confirm in the following dialogue with "Further".
Enter the path to your GP Manager folder (see above) and select "Further"
In the next dialogue, you will be asked to enter the ports for the incoming and outgoing mail server. The currently valid ports are specified for GMX and 1&1, Web.de and Strato.
The port numbers are written to Mail.ini by the installation routine. For the most common email providers, please refer to "Table 1" for the port number.
| Email provider | Incoming mail server | Outgoing mail server |
|---|---|---|
| GMX | 995 | 587 |
| Web.de | 995 | 587 |
| 1&1 | 995 | 587 |
| Strato | 995 | 465 |
If you are not sure which port numbers to enter here, ask your email provider. Then confirm with "Further".
In the following dialogues, click on "Further" and "Exit" to complete the installation of the update.
2.2.Customise the Mail.ini
If you use GMX, Web.de, Strato or 1&1 as your email provider, you can use a ready-made Mail.ini.
| File name | Link |
|---|---|
| Mail_1and1.ini | [wpfilebase tag=fileurl id=512 linktext=' Mail_1and1′ /] |
| Mail_GMX.ini | [wpfilebase tag=fileurl id=510 linktext=' Mail_GMX' /] |
| Mail_Strato.ini | [wpfilebase tag=fileurl id=509 linktext=' Mail_Strato' /] |
| Mail_Web.ini | [wpfilebase tag=fileurl id=511 linktext=' Mail_Web' /] |
Select the appropriate preconfigured Mail.ini file for your email provider.
If you do not have the INI files, you can download them from the homepage (see table). If you use a different email provider, select one of the INI files we offer.
Open the corresponding INI in any text editor (e.g. with Notepad). You must always change the sender address. The line in the INI file reads, for example: "Address = Ihre.Mail@web.de". For GMX.de, make sure that you use the ending that you selected when setting up your email. So gmx.de, gmx.net, gmx.at or gmx.ch.
If the Mail.ini is for your provider, then you do not need to make any further changes in the INI itself. If you use a different provider, you may have to adjust the security settings in Mail.ini. You can ask your email provider for the settings, unfortunately GeBioM mbh cannot provide an INI file for all email providers.
2.3.Copying the Mail.ini
Copy the Mail.ini into the subfolder "GpSystem\INI" of the GP Manager folder (see Figure 1).
2.4.Configuring the mail module
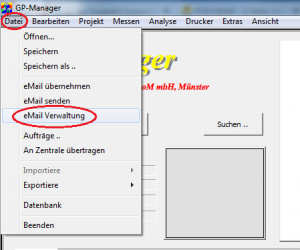
Start the GP Manager and select "File" -> "eMail administration"
In the following dialogue, select "Configuration ..."
You can enter your login information for the email inbox in the following dialogue. If your GP Manager is installed in a different location, please also change the "Standard folder ...".
Check whether the correct addresses have been entered under "Server". If you have copied a suitable Mail.ini, these values should be correct. If you use Web.de, please also read the FAQ point 3.4
Enter the user name and password for your email account.
Select "Test connection"If everything is configured correctly, the message "Test SMTP - Access to SMTP server OK" or "Test POP - Access to POP server OK" should appear. This completes the configuration of the email module. Next, you must add a contact to your address book in order to be able to send emails to them.
Attention:
You can tick the "Check subject", then all emails will be retrieved. This is not normally a problem, but can lead to problems if the same email account is also used for other GP Manager installations or elsewhere. In this case, the emails are no longer available there, as the emails are deleted from the server after retrieval.
Note:
Change the subject and leave the tick next to "Check subject", you must change the subject in the Mail.ini in the section [Init_Send] also have to be adjusted. Otherwise, emails are still retrieved, but are no longer offered for transfer.
3.eMail address book
To transfer your customer data by email, you can add contacts to your address book. You can access the address book in version 6.5 via "File" -> "eMail administration" -> "Address book ..." (see Figure 7). In version 7 via "GP Touch Mail" -> "E-Mail administration" -> "Address book ..." (see Figure 7).
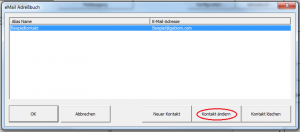
If you have copied a Mail.ini, the following dialogue should already contain a "Example contact" are included. Click on the example contact so that it is highlighted in blue (see Figure 8).
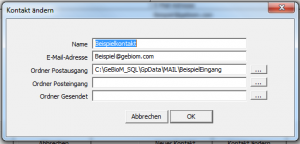
Then click on "Change contact", adjust the individual fields accordingly in the following dialogue (see Figure 9).
Note:
If only emails are to be received on this computer, you can also leave the address book empty. In this case, delete the example contact.
You can still send an email by selecting "File" -> "Send email" -> "Cancel". Here you can compose an email and enter any sender.
If you insert only one contact, emails are automatically sent to this contact.
3.1.Name
Change the name of Example contact into the name of a branch or an employee to whom the customer is to be sent.
3.2.E-mail address
Change the email address from Beispiel@gebiom.com in the email address to which you would like to send the data.
3.3.Outbox folder
Retrieved emails are temporarily stored in this folder. Make sure that the GP Manager has write authorisation in this folder. It is recommended to select a subfolder of the folder in which the GP Manager is installed on the target computer.
3.4.Sent folder
This field currently has no function.
4.Send email
Once you have configured the email server and created your own contact, you can send emails from the GP Manager.
Open a project via "Project" -> "Determine". You can then save the data via "File" -> "Send email" button. If you have several entries in your address book, you can decide which contact you would like to send the email to.
If you have entered exactly one contact in your address book, the email will be sent to this contact without any further enquiry.
If you have no contact or several contacts in your address book, the "eMail address book" dialogue appears.
Attention:
Sending to multiple email addresses is not possible. If you select several addresses (see Figure 11), the email will only be sent to the email address that was clicked first.
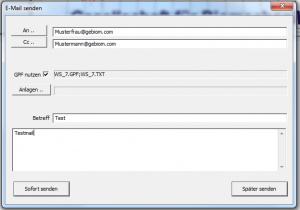
You can compose an email from this dialogue by selecting "Cancel". The following dialogue then appears:
4.1.To ...
Enter the email address to which you would like to send the email in this field.
4.2.CC ...
Enter additional email addresses in this field, the recipient will also receive the email.
4.3.Use GPF
Select this option if you want to automatically send the customer data as an attachment.
4.4.Attachments
You can send your own files as attachments to your email here.
4.5.Subject
If a subject has been entered in Mail.ini, the subject is appended to this separated by " : ".
4.6.Send immediately
Sends the email to the registered senders.
4.7.Send later
Adds the email to the outbox for later dispatch.
5.Receive emails
There are two ways to retrieve emails with GP Mail. You can either "Receive" emails via "File" -> "Email management". Or you can select "File" -> "Receive email" -> "Receive". If you select "Receive e-mail", you can enter the e-mails directly into your system. It is therefore recommended that you use this method.
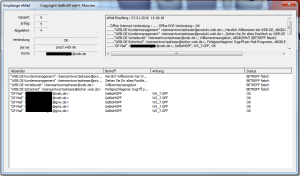
Click on "Receive" in the following dialogue. A dialogue with status information on email receipt follows. With the default settings, only emails with a matching subject are retrieved. All other emails remain on the server.
Figure 13 shows what the dialogue for receiving emails looks like. The dialogue shows all emails that are on the server. It also shows the name of the attachments under "Attachment" and the status of the email under "Status". Detailed information on email receipt can be found in the top right-hand section of the dialogue. A detailed error message is also displayed here if the connection to the server fails.
Email status
OKThe email was successfully downloaded from the server
SUBJECT incorrectThis status is only displayed if the email reception is configured so that only emails with the correct subject are downloaded. Emails whose subject does not match are given this status and remain on the server.
If emails have been successfully received, you can select from the existing emails which data you would like to transfer to your database. Close the receive dialogue with the cross at the top right.
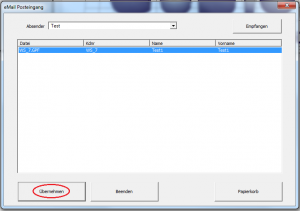
If emails with the correct subject have been retrieved, or if there are emails that have not yet been transferred, you can decide in the email inbox dialogue which emails you would like to transfer.
Click on the desired email so that the email is highlighted in blue. Then click on "Apply" (see Figure 14). Emails from senders that exist in your address book will only appear if you select "Sender" to select the corresponding sender. Unknown senders can be found in the drop-down menu under "Standard". If you do not have any senders in your address book, all emails are listed under "Standard" can be found here.
Attention:
Only one email can be transferred at a time; if you select several emails, the last email selected will be transferred.
6.Email administration
You can use the email management function to display emails you have sent and delete emails you no longer need from your computer. The view can be switched between the inbox and outbox folders.
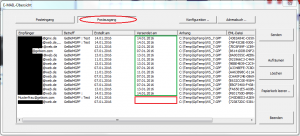
Open the email administration via "File" -> "Email administration". Here you get an overview of all your emails.
6.1.Inbox
All emails in the inbox are displayed in the overview. If emails have already been transferred, the column "Maintained" shows the date on which the email was entered (see Figure 15, marked in red). Emails that have not yet been entered are displayed without a date (green marking).
6.2.Outgoing mail
If you have selected the "Outbox" view, you will see all the emails in your outbox.
You can recognise emails that have already been sent by the fact that they appear in the "Dispatched on" have a date entered (Figure 16, green frame). Emails that have not yet been sent do not have a dispatch date (Figure 16, red frame).
Note:
Due to a programme error, emails can be sent but the GP Manager crashes. If several emails are marked for sending, only the first marked email is sent. If an email is marked as not sent, it will be sent, but will still not have a send date after the GP Manager is restarted.
6.2.1.Tidy up
With a click on "Tidy up" all emails that have already been entered are moved to the recycle bin.
6.2.2.Delete
If an email is selected, it can be deleted by clicking on "Delete" can be moved to the recycle bin.
6.2.3.Empty recycle bin ...
Deleted emails are temporarily stored in the recycle bin. These emails can be deleted by clicking on "Empty wastepaper basket ..." be permanently deleted.
7.FAQ
7.1.Why does the error message "No e-mail file has been created!" appear?
Make sure that you have selected a customer. Select "Project" -> "Determine" to search for a customer. You should then click on "File" -> "Send email" can send an email.
7.2.I have entered the correct data for my Web.de account, but I cannot retrieve any emails
Make sure that you have installed the SSL patch.
Make sure that reception for POP3/IMAP is activated in your account. By default, Web.de prohibits the retrieval of emails via POP3/IMAP. To do this, log in to your Web.de account via the Web.de homepage. Then click on "Inbox" -> "Settings" -> "POP3/IMAP retrieval" -> "Sending and receiving emails via an external programme (Outlook, Thunderbird)" (as at 07/01/2016).
By default, Web.de only retrieves the "Friends and acquaintances" folder via POP. Either add the sender address to the Web.de address book, or select "Inbox" -> "Folder overview" -> Move the mouse over the "Unknown" folder, click on the spanner that appears on the right and tick the box "Retrieve emails in this folder via POP3", then the emails will also be retrieved via POP (as of 07.01.2016).
7.3.Why does the message "GP Manager error - You cannot access your email account directly from the GpManager. Please contact GeBioM if you need this function"?
Direct mail reception has been set in Mail.ini to "No" button. In the Mail.ini the value behind B_Direct = Yes and restart the GP Manager.
7.4.Why can't the GP Manager reach the mail server?
Make sure that you have updated the mail module and that no firewall is preventing the GP Manager from sending.
7.5.Why does the error "GpManager - Not enough memory" appear when sending an email?
If a customer is selected who has too much measurement data, the data cannot be sent as an email. In this case, you must transfer the customer by saving the data as a GPF file.
First select the customer via "Project" -> "Determine" and then save the customer via "File" -> "Save as ..." save the customer on a USB stick, for example.
To import the customer, you can import the customer via "File" -> "Open" back into the GP Manager.

