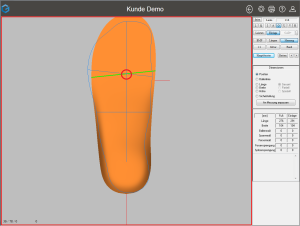
To place a model, use the option "Position" in the workspace "Models" of the toolbox. Positioning is done using the following keyboard shortcuts.

Werkzeugbox-Modelle-Funktionen-Position-markiert

Key combination Mouse movement Amendment
Ctrl key + left mouse button horizontal move right/left
Ctrl key + left mouse button Vertical move up/down
Shift key + left mouse button horizontal Width/length (depending on view)
Shift key + left mouse button Vertical Height/length (depending on view)

If the option "Position", you can select the insert with :

Ctrl + left mouse button + mouse movement Move horizontally/vertically
Ctrl + Shift + left mouse button + mouse movement Rotate forefoot/rearfoot area

Switch through the standard views to get an exact idea of the spatial position of the insert. Make sure that the insert is not below the zero line in views I, A, V and H. The zero line is the horizontal line. The zero line is the horizontal line.

Dimension-Position-richtig-markiert

Figure 16: Positioning the inlay (the bale lines should intersect at this point)

After positioning, the ball line of the insole (green line) should be positioned so that it intersects the point at which the ball line of the measurement intersects the foot axis.

The insert should be positioned so that it lies within the measurement.