Add insert/strips to existing library
Start GP Manager, "Analysis“ -> „GP CAD“ -> „>>Library"
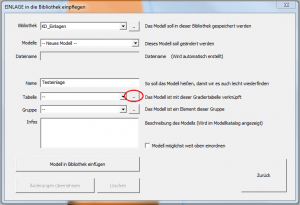
- Select the library from the "Library" drop-down menu in which you would like to save the insert.

- Select the model you want to change.
Note:
You can only change the supplied templates from the "KD_Einlagen" library if you save them in a separate library. To do this, you must first create a new library.Attention!
If you select an existing model and "Apply changes", the model will be overwritten with the currently open model. If you want to change an existing model, make sure that this model is also currently loaded in InsoleCAD! "- New model -" select. - Enter a name for the model under "Name" (e.g. sports insole, hollow foot insole, etc.).
- Select a grading table for your insole. The grading table defines the size of the insole for the different shoe sizes. If no table is offered in the drop-down menu or if you want to create your own grading table, click on "..".

- In the following dialogue, you can import the grading table of an existing insole or create a grading table yourself. This is particularly useful if you want to transfer existing blanks to your milling library and also want to use the insole moulds for your insoles. Each line of the grading table consists of a shoe size and measurements in mm (shoe size = length width height). In the table, the measurements are given in English formatting. This means that decimal places are indicated by a point. So not 10.00 mm but 10.00 mm. It is not necessary to create a separate line for each shoe size. Missing information can be entered via "Calculate" can be interpolated.

Give the table its own name in the field to the left of Save and click on
"Save".
Note:
Existing grade tables can be found in your local GP-Manager installation under: ./GpSystem/BIB_NAME/MODELLNAME.gradingyou can access these via the "Import ..." button and modify it for your purposes.
Where NAME in the path specification stands for the name of an existing library and MODELNAME for an existing model. - You can also sort the inserts in a library into groups. This helps you to find the insert in the library later. In the drop-down menu, select "Group", select the group to which you want to add the insert; you can also leave the insert out of any group "-" group. If you want to create a new group (e.g. Proprio - Child), please read "Create a new last/insole group".
- You could add more "Info" to further describe the insole (e.g. pad 5 mm, plantar fascia long, etc.).
- Finally, you can choose whether you want to use the "Place the model as high up as possible", the insert is sorted as high up as possible in the quick selection, making it easier to call up the insert quickly.
- With "Insert model into library" button to create the insert in the library.