Causes of errors

More and more devices are using radio for their communication. Two frequency bands have been made available so that these devices can communicate.

  • One frequency band at 2.4 GHz
    • Bluetooth (keyboards, mice, pressure measuring plates, ...)
    • WLAN (laptops, smartphones, computers, ...)
    • Various "smart devices", such as light bulbs, etc.
  • A frequency band at 5.4 GHz that has so far been used almost exclusively for WLAN devices.
  • Household appliances, such as microwaves, also generate electromagnetic waves in these areas.

All GeBioM devices use the 2.4 GHz frequency band and therefore have to share this band with other devices that also use this frequency.

However, this also means that the range and connection quality in this band depends on how many devices are still transmitting in this band. It is almost impossible to make a prediction for a location, as everyone is allowed to operate devices in these frequency bands.

Troubleshooting

  • If possible, there should be nothing between the transmitter and receiver. For example, if a Bluetooth pressure measuring plate is on one side of a room and the computer on the other, the Bluetooth stick should be plugged into one of the front USB ports if necessary.
  • It can help to operate the Bluetooth stick on a USB extension to remove it from the shielding metal housing of the computer. This also increases the distance to any Bluetooth keyboard used.
  • If no connection is possible, first try to bring the transmitter and receiver a little closer together.
  • If you need a greater distance, try to use fewer devices that use wireless communication. Try to use a mouse and keyboard with a cable.

Error description

During the measurement, the measurement is only displayed with a time delay. The measurement itself works and the measuring systems are recognised.

Causes of errors

The USB WLAN stick is close to the computer due to its design. This has several disadvantages for the reception of radio signals. The housing of the computer is made of metal and shields some of the signals. In addition, electromagnetic fields are generated in the computer itself, which can interfere with the stick.
In addition, there are often other devices on the computer that also use wireless communication, such as Bluetooth keyboards/mice.

Troubleshooting

Do not connect the WLAN stick directly to the computer, but use a USB extension. This serves as an antenna for the stick and also ensures that the stick is further away from sources of interference.

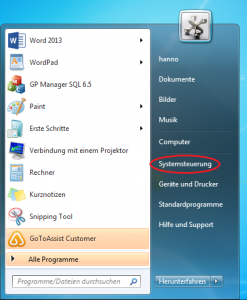
To install unsigned drivers under Windows 10, you must proceed as follows.

  1. Click on Start at the bottom left
  2. Enter "Command prompt" programme. As soon as you see the programme, right-click on the command prompt and select "Run as administrator„.
  3. Save all your current documents and enter the following character string in the prompt (the last two characters are zeros!):
     shutdown.exe /r /o /f /t 00
  4. The computer will then restart. Select the items in the following menu:
    • Troubleshooting
    • Advanced options
    • Start settings
    • Restart
  5. A menu is now displayed during the start-up process. Press 7 for "Disable forcing of driver signatures„.
  6. Until the next restart, you can now install drivers on the computer without a signature being required for the drivers.

Error description

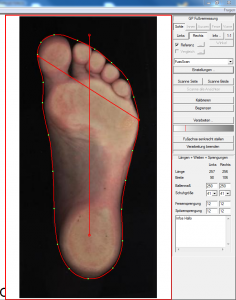
Normally, a scanned foot is automatically outlined with a red line. The line no longer appears. However, the foot is not recognised by the GP Manager during the measurement.

Cause of error

This error can have several causes.

  • You want to scan a footprint, or you have scanned a footprint and want to scan a foot, now you need to change the setting for invert.
  • The scan is not so good, so that an artefact is detected in the image to the border.
  • You are using a scanner that is not from GeBioM and works with a CCID chip instead of a CMOS chip

Troubleshooting

Use the "Limit" function

  1. Start the GP Manager and search for the customer
  2. Select the measurement in which the feet are not recognised
  3. Click on the "Limit" Button
    Begrenzen
  4. Draw a rectangle around the foot that is not recognised. If you have selected a rectangle that is too small, drag another rectangle until the entire foot is inside the rectangle.
  5. Then click on Limit again.
    Begrenzen
  6. Then change the threshold value setting to obtain an outline.

Deactivate Invert.

  1. Start the GP Manager
  2. Select Trade fairs -> GP foot measurement
  3. Select Process
  4. Remove the tick from Invert
    Verarbeiten-markiert

The border is set at the edge of the scan

It is often the case that the border for the foot is set similarly to the following image.

Umrandung_rand

  1. In this case, select "Settings
  2. In the dialogue, set the scan area so that the edge is not scanned. Then scan the foot again.
  3. The GP Manager should now set the border around the foot correctly again.

You are using a CCIS scanner

  1. If you are using a CCIS scanner, the background around the foot is white. A CMOS scanner displays the area around the foot in dark/black.
  2. Unfortunately, CCIS scanners are not yet compatible with the GP Manager.

Error description

The scanner scans an image, but the image only shows part of it or the colours are not correct. For example, the image is only black and white or you can only see a section of the scannable area.

Cause of error

The scanner driver only allows you to mark a part for scanning. The scanner can also only produce black and white or greyscale images. If the settings are changed, these settings are then retained.

Troubleshooting

  1. Ensure that the cable is correctly connected, undamaged and plugged into a USB 2.0 socket.
  2. Start the GP Manager
  3. Select "Trade fairs" -> "GP foot measurement
  4. Select on the right "Settings
  5. Set the recommended Settings in.

Error description

The computer has been connected to the MODA WiFi router. The two transmitters of the measuring systems are switched on, but the GP Manager cannot find the measuring system.

Cause of error

A programme error in Windows ensures that the computer does not always update its IP addresses when it is connected to a new network. For this reason, the current network address is incorrect and it cannot connect to the measuring systems.

Troubleshooting

Run the hotfix from Microsoft. You can download the hotfix from our Downloads download.

Pressure measurement\GP MobilData\Tools\MobilData WiFi\MicrosoftFixit20140.mini.diagcab

Error description

An image created with the GP foot measurement module is not displayed in InsoleCAD. You have already selected a measurement in the GP CAD module (CTRL + Measurement) and the button for BMP is activated.

Cause of error

The problem can occur if the measurement in the GP foot measurement module has not been processed correctly. Carry out the following steps:

  1. Select the GP foot measurement module via "Trade fairs" -> "GP foot measurement
    GP Fußmessung
  2. Edit the contour line manually by placing the green dots on the edge of the measurement (also carry out this step if the dots are already well positioned, move at least some of the dots). You can move the points by clicking on them with CTRL + left mouse button.
  3. Proceed in the same way with the foot axis. You can move it by clicking on the end points with the left mouse button. Then select "Set foot axis vertical".
  4. The GP CAD measurement should then be displayed.
  5. If this has not helped, select "Calibrate" and start the process again from the beginning.

If you have a pressure measuring plate of type MS4 and 64-bit Windows, install the driver for the pressure measuring plate as follows:

  1. For Windows 8 and 10 please read please note:
  2. In a standard installation, the driver is located in the "C:\GeBioM_SQL\GpTools\Drivers\psaa_USB2_64_Bit\driver\amd64" Alternatively, it can be downloaded: [wpfilebase tag=list id=211 pagenav=1 /].
  3. Carry out the driver installation as an administrator by right-clicking on the file "dpinst.exe" and select "Run as administrator„.
  4. Follow the driver installation instructions. The driver cannot be used yet.
  5. Start the device manager and select "USB controller" the device "Cesys PSAA4096v2 compatible device (loading stage) ...", right-click on it and select "Update driver software...„.
  6. Select "Search for driver software on the computer." and in the next dialogue: "Select from a list of device drivers on the computer.". Remove the tick from "Show compatible hardware." and install the driver "Cesys PSAA4096v2 compatible device„.
  7. Now execute the file "Setup.exe" in the subfolder "\GpTools\Driver\psaa_USB2_64_Bit" as administrator. During installation, specify a folder in which the service is to be installed, e.g: "C:\GeBioM_SQL\". A new driver should then be installed at the bottom of the taskbar. After successful installation, the pressure measuring plate can be used.

If you have an MS4 pressure measuring plate and 32-bit Windows, install the driver for the pressure measuring plate as follows:

  1. For Windows 8 and 10 please read:
  2. The driver is located in the folder "C:\GeBioM_SQL\GpTools\Drivers\psaa_USB2\driver" or can be downloaded here: [wpfilebase tag=list id=209 pagenav=1 /].
  3. Start the device manager. How you can call up the device manager depends on the Windows version.
  4. A device unknown to Windows should be found in the device manager. Right-click on the device and select "Update driver
  5. In the following dialogue, select: "Search for driver software on the computer."
  6. Specify the folder under 2. as the folder for the driver, or the folder where you downloaded the driver.
  7. Click on Continue
  8. The driver should then be installed by Windows.

If you have a pressure measuring plate of type MS3, you can only use the pressure measuring plate if the operating system also has 32 bit.

  1. For Windows 8 and 10 please read:
  2. The driver is located in the folder "C:\GeBioM_SQL\GpTools\Drivers\psaa_USB1" or can be downloaded here: [wpfilebase tag=list id=210 pagenav=1 /].
  3. Unzip the driver and remember the folder in which you unzipped the driver.
  4. Select Start
  5. Right-click on "Computer" and select "Manage
  6. In the following window, click on "Device manager
  7. You should see an unrecognised device, you can recognise the device by the exclamation mark.
  8. Right-click on the device and select "Update driver ...
  9. Select "Search for a driver on the computer.
  10. Enter the path to the driver.
  11. Repeat points 7-10 a second time if necessary.
  12. If this procedure does not work, please contact GeBioM Support.