Error description
The tiller does not start. Pressing the power button on the tiller has no effect. This error can occur with the following milling machines:
- GP M101
- GP M102
- GP M103
- GP M151
- GP M302
- GP M303
- GP M251
- GP M202
Under "View" -> "Status of the machine" boxes at the top right are highlighted in light red. This means that the limit switch has been triggered for this axis. In the example illustration, the negative limit switch of the X-axis has been triggered.

Causes of errors
The router is in the limit switch position. This can happen if errors occur during milling.
Troubleshooting
The tiller must first be moved out of the limit switch position. This can be done in several ways.
- Start CNC Remote
Option 1: Automatic release from the hardware limit switch:
- Click on "Control system„
- Select "Options„
- Click on "Release hardware limit switch"

- Follow the points below under "Reset the milling machine
Option 2: Release via manual control from the hardware limit switch:
- Select the hand symbol and then click on the green arrow pointing to the left.
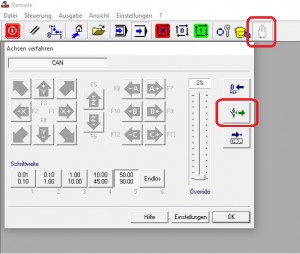
- Follow the points under "Reset the milling machine
Option 3: manually release from the hardware limit switch:
- With our small milling cutters (not GP M303, GP M400, GP M400xxl), you can also move the milling cutter out of the limit switch manually.
- Open the door
- Move once slowly all axles by a few centimetres.
- Close the door
- Press the power switch.
- Press the reset button on the CNC Remote 1-2 times.

It should display the message "A reference run is required. Would you like to perform the reference run now?" appear. Confirm with "Yes„.
Reset the milling machine
- A dialogue should appear with the message "Power up servo amplifiers" dialogue box appears. Confirm this dialogue not.
- If the dialogue "Power up servo amplifiers" not:
- Check the status of the milling machine. Select "View" -> "Status of the machine„

- In the following dialogue, the boxes at the top right should not all be greyed out. If this is the case, please contact support.
- First press the power switch.
- Now confirm the dialogue "Power up servo amplifiers" with "OK„.
- Press the reset button on the CNC Remote 1-2 times.
It should display the message "A reference run is required. Would you like to perform the reference run now?" appear. Confirm with "Yes„.


