2.2.3.3 Definition at any point of the insert
In addition to selecting the models and setting the hardness for the entire insole, you also have the option of specifically defining the hardness of the boxes.
Selection in the sagittal plane:
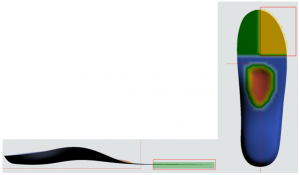
A red box can be drawn with the left mouse button to select individual boxes (e.g. forefoot, see Figure 10). The degree of hardness can then be defined for these boxes. This makes it possible, for example, to make the bottom layer below the pad harder again afterwards (Figure 11). In this case, the degree of hardness is changed across the entire width of the insole.

Figure 11 Selection of an area using the left mouse button. Then select the hardness.
Figure 12 Selection of the lower layer below the pad to make it harder again.
If you have selected an area in the sagittal plane and then switch to the view from above [O] or below [UThen you can narrow down the area further. To do this, drag another red box with the left mouse button. You can explicitly define the degree of hardness for this area. The rest of the area remains unaffected (Figure 12). This gives you the option of selecting different areas on the insert and defining the degree of hardness individually for these areas (Figure 14).

Figure 13 Select an area in the sagittal plane, then switch to the view from below [U] and drag a new red box with the left mouse button and define the degree of hardness for this area.

Figure 14 Insole with different degrees of hardness within the insole
With the button [CopyYou can copy the definition of the hardness levels to the other side.
NOTE: Only use if the left and right inserts have a similar structure. The entire PointCloud is copied and not aligned with the other insert. If you want to design different inserts, you must define the degrees of hardness for left and right separately.
Once you have defined the degrees of hardness for both insoles, send the insole for central production via the [3D printer] to GeBioM mbH. You will then receive a message that the file has been sent. Confirm this with OK.
NOTE: Only the customer number will be sent. No further customer-related data is transmitted to GeBioM mbH. Close the module via  .
.