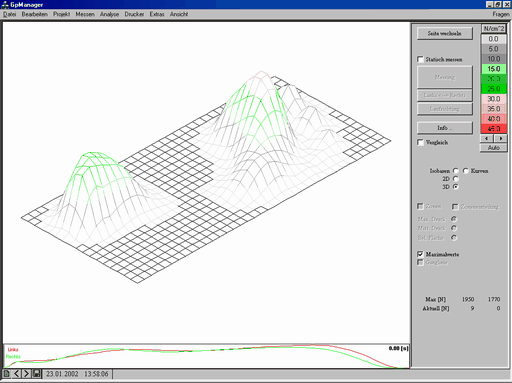
Via the button "3D" button will take you to the tools for the 3D design of insoles. To use these tools, you need the data from a 3D scanner (GP EasyScan, GP LaserScan, GP GipsScan). You can model the insole on the basis of a foot, foot foam, plaster or insole scan. If the button is deactivated, there may be two reasons for this. Either you have not selected a measurement or a measurement that does not contain any 3D information.

3D

Figure 17: 3D workspace

You can perform a 3D measurement with CTRL + left mouse button on the "Measurement" Select button.

Attention: It is also important for a 3D measurement that the foot axis and the bale line are set correctly in the measurement module.

Note:  How to create a 3D measurement is described in the manuals for the respective measurement modules.

If you have selected a 3D measurement and an insert from the library, position it as described in 3.5.1.1 Position.

Once you have positioned the insert, you can click on the "3D" to model the 3D structure of the inlay.

The "3D" options field causes a change to a 3D pressure-range. Please note that this only applies to the gait pattern of the active zone (red rectangle). The button "change side" retains its effectiveness. Accordingly, a quick change to the other measured foot side is possibly by a single mouse click.

3D

You can view this measurement from different perspectives. To do so, please click into the working surface and rotate the measurement while holding down the left mouse button. The following key combinations and mouse movements determine the rotating direction:

Key Combination Mouse Movements Rotating Direction
Left Mouse Button Horizontal Around the y-axis
Left Mouse Button Vertical Around the x-axis

The "3 D" radio button causes a change to a 3D print image. Please note that this only applies to the gait pattern of the active zone (red rectangle). The "Change side" button retains its function, so that a quick switch to the other measured foot side is possible with a simple mouse click.

MS_3D
clip0005

You can view the measurement from different perspectives by clicking in the workspace and rotating the measurement while holding down the left mouse button. The direction of rotation is determined by the following key combination and mouse movement:

Key combination Mouse movement Direction of rotation
Left mouse button horizontal around the y-axis
Left mouse button Vertical around the x-axis

By moving the mouse vertically while holding down the CTRL key, the print area is raised or flattened. This function can be useful when preparing a printout.