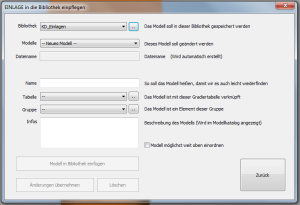
Library >> (Add insert to a library)
You can organise inserts in libraries. With every installation, you will find a selection of ready-made inserts in the library BIB_GP_Inserts. You can use these inserts as the basis for your own inserts. You must save the modified inserts in your own libraries. Of course, you can also create your own inserts from scratch.
Select "Library >>" to the "Add an insert to the library" dialogue.
Library
Under Library, you can select the library in which you want to save the insert.
Note: Supplied inserts cannot be changed. If you want to change an insert, you must transfer these inserts to a customer library. To do this, load the insert, make any necessary adjustments to the insert and select "Library >>". Select a customer library and then save the insert as described below.
Library -> ...
With the button on the right (".."), you can rename libraries and create new libraries. You can also include and deactivate libraries (see ).
Models
You have the option of overwriting an existing model with the current insert. In this case, select the name of the model here. If you want to create a new insert, select "- New model -"
File name
The file name is derived from the model name. Nothing can be entered here. If you have selected an existing insert, the file name under which the insert can be found in the library folder is displayed here.
Name
Give the insert a name. The insert appears under this name in the model catalogue.
Attention: Do not use any special characters for the name. A file with the name of the insert is created. If the name contains special characters, the file cannot be created. Only use letters, numbers, spaces, hyphens and underscores.
Table
Enter a grading table for the inlay. This is used by the GP Manager to calculate the dimensions of the insert.
Table -> ...
With the button on the right ("..") you can enter the dimensions for the inlay manually or import an existing grading table. Please note that the numbers are written according to the English notation. A full stop is used here instead of a comma.
Using the number pi as an example, 3.14 becomes 3.14 in the English notation.
The measurements are given in the table in the following order: "Shoe size = length width height" (in mm).
Note: The GP Manager is able to calculate the grading table. To do this, you must enter the measurements for at least two shoe sizes. You will achieve the best results if you enter the measurements for shoe sizes 36 and 43.
Group
In addition to libraries, inserts can be organised in groups. You can select an existing group from the drop-down menu. In the model catalogue, you can display the inserts according to these groups.
Note: In the model catalogue, the groups are called "Type".
Group -> ...
With the button to the right of Group ("..") you can edit your groups. This makes it easier for you to find inserts in your libraries.
Note: If you have created a new group, it is displayed in the "Add an insert to the library" dialogue is only displayed after you have closed and reopened it once.
If you assign a number twice, it can happen that deposits are assigned to a group that already exists. You should therefore avoid assigning a number twice by mistake. It is advisable to leave larger number spaces between different groups. For example, you can start groups for adults only from 100. Groups for children's inserts from 200.
Info
The text entered here appears in the model catalogue under the respective insert.
Place the model as high up as possible
Select this option so that the insert is categorised at the top of the selection menu. You should select this for frequently used inserts. This allows you to find the inserts quickly in the main window.
Note: If you want to categorise existing inserts at the top, open the insert and select this option.
Insert model into library
This button is used to add the insert to the library.
Apply changes
This option writes the changes to the loaded insert. This means that the insert currently displayed on the workspace is saved with the changes. If you only want to rename existing inserts, you must ensure that the insert you want to rename has been loaded from the library beforehand.
Delete
The insert selected under Models is deleted from the library.
Back
You return to the GP InsoleCAD module without making any changes to the library.