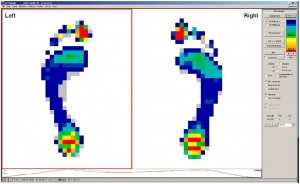
The "3D" options field causes a change to a 3D pressure-range. Please note that this only applies to the gait pattern of the active zone (red rectangle). The button "change side" retains its effectiveness. Accordingly, a quick change to the other measured foot side is possibly by a single mouse click.

3D

You can view this measurement from different perspectives. To do so, please click into the working surface and rotate the measurement while holding down the left mouse button. The following key combinations and mouse movements determine the rotating direction:

Key Combination Mouse Movements Rotating Direction
Left Mouse Button Horizontal Around the y-axis
Left Mouse Button Vertical Around the x-axis

After activating the options field "2D" the gait patterns are displayed as colour pixels.


2D

In the default settings the gait patterns are displayed as isobars. This figure displays the constant pressure distribution. The options field "Isobars" is activated.

isobars

After clicking on "Info..." you can enter information concerning the dataset into a dialogue box that is displayed on the display area.

info-dialog

The information is entered into the text line and by clicking on "Take over" directly displayed in the respective display area. When clicking on "cancel" the entry is deleted.

Note:
If you click on cancel while there is already some information stored, the information will be deleted.

If you zoomed into the force-time diagram of a measurement, you can use the "cut" function to delete the remaining part of the measurement, i.e. only the currently visible part of the measurement is saved. This function is carried through without callback and hence to be used with care.

By using this function the display of the running direction can be changed, i.e. after clicking this button the displayed gait pattern is rotated by 180°. In doing so please note that this only applies to the active zone (red rectangle) of the working surface (to change the active zone, see "change side").

Note:
Please make sure that the toes are directed towards the top, while the heel is directed towards the bottom of the screen. This direction is necessary, as it is needed for the calculation of specific methods (e.g. impulse).

Should the display of the gait patterns of the two feet be inverted, you can use the function "Left Right" to swap the measurements to the correct side.

Note:
Before each measurement you should ensure that the active zone (red rectangle) in the display area is adapted to the measurement object (right or left foot; see "change side").

By clicking the "Change Side" button the active zone (red rectangle) of the display area changes. Another possibility to change the active zone is to single click with the left mouse button in the respective zone.

Below the display area there is a force-time diagram. Here, the summed force is plotted in dependence on the time. The summed force of the left foot is displayed as a red line, while that of the right foot is displayed as a green line.

SQL_FussDruck MD_KraftZeit

GP MobilData

SQL_FussDruck MS_KraftZeit

GP MultiSens

By a single click on the left mouse button on the diagram that point in time is selected and the respective pressure distribution patter is displayed in the display area. A black, vertical line marks the selected point in time. Simultaneously, the current force values are displayed in the area of the force display in the line "Current [N]". The selected point in time appears in the diagram's upper right corner. When holding down the left mouse button on the line, it can be moved resulting in a "quasi-Realtime"-display of the gait pattern. A further possibility to scroll through the gait patter is to use the right or left arrow buttons on your keyboard. Here, the scrolling direction corresponds to the arrows.
Furthermore, you can zoom into a specific area of the diagram. To do so, you need to click both the left mouse button and the CTRL-key and then use the mouse to draw a rectangle above the area to be enlarged. When combining of the CTRL-key with a single click on the left mouse button the whole measurement is displayed again.

After a measurement or after opening a previous measurement, the gait pattern is displayed on the display area of GP FootPrint. Also the measurements of different measurement areas (e.g. hand, arm, etc.) can be displayed.