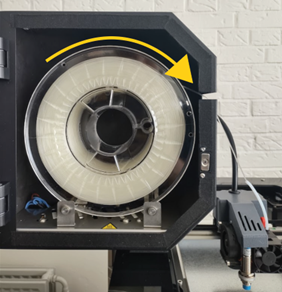
| When inserting a filament spool into the filament chamber, the spool must be aligned correctly to avoid problems.
The spool should be installed so that the filament is unrolled from the top, as shown in the illustration. |
 |
This is the manual for the Mike2 inlay 3D printer. The print head of the Mike 1+ is identical in construction to the Mike2
It is necessary to use the Filament change menu if:
- Filament is used for the first time
- an empty coil is to be replaced with a new coil
- a spool is to be inserted into a printer that does not contain filament
- filament is to be removed from the printer.
|
1 |
Open the menu Settings (1) | 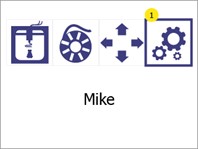 |
|
2 |
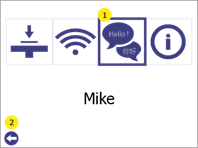
Select the Language selectionby pressing the language selection button (1)
Press the back button (2) to return to the main menu |
 |
|
3 |
The arrow (1) indicates the currently selected language; to select a new language, press the desired language to select it and then click on it again to confirm it as the new language.
Press the up (2) and down (4) arrow buttons to scroll through the list of available languages.
Press the Back button (3) to return to the Settings to return. |
 |
The printing chamber is equipped with lights that help the user to see inside, but also to indicate the status of the printer. Depending on the status, the colours change as follows:

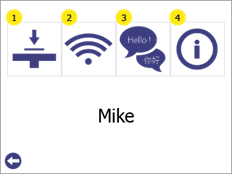
| 1. print bed calibration
Enables access to the print bed calibration process.
For further information see chapter Error! Reference source could not be found..
2. Wi-Fi configuration Enables access to information and configuration of the printer in the local network.
Further information can be found in chapter 9.
3. language selection Allows the user to change the language of the printer menu.
Further information can be found in chapter 6
4. printer information and firmware update Displays information about the printer and provides access to the printer's firmware update
Further information can be found in chapter 13 |
 |
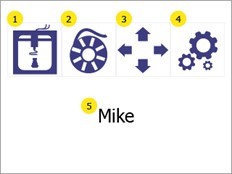
| 1. print USB
Enables printing via a USB stick.
Further information can be found in section 11.1.
2. filament change Use the Filament change menu to insert and change the filament in the print head.
Further information can be found in chapter 7.
3. manual control The manual control gives you access to the movement of the print head and print bed in all three axes of the printer. It also gives you access to manually extrude or pull the filament in or out of the print head.
Further information can be found in chapter 12.
4. settings Enables access to an additional menu with the following functions: 1. print bed calibration 2. Wi-Fi configuration 3. language selection 4. printer information and firmware update
Further information can be found in chapter Error! Reference source could not be found.
5. printer name Displays the name of the printer in the local Wi-Fi network. This is defined in the Wi-Fi configuration. By default, it is the name of the printer model.
|
 |
The filament chamber serves as a place to keep the filament used by the printer ready and at the same time to keep the condition of the filament stable.
When the filament chamber is supplied with power, a red light in the chamber switches on.
WARNINGIf the power supply is disconnected (power button on the back (OFF/0) or the cable has been removed), make sure that the filament is removed from the filament chamber and stored in a dry and warm (min. room temperature) environment.