1.Installation
- Close all programmes running on your system with the exception of the desktop.
- Insert the enclosed data carrier into the USB port of your computer and run the "Full version_V7_R0.exe" from.
- Follow the instructions on the screen.
Attention:
Remember that the programme is a measured value acquisition and analysis programme, as a result of which some of the connected hardware components (MultiSens and MobilData) must be calibrated.
2.Overview and start
In order to GP Manager open the GPM_V7 shortcut on your desktop. After starting GPMAN you will see the main user interface with your activated modules.
After starting, you will see the following user interface. You can find out more about this view and the functions in chapter 3.
3.Home page
After starting the GP Manager, you will be taken to the start page.
3.4.Project overview
All previous projects are displayed in the project overview if you have selected a customer.
The preview images of the measurements, your information on the measurement and the creation date are displayed (the preview images are only loaded once the measurement has been opened. If only symbols are displayed here, the measurements must be opened once).
To view further measurements, move the display upwards with the left mouse button or use the mouse wheel while the cursor is positioned over the project overview. Double-click on the preview image to go directly to the relevant measurement and the relevant measurement module.
4.3.Unload customer
If you have already loaded a customer, this will be displayed on the start page in the centre of the menu bar. If you would now like to continue working in the GP Manager without a loaded customer or load another customer, please press the "Unload customer" button. The customer called up will then be unloaded again and the customer name display will appear empty.
Furthermore, the customer mask is cleared so that you can immediately search for or create a new customer without the data of the previous customer being displayed.
4.5.Print
If you have already taken a measurement with a module, e.g. GP foot pressure, you can access the print menu by pressing the "Print" button.
The print menu:
In the print menu, print templates (1) for the respective module are suggested on the left-hand side. By selecting a print template, a print preview (2) is displayed in the centre of the view. Click on the "Print" button (3) to print the selected print template and return to the module.
If you have decided not to print the measurement, click the arrow (4) to return to the module.
How to set up your printer is described in chapter 5.1.1.
4.6.Questions / Support
If you have any questions about the GP Manager, individual modules or measuring devices, please click on the "Questions / Support" button.
You will then be directed to our support page, where you will find suggested solutions to common problems. If your problem is not described or you have further questions, please feel free to contact us.
4.7.1.Search customer
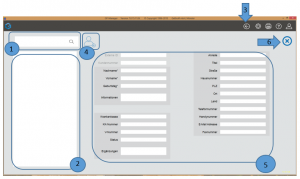
To search for a customer, please enter the first few letters of the customer's surname in the search field (1). The search starts automatically when at least three letters of the surname have been entered. If fewer letters are entered, the search is started by pressing the "Return" button.
It is also possible to search by date of birth (e.g. 01/01/2001), by customer number (e.g. O_4) or by parts of the name. Parts of the search term can be replaced by an *. The following searches are possible:
- Search for the beginning of a name Ma*
- Search for end of name *en
- Searching for the beginning and end of ma*es
If the surname contains a space, this must be replaced by an *. For example, to search for "von Fraunhofer", enter the following search term:
- "from*Fraunhofer"
To search for a first name, you must start with a space( ). A * also serves as a placeholder here.
- " Michael"
- " *ael"
- " Mi*"
With large customer databases, a customer can also be found as follows (e.g. Thomas Müller).
- Search for the surname "Müller" followed by a comma and a space.
- "Müller, "
- The surname is terminated by the comma. The first name can then be entered:
- "Müller, Thomas"
- The search returns all customers named "Thomas Müller".
The existing customers that match the search are displayed in the lower field (2). Click on the relevant customer to select it and the customer data will appear in the customer screen (5). To be able to carry out a measurement with the selected customer, please return to the start page first. The arrow (3) takes you back to the start page, the selected customer is accepted and displayed in the black menu bar.
4.7.2.Create customer
A customer can be created manually or by scanning the health insurance card.
If you have already selected a customer, the customer screen (5) contains the customer data. To create a new customer, first press the "Create customer" button (4). This will display an empty screen. You can then enter the necessary customer data manually or use the "Import health insurance card" button to import the health insurance card and transfer the data. This button only appears if you have already installed a card reader.
The data on the health insurance card is compared with the customer data in the database. If a customer with the same first name, surname and date of birth already exists, the missing data is added.
To save and accept the data, click on the arrow (3) to return to the start page.
4.7.3.Change customer data
To change the existing customer data, first select a customer (chap. 4.7.1). Then go to the corresponding field in the customer screen (5) and change the details.
To save and apply the changes, click on the arrow (3) to return to the start page. You will now be asked once again whether you want to accept the changes and have the option to undo the changes.
4.7.4.Leave customer site
If you want to leave the customer page without searching for a customer, making changes to customer data or without creating a new customer, please press the "Cancel" button (6).
5.Modules
Depending on the installation, your module view may contain more or fewer modules. The individual modules are customised during installation.
5.1.1.Set up printer
The "Printer setup" function in the GP Admin module is used to set the printer parameters for your printer.
The parameters are selected via the standard Windows dialogue box for printing files.
Note:
Please also read your printer manual.
5.1.3.Calibrate screen
The "Calibrate screen" function in the GP Admin module is used to display graphic objects without distortion. The following window opens:

To ensure that the calibration is carried out correctly, please proceed as follows:
- Select how large you would like the calibration box to be. As a rule, it is sufficient to leave the standard selection at 100 x 100 mm.
- Change the size of the dialogue box so that the box outlined in the image is enlarged to 100 x 100 mm (preferably with the mouse).
- Click on the "Apply calibration" button.
- Click on the "Exit" button to close the dialogue box.
- Close the GP Manager.
- Restart the GP Manager. Only now is the calibration applied.
Note:
Recalibration is only necessary if the resolution under Windows is changed, a different graphics card is installed or a different monitor is used. Poor calibration is present, for example, if the dimensions of the bar are not displayed correctly, i.e. the bar is compressed or stretched.
5.1.5.About GP Manager
After clicking on "Info about...", you will receive information about the software installation (e.g. version, paths, etc.). This should be known when calling the hotline. The dialogue box is closed by clicking on "OK".
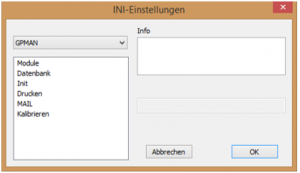
Click on "Backup created" to initiate a backup of the most important system files (ini. files).
5.1.6.Unblock customer
As soon as a customer is called up, it is blocked for other users in the database. The block is normally cancelled when the customer is closed. If customers are permanently displayed as not released / blocked, the customers can be released using the "Unblock customer" function, i.e. they are unblocked accordingly in the database.
5.1.7.Delete customer
After selecting the "Delete customer" button, the following window opens:
Start the search for the customer by entering the surname, first name or date of birth and click on "Search". A list of possible customers will then be displayed. Select the relevant customer and click on "Delete".
5.1.8.Summarise customers
If a customer has been created twice in the database, you can merge the customer data into one customer using the "Merge customer" button. To do this, search for the two customers in the window. Select the respective customers in the two lists. By clicking on "Apply", the customer data of the customer selected on the right-hand side is transferred to the customer selected on the left-hand side. The customer retains the customer number of the customer displayed on the left.
5.2.1.Open file
If you want to load a data record from a customer, please press "Open file". The Windows dialogue box appears in which you can select the corresponding path to your customer's GPF data record.
Once you have selected the relevant GPF data record, press "Open" and the data record will be loaded into the GP Manager.
5.2.2.Save file
This button is used to save your existing data records. If you have not yet selected a customer, you will first be prompted to do so. The GPF data record is then saved under the path "C:\Temp\GpTemp" saved.
5.2.3.Save file as
This button can also be used to save the existing data records. In contrast to section 5.2.2, this function also allows you to select the file path where the data record is to be saved.
5.2.4.Read folder - Import files
If you want to import several GPF files from a specific folder into the GP Manager, please click on the "Read folder" button. A window will open in which you can select the relevant folder.
If you use this function to regularly import your customer data, please contact us so that we can set up a standard folder for you.
5.2.5.Save files as gpf
With this button you can either save your entire database as GPF files by first selecting the "Complete" button and then clicking on "Save files as gpf". Or you can save customer data from a specific date as GPF files. To do this, first select the date, select "From specific date" and then click on "Save files as GPF".
A window will then open in which you must select the storage location.


