GP Manager
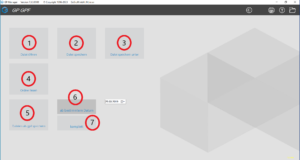
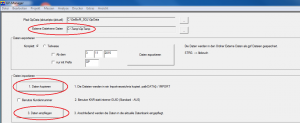
To import/export or save files as GPF, click on the "GP GPF" tile on the GP Manager after selecting a customer.
- Open file
The "Open file" tile is selected if you want to add a GPF file to the selected customer.
Clicking on this opens a browser window in which the corresponding file can be selected. This is done by clicking on the "Open" button.
- Save file
The "Save file" tile is selected if the selected customer with all measurements is to be saved as a GPF file.
This is done by simply clicking on the tile. When the file has been saved, "Written files: 1" appears in blue at the bottom centre.
- Save file as
The "Save file as" tile is selected if the selected customer is to be saved in a different file path or if only certain measurements or designs are to be saved as a GPF file.
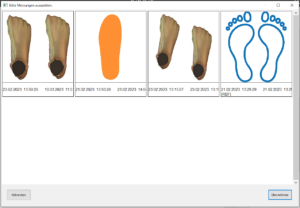
Clicking on the tile opens a window in which the measurements and constructions of the selected customer are displayed.
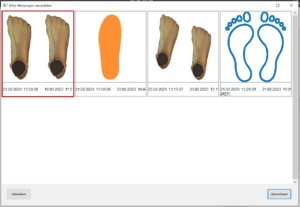
Clicking on a measurement selects it and gives it a red border.
To select several at the same time, press the CTRL key and then select further measurements or constructions by clicking with the mouse. 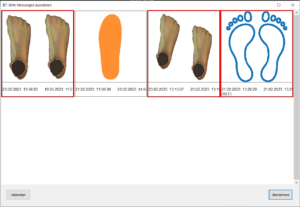
This is again indicated by the red border. Confirm this by clicking on the "Apply" button.
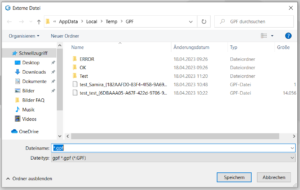
Next, select the storage location in the new window and confirm with the "Save" button.
- Read folder
The "Read folder" tile is selected if a folder with several customers is to be integrated into the GP Manager.
Clicking on this opens a browser window in which the corresponding folder can be selected. This is done by clicking on the "OK" button.
- Save files as gpf
The "Save files as gpf" tile is selected if the complete data set or data from a specific date is to be saved or transferred.
Firstly, you can choose between "from specific date" and "complete" from the small tiles. If the tile is activated, it is displayed in a darker colour.
- as of a certain date
The "From a specific date" tile is selected to save or transfer data from a specific date up to today.
To do this, select the desired date in the drop-down menu next to the tile and then click on the "Save files as gpf" tile and select the storage location in the window that opens and confirm with the "OK" button.
Note: If today's data is to be backed up or transferred, a day before today's must be selected in the drop-down menu.
Once the process is complete, "Written files:... " appears in blue at the bottom centre.
- Complete
The "Complete" tile is selected to save or transfer the entire data record.
If this is activated, the "Save files as gpf" tile is clicked and the storage location is selected in the window that opens and confirmed with the "OK" button.
Once the process is complete, "Written files:... " appears in blue at the bottom centre.

Open the GP Admin module

and click on "Calibrate screen"
A window will now open in which you must select whether you want to align the square shown there to 10x10cm, 20x20cm or 30x30cm. Once you have decided on a size, drag the window in length and width so that the square (circled in blue) has these dimensions. Use a ruler, tape measure or folding rule held up to the screen. When the dimensions match, click on the [Apply calibration] button.

Close the GP Manager and restart it. Only then will the calibration be accepted.
Error description
If a user without administrator rights starts the GP Manager, the connection is slow. The GP Manager may take several minutes to search. If the user is logged in as an administrator or domain administrator, the GP Manager responds normally quickly.
Cause of error
Windows 10 caches files from the network. Unfortunately, it seems that in some configurations the permissions for the file location are not set correctly. This can be traced if you use the Process Monitor from Microsoft and monitor the GpManager.exe process (https://docs.microsoft.com/en-us/sysinternals/downloads/procmon).
Troubleshooting
The easiest way is to deactivate the cache for network shares in the registry. Here is a summary and a link to the article from Microsoft:
In the registry you can create three DWORD values under the path: HKEY_LOCAL_MACHINE\System\CurrentControlSet\Services\Lanmanworkstation\Parameters
According to the article, these should be deactivated in the following order in the event of problems:
- Directory cache, by setting DirectoryCacheLifetime to ZERO.
- File Not Found cache, by setting FileNotFoundCacheLifetime to ZERO.
- File information cache, by setting FileInfoCacheLifetime to ZERO.
https://docs.microsoft.com/en-us/previous-versions/windows/it-pro/windows-7/ff686200(v=ws.10)
A patch for the registration can be downloaded here: Windows slow-search registry file.zip
- Make sure that all the latest updates are installed for your Windows 10. If you do not allow automatic updates for Windows 10, you should always install the update KB3093226, as this fixes a bug that affects the Bluetooth function.
- If you are still using an old 2D Mustek scanner, you can no longer use it from Windows 8 onwards. Unfortunately, there is no working driver for Windows 8 and 10 to address the scanner. If you do not know which scanner you are using, read "How can I recognise which scanner I am using?„.
- Make sure that hardware that does not originate from GeBioM is also compatible with the new Windows version.
- After updating to Windows 10, be sure to update the Drivers for your Graphics card.
- After the update, make sure that the DirectX version is the latest version. You can download the setup for DirectX in the subfolder \GpTools\Directx of your GP Manager (How to find your GP Manager installation). The setup file is called dxwebsetup.exe and requires an Internet connection to function.
- Make sure that the Visual Studio Redistributable packages are installed. The packages are also located in the GpTools folder of the GP Manager installation (Vcredist_2008_SP1, Vcredist_2010, Vcredist_2013).
- Download the latest drivers for your hardware from our homepage. With the update to Windows 10, the 2D scanners, for example, may no longer work.
- If you do not know which scanner you are using, read on: How can I recognise which scanner I am using?
This list only includes current hardware from GeBioM. For older hardware, please contact customer support to be sure.
Error description
You have two or more installations of GP Manager and would like to transfer data between them.
Troubleshooting
There are several ways to share data between different installations, depending on the effort involved.
Each method has its own advantages and disadvantages. Which method is suitable for you depends, among other things, on how your company IT is organised.
Export GPF files and import them on the target computer
This method requires some manual work, but also reliably backs up the data. You can use this method to both transfer the data and perform a backup. However, the effort required increases with each additional installation.
This is a particular problem if data is collected on several computers, but needs to be available on all of them. With more than 2-3 installations, the effort involved in this case is considerable.
How to back up and restore GPF files is described here: "How can I back up the data from my GP Manager?„.
Advantages
- If you use this method regularly, you will automatically have a data backup.
- If the data volume is low, you can also send the data as an email.
- With regular backups, only the newly created data needs to be backed up. A single data backup only takes a short time.
Disadvantages
- You could also send individual data records manually by email, but this is quite time-consuming as you have to search for the relevant files using the customer number. As a result, the data is usually only available on the target system after a long delay. Depending on the frequency of the backup Daily, Weekly, ...
- The data must be backed up on each computer on which it is recorded and, if necessary, transferred to all other computers. The effort involved increases with every computer that is added.
Using GP Manager with a server
This method is only available to you if you have also purchased the GP Manager as a server version. If the GP Manager installations can be connected via a network, you can use the method of using one installation as a server. The server manages the database with all measurements and the other GP Manager installations access it.
Advantages
- All GP Manager installations have access to the same data.
- Once measurements have been recorded, they are immediately available to all installations.
- Once set up, this method requires hardly any manual intervention.
- Ideally, only the server needs to be backed up so that all data collected with GeBioM products is backed up (this only applies if all installations are actually used exclusively in server mode).
Disadvantages
- There should be a fast network connection between the individual installations (a local network or a fast Internet connection).
- If the data is transferred via the Internet, a VPN server is also required, as the GP Manager requires Windows shares.
- A computer is required as a server on which the entire system runs.
- If the server fails, the other installations also stop working.
- If no network connection to the server is possible, the other installations will no longer work.
- If no data backup is performed on the server, in the worst case all data will be lost if the server loses data.
Save and open customers
You can always export individual customers via "File" -> "Save" and then import them in another installation with "File" -> "Open".
Advantages
- The function is activated for every GP Manager installation.
- Easy to use, once a customer has been selected, it can be saved.
- Good control over the data that is shared.
Disadvantages
- If several data records are to be transferred, the method is time-consuming.
- You must transfer the measurements individually.
- Depending on how you transfer the data, the data may not be available on the target computer until later.
- If the data is to be available on several computers, this method is labour-intensive.
Sending data records with GP Mail
You can purchase the GP Mail module, which allows you to send customers emails directly from the GP Manager.
Advantages
- You can select the target installation for each data record you want to send.
- You can control very precisely which data you would like to transfer.
- The data can be made available on the target system in a timely manner, as it can be sent quickly by email.
Disadvantages
- You must transfer the measurements individually.
- This method is only suitable if only a few measurements are to be divided.
- As all customer data is sent in one email, this only works with smaller data sets. Sending videos quickly fails if the email attachment is too large
- The data records must be imported individually on the target computer.
- It is time-consuming to make all measurements available on all installations.
If you need advice on which method is suitable for you or how to configure the GP Manager, you are welcome to call GeBioM Support.
Version 7
Instructions for version 7 can be found in the GP Manager V7 manual
Version 6
Error description
A customer that has been created can no longer be found using the search functions in "Project" -> "Determine". It looks as if the GP Manager has deleted/lost the customer data or as if the customer was never created in the GP Manager.
Causes of errors
Several sources of error lead to this error. The GP Manager up to version 6.5 allows the entry of special characters and spaces in customer names. If these are at the beginning of the name, the customer can no longer be found; typing errors also mean that the customer can no longer be found.
Another possibility is that the first name and surname have been swapped during input. However, the GP Manager only searches for first names and customer numbers.
The GP Manager never deletes a customer once it has been created, so it only looks as if the user has disappeared. If a customer has been created, it is definitely saved.
Troubleshooting
Follow the path below to find your customer again.
- Start the GP Manager and click on "Project" -> "Determine" in the menu bar.

- If you know the customer number with which the customer was saved, enter the Customer number in.Attention:
Customer numbers always consist of two parts separated by an underscore "_". For the search to work using the customer number, you must enter at least the front part including the underscore. In the illustration under point 6, this would be "WS_" - If you do not know the customer number, enter the following in the search mask Surnames of the customer.

- If you were unable to find the customer in this way, another possibility is that you have entered one or more spaces before the customer's name. Try searching for the name with leading spaces: " Surname"
- You may have mixed up the customer's first name and surname in the input mask. To be on the safe side, search for the First names of the customer.
- If you cannot find the customer in this way, another option is to search for customers who were created shortly before or shortly after this customer. For example, if you know the day on which you created the customer, you could search for other customers who had an appointment on that day. As an example, we have the customer "First name Last name", we can search for lost:
Surname: Timelier
First nameCustomer
Customer numberWS_12
search.
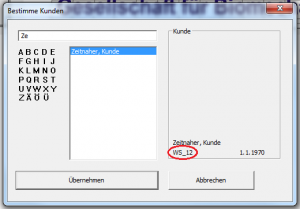 The customer was created after our lost customer. This means that his customer number is larger. By searching for a customer number that is similar, we can try to find the customer again. For example, you can now search for "WS_11", "WS_13", etc.
In our example, we find the lost customer via the customer number "WS_11".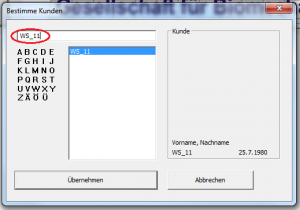
Error description
When trying to open a customer, the message appears that the customer is blocked. The customer cannot be opened
Causes of errors
The GP Manager only allows one instance of a customer to be edited at a time. If a customer is edited on several workstations at the same time, changes to the customer may be overwritten later.
It may happen that the customer is not released again due to a crash during processing.
Troubleshooting
If you are sure that you are the only one making changes to the customer, you can unblock the customer.
Attention:
If the customer is processed on two computers, this can lead to data loss for this customer. Make sure that the customer is not opened twice.
GP Manager V7
- Start the GP Manager
- Select "GP Admin„
- Select "Unblock customer„
- In the dialogue you can see the workstations and the customers who are currently processing them.
- Select the workstation that is currently processing your customer.
- Click on "Unlock„
GP Manager V6.5
- Start the GP Manager
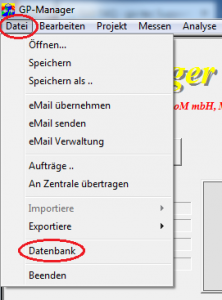
- Select File -> Database
- In the lower area, you can select the work centres that currently have customers open.
- Select the workstations.
- Then click on "Remove lock !!!!„
Error description
Logos other than the GeBioM logo should appear in the GP Manager. The GeBioM logos appear in the project overview, which is displayed directly after starting the GP Manager. And on the printouts, which can also be edited using the GP print page editor. If you do not want to change the print templates because you like the output of your printer, you can replace the logos directly.
Troubleshooting version 6
There are GeBioM mbH logos in several places in the GP Manager. If you want to replace these with your own logos, you can find and exchange logos as follows.
Firstly, you need to find the folder in which the GP Manager saves the logos.
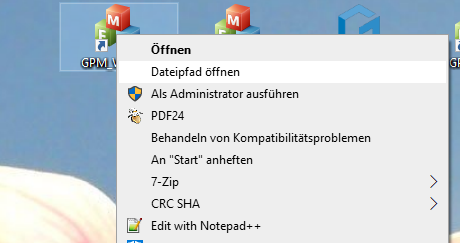
- How to find your GP Manager installation
- The folder contains the subfolder GpSystem\BMP. This folder contains the corresponding logos as BMP files
- Starter.bmp - Is displayed while the GP Manager is being started
- GEBIOM11.bmp - Displayed in the project view.
- GEBIOM12.bmp - Used for print templates.
You can replace the corresponding logos with your own bitmaps.
Attention:
You must use bitmap files. It is not possible to use JPG or PNG files. If your logos have a different file type, open them in an image editing programme and save them as a bitmap.
The file extension is hidden in the standard Windows settings. You can recognise this by the fact that the GpSystem\BMP folder the files as Starter, GEBIOM11 and GEBIOM12 (without .bmp) are displayed. If you then add the file extension, the file in Windows is called Starter.bmp.bmp and is no longer found by the GP Manager.
Instead of the image, you will only see a red cross on a white background for incorrect files.
Troubleshooting version 7
To change the logo in the printout, please open the GP print page editor module. You will then find all possible GP Manager print pages under Templates. The default is GP_Print_Standard. If this page is selected, you can change the stored image by double-clicking on the current logo.
Error description
- After updating Windows 10 to 1803, the connection to the SQL server fails.
- The LaserScan 3D f fails to connect during the scan
Cause of error
The GP Manager is started from a network share. For example, from a network drive or a server. The server itself only supports the Samba protocol in version 1.X.
Microsoft has categorised older versions of the Samba protocol as insecure. In order to avoid security risks, it appears that programmes started from a network drive with older versions are not given access to the network.
Troubleshooting
First, you should run a PowerShell with administrator rights. To do this, open the Start menu and enter "PowerShell". You can then right-click on the PowerShell and select the "Run as administrator" option.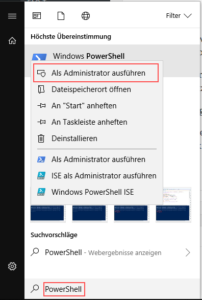
You can then execute the "Get-SmbConnection" command in PowerShell. This gives you the Samba version (dialect) of all connected network drives. If the GP Manager share has a version of 1.X, the error occurs.
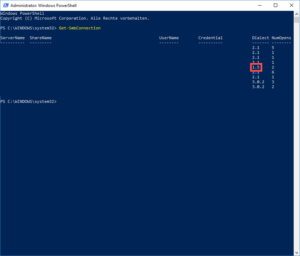
To rectify the error, proceed as follows:
- Update your server so that it supports a more recent version of the Samba protocol or :
- Copy the GP Manager from the server to the local computer (the computer with Windows 10 (1803)).
The setting for the preview images can be found here:
GPM_V7\GPSystem\SKIN\GPManager\SKIN_LISTEN\LISTEN_Start_page_Measurements
Skin.ini
[Item]
F_width_per cent = 20
The smaller this value is selected, the smaller the preview images are displayed. The smaller they are displayed, the more will fit in the window provided.
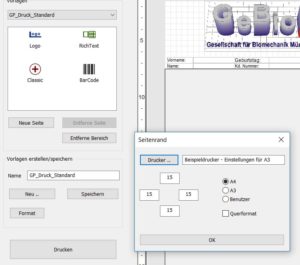
In the print page editor, you have the option of specifying a fixed printer for any print page. To do this, the page must be selected and then the printer must be specified using the Format button.
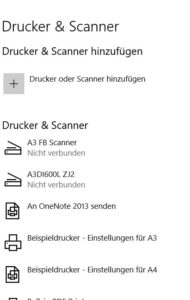
Example: A printer can be created several times with different settings via Windows and then permanently stored in the corresponding print file.
Error description
The GP Manager cannot be started, or it starts with an error and can only be closed afterwards. One of the errors listed below occurs.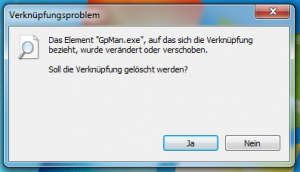
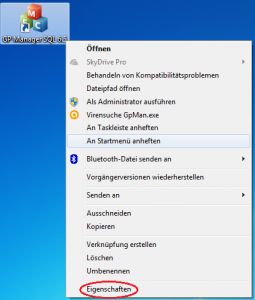
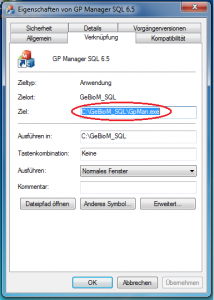
Shortcut problem - The "GpMan.exe" element to which the shortcut refers has been changed or moved. Should the shortcut be deleted?
The hard drive is full. In this case, the GP Manager will not start. There is no error message. The first logo for starting the GP Manager is still displayed. After that, it is no longer displayed.
If the error is one of those described above, see: "This is a linking problem„
Link problem - The drive or network connection to which the "GP Manager SQL 6.5.lnk" link refers is not available. Ensure that the data carrier is inserted correctly or the network resource is available and repeat the process.
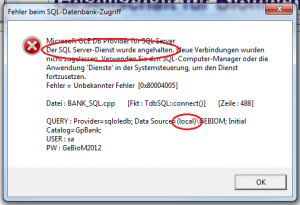
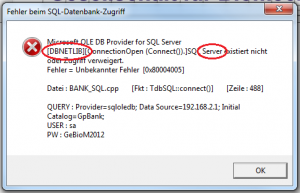
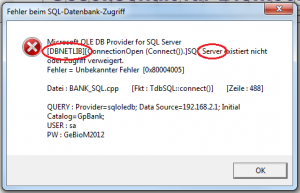
SQL database access error
Microsoft OLE DB Provider for SQL Server
The SQL Server service has been stopped. New connections have not been authorised. Use the SQL Computer Manager or the 'Services' application in the Control Panel to resume the service.
Error = Unknown Error [0x80004005]
Connect to database
[DBNETLIB][ConnectionOpen(Connect()).]SQL Server does not exist or access denied.
Well then, goodbye
If the error is one of the two SQL errors see: "This is an SQL problem„
Causes of errors
As there are several ways in which the GP Manager can be installed, there are several causes of errors.
The causes of errors can be divided into two areas. The GpMan.exe must first be executed so that the GP Manager can be started. There is usually a shortcut to this file on the desktop; if the GpMan.exe is not found, the error message "Shortcut problem" is displayed at the top.
The second area that leads to errors is the connection to the SQL database. The data that the GP Manager saves is stored in an SQL database. If there are problems with the SQL database, the error message at the top of the window reads "SQL database access error".
Both linking problems and SQL errors can be further subdivided into problems with the computer on which the GP Manager is installed and errors that have to do with the network.
Troubleshooting
First try whether a Restarting the computer If this does not solve your problem, continue with the solutions described below.
If the error message above states Link problem, follow the points under "This is a linking problem", in case there is an error with SQL database access, follow the instructions "This is an SQL problem„.
The hard drive is full
If the GP Manager crashes without an error message, check whether your hard drives still have space available.
Error description
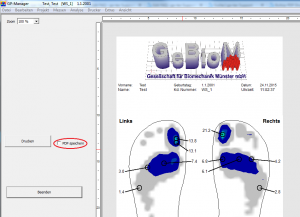
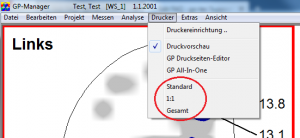
The error looks like this: you have to click on "Printer", select a print view ("Standard", "1:1" etc.) and tick "Save PDF", but the print dialogue of a PDF printer is not displayed.
Causes of errors
No PDF printer is installed or the installed PDF printer is not entered in the configuration files.
Troubleshooting
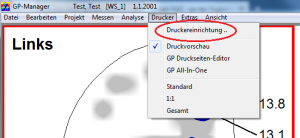
You can export any measurement as a PDF by printing the file as a PDF. If a PDF printer is installed, you can export a PDF by first explicitly selecting the PDF printer via "Printer" -> "Printer setup ..." button. Remember to then reset the printer to your usual printer in the same way. This also works if the PDF printer is not entered in the configuration files.
If you "Save PDF" more frequently, please contact GeBioM Support and tell them to add your PDF printer to the configuration file.
If you do not know how to print a measurement, follow the instructions "Save measurement as PDF".
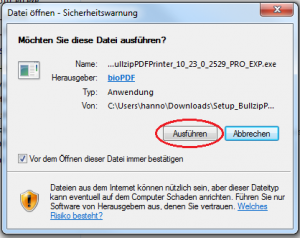
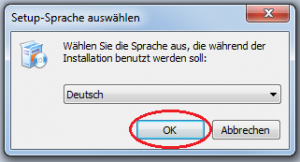
If a PDF printer has not yet been installed, go to "Install Bullzip PDF printer" describes how to install a free PDF printer.
Error description
If you start GP Manager V7 and select a customer, the programme is closed after clicking on the back arrow.
Causes of errors
The error only affects the GP Manager from version 7, older versions are not affected by this problem.
There is an incompatibility between GP Manager V7 and the "AMD Gaming Evolved" programme from Raptr.
The programme is supplied together with AMD Radeon graphics cards and is installed when the graphics card driver is updated.
Troubleshooting
The "AMD Gaming Evolved" programme must not run in the background while working with the GP Manager. Exit the programme if it is running.
- Prevent the programme from starting automatically. Open the programme and select the small tool key in the top right-hand corner of the window.
- Click on "Settings„
- Deactivate the option "Start Raptr automatically„
Error description
After starting the GP Manager, a series of similar error messages of the form "Cannot load XY.dll" appear
Depending on the installation of the GP Manager, various DLL files are listed, for example:
- GP_DV_Fussdruck.dll
- GP_CAD.dll
- GP_Questions.dll
Causes of errors
A DirectX version is required to start the GP Manager. If DirectX is not installed, the GP Manager lacks information on how it should display individual modules.
Troubleshooting
Install DirectX, the installation file is supplied with the GP Manager and can be found in the GpTools folder.
- Open the folder in which the GP Manager is installed (To find the GP Manager folder).
- Open the GpTools Folder
- Go to the Directx Folder
- If the computer has an Internet connection, start dxwebsetup.exe
- If the computer has no Internet, you can run directx_Jun2010-redist.exe
If the error persists, please contact GeBioM Support.
