8.3 Bed levelling adjustments
The Bed adjustment menu gives the possibility to fine tune the bed levelling of the printer in order to achieve better adhesion (sticking) of the extruded material to the printing surface.
OBS: Before starting this procedure, make sure that the print head temperature is below 80 oC and the nozzle is clean (see Section 14)
| 1 |
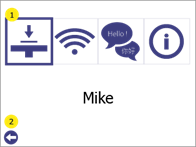
Enter the Settings menu by pressing the settings button (1).
|
|
2 |
Enter in the Bed levelling menu (1)
Press Back (2) to go back to main menu. |
|
3 |
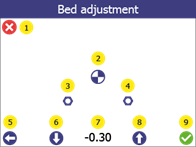
Enter in Bed adjustment menu (1).
WARNING! When you press on (1), the printer will start moving. Make sure that there is no objects or body parts inside the printing chamber. Press Back (2) to go back to Settings menu. |
|
4 |
1. Press on the “Reference point” button (2). The offset value (7) for Mike should be between –0.4 and – 1.2. If the measured value is outside this range, please contact Customer Support before proceeding.
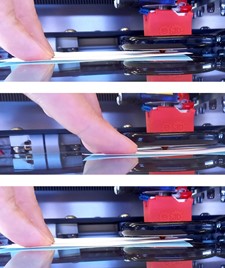
(Note: (3) & (4) are levelling points, used during Service procedure ) 2. Take a piece of paper (for regular printer, from notebook, etc) and try to fit between the print head and the printing surface without using force. 3. If paper cannot fit in (distance is too short), press the Down arrow (6) to move the bed down until the paper can fit in. 4. With the paper between the head and the printing surface, do the fine tuning. Move the paper slightly back and forth while bringing the bed up one step at a time using the Up arrow (8) (each step is 0.05mm).
5. Press Down arrow (6) once. 6. Confirm the adjustment by clicking OK (9). Click Home (1) or Back (5) to cancel everything (no changes will be saved)
After this operation, perform a test print (see section 8.2) to confirm that the levelling was successful.
|


