| Power requirements | 230V AC 50 Hz (1.5A);
120V AC 60 Hz (3A) |
| Power consumption | Normal operations: < 100W
Idle: < 50W Stand by: < 40W |
| Operating room temperature | 5–35oC (40-95o F) |
| Print head temperature | Operating: 240-260o C (464-500o F);
Maximum: 285o C (545o F) |
| Filament chamber temperature | Operating: 35-45o C (95-113o F)
Maximum: 80o C (176o F) |
| Printer working area size
(Biggest printable object) |
W / D / H
40.5 / 14.5 / 15 cm (15.9 / 5.7 / 5.9 inch) |
| Printer size
(Cables and filament chamber installed) |
W / D / H
67 / 54 / 75 cm (26.4 / 21.5 / 29.5 inch) |
| Printer weight | 32 kg (70 lbs) |
Below you will find all error messages for which you can take action yourself. For all other error messages, please contact our support (cubix@gebiom.com).
| Error | Cause | Solution | |
| ERROR 211: USB removed | USB flash drive was disconnected during the operation. | Make sure the USB drive does not get unplugged during printing.
In case the error appears, but the USB drive is still inserted into the printer 1. Inspect your USB drive. 2. Try using a different USB drive. |
|
| ERROR 212: File not found | The printer tries to resume a paused print but the file cannot be found on the USB flash drive | Restart the print | |
| ERROR 213: USB Power Fault | The connected USB stick draws too much current and was disconnected to prevent damaging the printer electronics | Remove the USB drive , click OK and try with another one. | |
| ERROR 410: Setup file not found | During set-up, the printer can’t find the file at the root of the USB key or can’t open/read it | 1. Make sure that the file wifi_config.cir is located on the root folder of the USB drive.
2. Make sure that the file wifi_config.cir is not read protected. |
|
| ERROR 411: Wifi connection impossible | Connection timeout (likely because the router does not respond to the printer) | 1. Retry to establish the connection
2. Make sure the WiFi router is properly functioning 3. Make sure the firewall does not block the IP of the printer |
|
| ERROR 412: Wifi connection impossible | The password specified is incorrect | Make sure there is wifi_config.cir on the USB drive with the correct password for the chosen network. | |
| ERROR 413: Wifi connection impossible | The printer can’t find the network | 1. Make sure there is wifi_config.cir on the USB drive with the correct network name.
2. Make sure the WiFi router is properly functioning 3. Make sure the firewall does not block the IP of the printer |
|
| ERROR 417: Wifi connection lost | Wifi connection lost (due to timeout) | 1. Restart the wifi transfer
2. Inspect the proper functionality of the WiFi router. 3. Try moving the printer closer to the router |
|
| ERROR 520: Newer slicer required | The version of the slicer that generated the file is old and not supported by current Firmware | Make sure to use the latest available version of the slicing engine. | |
| Other errors | Error that requires service has been detected | Try restarting the printer.
If the problem persists, contact cubix support and let them know the error code |
- The filament ran out before the print could finish. Check if the filament needs to be changed.
- Printer firmware error. Check the printer screen for error messages. If the error message is not self-explanatory, contact customer service.
- Something was inside the workspace during print, blocking the printer. Check the workspace for foreign objects.
- The print head silicone sleeve fell off blocking the printer. Check that the red silicone sleeve is correctly attached to the print head. Verify that the silicone sleeve has no cracks in the silicon.
- The power to the printer cut during print. Check that the printer is ON.
- Print bed is too close to the print head on the first layer. Calibrate the height by following the bed levelling procedure (see chapter 8).
- Printer has run out of filament.
- Filament is tangled inside the filament chamber. Inspect the filament in the filament chamber.
- The filament is stuck inside the print head. Using the filament procedure, unmount the filament, cut a piece off it and re-insert it.
- The printer is clogged, and the print head needs cleaning. Perform a cleaning procedure.
- The printed part is rough on the surface with small bubbles. This may happen if the filament is moist because the filament chamber is OFF, or it has been stored in a non-controlled environment.
- Check if the filament chamber is disconnected.
- Change the filament with one that has been stored in controlled environment.
- Leave the moist filament in the (powered) filament chamber without printing for a day to dry out.
- The print surface is not clean. Wipe the printing surface with isopropyl alcohol (see chapter 14).
- The printer height is wrong. Calibrate the height by following the bed levelling procedure (see chapter 8).
Each problem is presented with possible causes and their solution. Go through the list in the order presented. If a problem cannot be solved, contact cubix support (cubix@gebiom.com).
Cleaning the print head is a vital procedure, that contributes to the quality of the printed objects by reducing the risk of clogging and maintaining consistent extrusion of filament.
- We recommend cleaning the exterior tip of the printhead (the nozzle) on a daily basis, by using the cleaning tool included in the accessory box.
Let the print head to cool down first. Scrape off the nozzle until the tip is free from residue filament. It is IMPORTANT not to hit the inductive sensor behind (blue dot) while cleaning the nozzle.
- We recommend cleaning the interior of the nozzle twice a week or every time a new filament spool is loaded. Use only approved cleaning filament and the below “cold pull” method.
- Remove the loaded filament from the nozzle (using filament change procedure)
- Insert the cleaning filament into the nozzle.
- Extrude 3-4 cm. of filament. In some cases, the clogged material will come out.
- Set the temperature to decrease from default 265 °C to 125 °C
- Extrude cleaning filament while temperature is falling.
- At around 200 °C extrusion stops, as filament cannot melt anymore.
- When temperature gets to 130-125 °C pull the cleaning filament straight up from the hot end, until it is released from the nozzle. OBS: Pull the gear/lever back to relieve the pressure on the filament, while doing this step.
- This hard pull will remove impurities and material from the nozzle.
- Look through the nozzle hole, you should be able to see all the way through.
If not, repeat steps 2 to 9 until the cleaning filament can be removed free of impurities and you can see through the nozzle hole.
Every print will leave some oil residue from the printed material that over time will cause printed objects to stick less to the surface. It is recommended to thoroughly wipe clean the printing surface with isopropyl alcohol to remove any leftover oil residue (see chapter 10).
To ensure the printer keeps printing as expected, regular cleaning is advised. Both the print bed and the printhead requires cleaning.
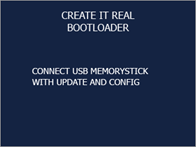
For updating firmware, a USB key is necessary. Transfer the update files that are provided by GeBioM mbH to the root folder of a USB key, unplug the USB key, and then follow the steps below:
| 1 |
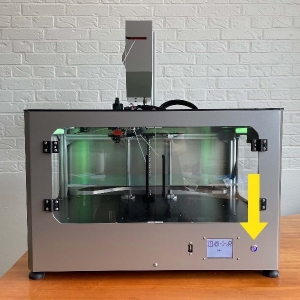
Power up the printer.
|
|
2 |
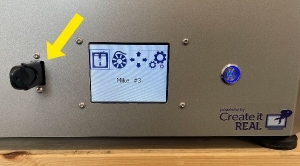
Plug the USB into the printer. |
|
3 |
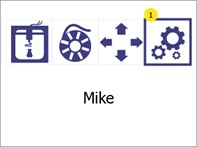
Open the Settings menu (1). |
|
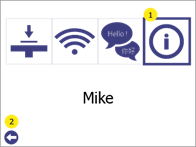
4 |
Go to the info menu (1).
Press Back (2) to go back to main menu.
|
|
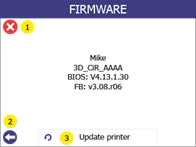
5 |
Select Update printer (3).
Press Back (2) or Cancel (1) to go back to main menu |
|
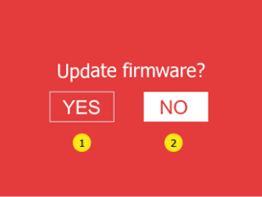
6 |
Click on “Yes” (1) twice to confirm.
Press “No” (2) to go back to main menu.
|
|
7 |
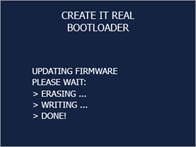
Wait for the update to be installed.
|
|
8 |
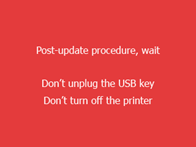
Let the printer start without removing the USB from the printer.
|
|
9 |
Wait until green screen with confirmation for the successful update or an ok button appears. |
